Add a drop shadow
Before proceeding with this topic you need know how to work with selections.
The "Drop Shadow" effect permits adding a shadow behind an icon to produce a 3D effect. Adding this shadow is important to make Windows compliant icons.
![]() This feature works only with RGB/Alpha Channel image formats.
This feature works only with RGB/Alpha Channel image formats.
Apply the drop shadow effect
1. Select a region with the selection tool or use a floating selection. If no selection is active, the adjustments will apply to the whole image.
2. Choose Draw/Adjustments-Effects/Drop Shadow or press "D". A dialog box opens. To get a better idea of the adjustments you're doing, we recommend you to activate the Preview option. It permits you to see the changes in background (editor and preview windows).
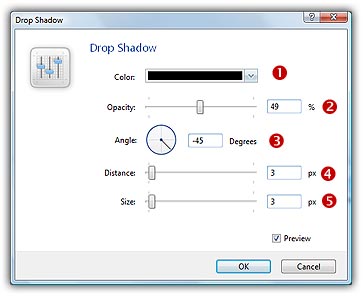
3. In Colors (![]() ), select the desired color for the shadow. Click on the down arrow to choose in a list of predefined colors or click the color rectangle to specify the color using a dialog box.
), select the desired color for the shadow. Click on the down arrow to choose in a list of predefined colors or click the color rectangle to specify the color using a dialog box.
4. In Opacity (![]() ), specify the opacity percent for the shadow.
), specify the opacity percent for the shadow.
5. In Angle (![]() ), the angle of projection for the shadow. You can specify the angle using the text box or by clicking with the mouse directly in the circle.
), the angle of projection for the shadow. You can specify the angle using the text box or by clicking with the mouse directly in the circle.
6. In Distance (![]() ), specify the distance in pixel between the image object and the shadow.
), specify the distance in pixel between the image object and the shadow.
7. In Size (![]() ), specify the size of the shadow's gaussian blur.
), specify the size of the shadow's gaussian blur.
8. When done, click OK. The drop shadow is applied immediately.