How do the Photoshop® Templates work?
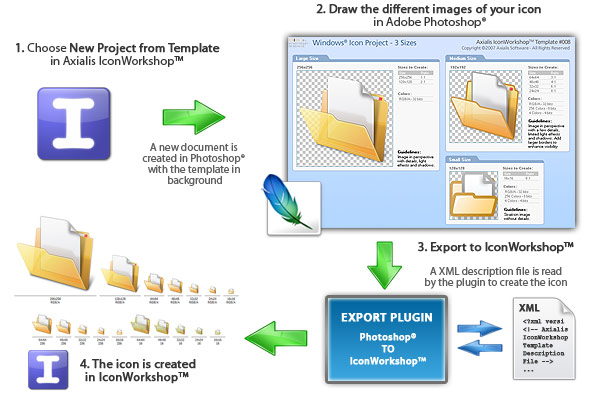
Templates permit you to use the powerful tools of Adobe Photoshop® to draw your icon in different formats, then transfer the work to IconWorkshop. Axialis IconWorkshop™ creates the icon automatically in one step.
A template is a ready-to-use image which contains enpty/transparent square areas where you can draw your icons in different formats. This image is designed to be placed in background of your drawing project. You make your artwork in layers that you add on top of this backround template. You can add as many layers as you want and you can save your project as individual files for future use or modifications. Once your work is done, just export it into IconWorkshop™, the image will be temporary flatten and the icon created.
In order to transfer the images from Photoshop® to Iconworkshop™, you need to install the Axialis transfer plug-in. This is a small software component which permits you to export the images directly in memory without saving them to a file. Learn more about the Photoshop® plug-in...
How do the Photoshop® templates work?
Select "new icon project from template" in IconWorkshop™. Choose one template (10 templates are provided, see below). Adobe Photoshop® is launched and a new image document is created with the template image in background. Draw your images, creating layers as necessary. You can save the work as a PSD file for later use. Choose "Export to IconWorkshop™". The Axialis plugin is launched, a XML description file is read (you can create your own) and the icon is created in IconWorkshop™. Just retouch it if you want and save it.
How many templates are included in IconWorkshop?
10 templates are included in IconWorkshop. Each template is composed of 2 files: a PNG file with transparency which is the image file on which you'll draw the different sizes of your icon; a XML file describing the template (this is a text file with the same filename, extension XML). You can create your own new templates. Files are located in [Application Data]/Axialis/IconWorkshop/Templates. The 10 templates are:
|
1. Windows Icon - All Formats 2. Windows Vista Icon (256x256,...) 3. Windows XP Icon (48x48,...) 4. Macintosh OSX Icon (128x128,...) 5. Macintosh OSX Tiger Icon (256x256,...) |
6. Macintosh OSX Leopard Icon (512x512,...) 7. Windows Project (2 Sizes) 8. Windows Project (3 Sizes) 9. Macintosh Project (2 Sizes) 10. Macintosh Project (3 Sizes) |
What is the difference between "Simple Icon" and "Icon Project" templates ?
The Simple Icon Templates (numbers 1 to 6) have been designed to permit you to draw all the formats of the icon, including RGB/A, 256 and 16 colors. If a format is left blank, it will not be added to the icon. We recommend you to follow this tutorial: Use a Simple Icon Template
The Icon Project Templates (numbers 7 to 10) permit you to create 2 or 3 versions of your icon (based on the template you choose). Then, during the export, the formats are created according to the XML descrition file. Usually, image formats in project templates are created using the following guidelines:
• 512x512, 256x256, 128x128 to 72x72 : Image in perspective with details, light effects and shadows.
• 64x64 to 24x24 : Image in perspective with a few details, limited light effects and shadows. A border is added to enhance visibility.
• 16x16: Flat image without details and large borders.
Install the Photoshop-to-IconWorkshop™ transfer plug-in
Before using the as detailed in next topic, you need to install it on your computer. The plug-in can be easily installed from within Axialis IconWorkshopä in one fast and simple operation.
1. Before installing the plug-in you need to close the Photoshop® application (if it is opened in background). Choose File/Install Photoshop® Plug-in...
2. The dialog
box Install the Photoshop to IconWorkshop Transfer Plug-in opens
(see below). In the Location edit
zone (![]() ), specify the Photoshop plug-in folder. If you don't
know the exact folder path, click the browse button (
), specify the Photoshop plug-in folder. If you don't
know the exact folder path, click the browse button (![]() )
to choose the folder in a list.
)
to choose the folder in a list.
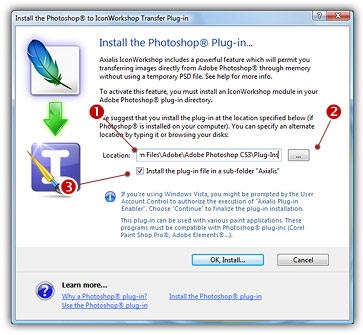
3. If you want
to create a subfolder "Axialis"
to install the plug-in module (recommended to organize your folder properly),
activate the option "Install in
a subfolder Axialis" (![]() ). Note that creating
a subfolder may fail with some compatible applications.
). Note that creating
a subfolder may fail with some compatible applications.
4. Click OK. When done, a message informs you that the plug-in has been installed.
5. Now you can start your Photoshop® application. The plug-in is visible in File/Export/Export to IconWorkshop menu. Read this for more info on how to use the plug-in filter.