Lesson 6 - Creating a new icon from an existing image
In this lesson, we'll create a new icon from an existing image. We'll create a Windows® and a Macintosh® icon.
Opening an image file in Axialis IconWorkshop™
1. First, we're going to load a file which is located in the Librarian. You must be sure the librarian is visible. If the librarian window is not visible (![]() ), check the Librarian button in the main toolbar (
), check the Librarian button in the main toolbar (![]() ) or press ESC.
) or press ESC.
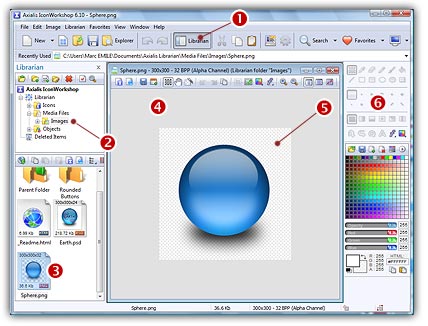
2. Select the "Media Files/Images" folder (![]() ). In the thumbnail preview list (below), you see a file named "Sphere.png" (
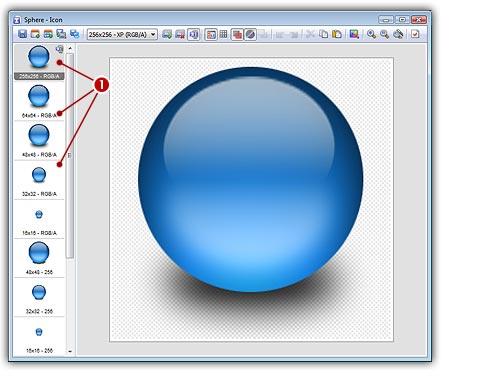
). In the thumbnail preview list (below), you see a file named "Sphere.png" (![]() ). Select it and press Enter or just double-click on it. The file opens in a document window (
). Select it and press Enter or just double-click on it. The file opens in a document window (![]() ).
).
The image "Sphere.png" is a Transparent PNG file. It means that it includes transparent areas in the image. This is where you see the "chessboard" texture (![]() ).
).
Note that the drawing tools are grayed (![]() ) because Axialis IconWorkshop™ does not currently support edition/drawing of images. Drawing is supported in icons only.
) because Axialis IconWorkshop™ does not currently support edition/drawing of images. Drawing is supported in icons only.
![]() It is highly recommended to create icons from transparent images. Axialis IconWorkshop™ will convert images to 32 BPP with transparency when possible. The following image formats can include transparency: Photoshop PSD, PNG, RGB, GIF, JPEG 2000 and WMF.
It is highly recommended to create icons from transparent images. Axialis IconWorkshop™ will convert images to 32 BPP with transparency when possible. The following image formats can include transparency: Photoshop PSD, PNG, RGB, GIF, JPEG 2000 and WMF.
Creating a Windows® icon from this image
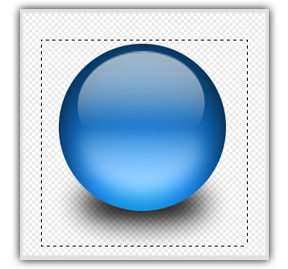
3. Before proceeding, we recommend you to select the portion of image you whish to use to create your icon. If you leave too many transparent area around your image (this is the case in this image), the visible part of your icon will be too small.
4. Select the portion of image: Use the selection tool (upper-left button of the tool palette) and select a 256x256 portion of the image (do not cut the shadow below the sphere). This will produce the best results when creating the 256x256 formats of the icon. To track the size of the selection on-the-fly, see the selection indicator in the status bar (lower-right corner of the main window: ![]() ). When done, an animated dashed rectangle has been created. See the result below:
). When done, an animated dashed rectangle has been created. See the result below:
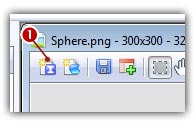
5. When the selection is done, choose Image/Create Windows® Icon from Selection or press "I". You can also click the following command button in the local toolbar (![]() ):
):
6. A large dialog box New Windows® Icon From Image opens (see below). In the Icon Project Name zone (![]() ), enter the icon project name: "MySphereIcon". Do not specify any extension.
), enter the icon project name: "MySphereIcon". Do not specify any extension.
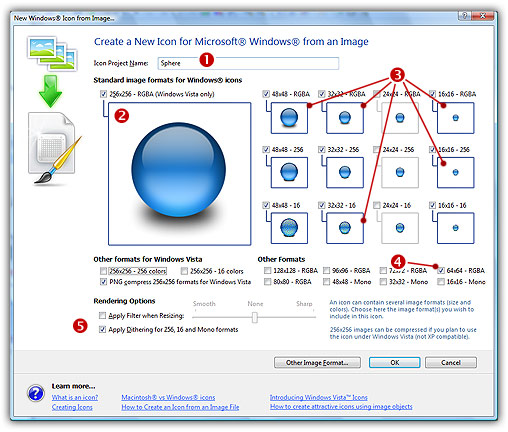
7. In the Standard Image Formats for Windows group, select the image formats to add in the icon (![]()
![]()
![]() ). Just click on the image preview to select. We recommend you to add the following formats in a Windows® icon:
). Just click on the image preview to select. We recommend you to add the following formats in a Windows® icon:
![]() 256x256 - RGB/A
256x256 - RGB/A
![]() 64x64 - RGB/A
64x64 - RGB/A
![]() 48x48 - RGB/A
48x48 - RGB/A
![]() 32x32 - RGB/A
32x32 - RGB/A
![]() 16x16 - RGB/A
16x16 - RGB/A
![]() 48x48 - 256 colors
48x48 - 256 colors
![]() 32x32 - 256 colors
32x32 - 256 colors
![]() 16x16 - 256 colors
16x16 - 256 colors
![]() 32x32 - 16 colors
32x32 - 16 colors
![]() 16x16 - 16 colors
16x16 - 16 colors
You can also apply or not the dithering option to the 256/16 color images as well as add a filter effect to smooth/sharpen the resulting images in RGB/A mode (try ![]() and see the results in the preview images).
and see the results in the preview images).
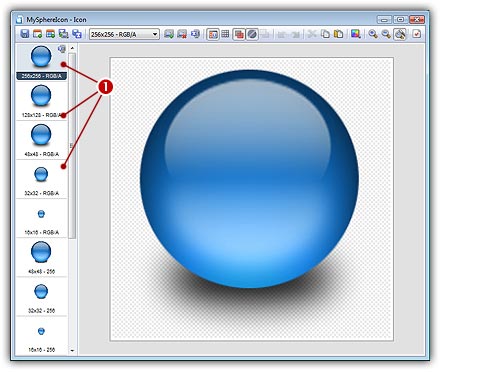
8. When done, click OK. The icon is automatically created with the various image formats you've chosen. You can click on the various image formats you've created (![]() ) to see the results in the editor window.
) to see the results in the editor window.
9. In the preview window you see the icon displayed at scale 1:1 (or 1:2 for the 256x256 format) on a gray background. It is recommended that you switch to 256x256 preview mode if you want to work with 256x256 Windows Vista™ icons. To switch to this mode, right-click in the preview window, a menu opens. Choose "256x256 Display". The preview window now operates in floating mode. Use the same method to return to the previous state: choose "128x128 Display", remove the "Floating Window" option and use the mouse to dock the window.
10. As it could be useful to see how the icon is displayed on several type of background lightness, an easy way to change the preview background has been implemented. Just click with the left button of your mouse in the preview window and the background lightness will change (cycle from white to black).
![]() By changing the background lightness of the preview window (left-click in it), you can appreciate how Axialis IconWorkshop™ has resized the image and created perfect borders around the sphere object.
By changing the background lightness of the preview window (left-click in it), you can appreciate how Axialis IconWorkshop™ has resized the image and created perfect borders around the sphere object.
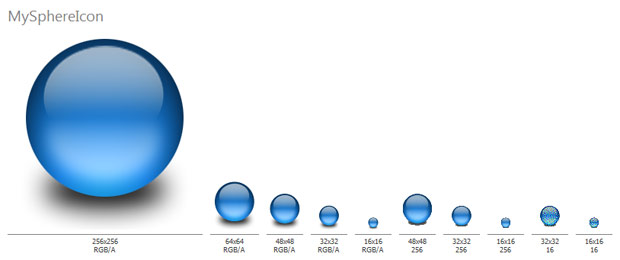
11. Why don't take a look at all the formats you've created and admire your work? This is possible to display all the format on the same document by using the "Snapshop" feature. Choose "Edit/Create Snapshot". A dialog box opens, several options are available. Select White Background and 16/2 colors (if necessary). Click OK. The following image document is created (see below). You can print it or save it for reference.
12. Don't forget that the icon is created in memory but not saved. Please save it in the librarian (in the "Icons" folder) as specified in Lesson 5 (name it "MySphereIcon"). It is saved in ICO format.
Creating a Macintosh® icon
Close the Windows® icon document you've just created, return to the "sphere.png" document and redo steps 3 & 4 of the previous topic.
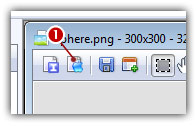
5. When the selection is done, choose Image/Create Macintosh® Icon from Selection or press "M". You can also click the following command button in the local toolbar (![]() ):
):
6. A large dialog box New Icon From Image opens (see below). In the Icon Project Name zone, enter the icon project name: "MySphereIcon". Do not specify any extension.
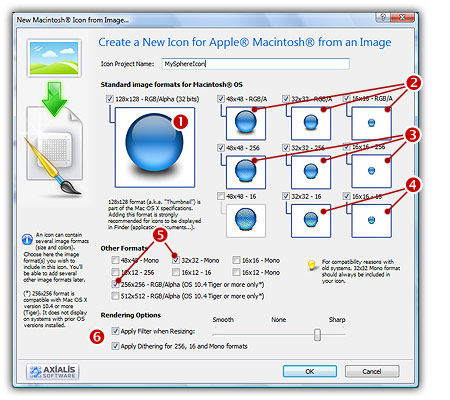
7. In the Image Formats group, select the image formats to add in the icon (![]()
![]()
![]()
![]()
![]() ). Just click on the image preview to select. We recommend you to add the following formats in a Macintosh® icon:
). Just click on the image preview to select. We recommend you to add the following formats in a Macintosh® icon:
![]() 256x256 - RGB/A
256x256 - RGB/A
![]() 128x128 - RGB/A
128x128 - RGB/A
![]() 48x48 - RGB/A
48x48 - RGB/A
![]() 32x32 - RGB/A
32x32 - RGB/A
![]() 16x16 - RGB/A
16x16 - RGB/A
![]() 48x48 - 256 colors
48x48 - 256 colors
![]() 32x32 - 256 colors
32x32 - 256 colors
![]() 16x16 - 256 colors
16x16 - 256 colors
![]() 32x32 - 16 colors
32x32 - 16 colors
![]() 16x16 - 16 colors
16x16 - 16 colors
![]() 32x32 - Mono
32x32 - Mono
You can also apply or not the dithering option to the 256/16 color images as well as add a filter effect to smooth/sharpen the resulting images in RGB/A mode (try ![]() and see the results in the preview images).
and see the results in the preview images).
8. When done, click OK. The icon is automatically created with the various image formats you've chosen. You can click on the various image formats you've created (![]() ) to see the results in the editor window.
) to see the results in the editor window.
9. In the preview window (![]() ) you see the icon displayed at scale 1:1 on a gray background. Click with the left button of your mouse in this window to change the background lightness (cycle from white to black).
) you see the icon displayed at scale 1:1 on a gray background. Click with the left button of your mouse in this window to change the background lightness (cycle from white to black).
10. Save it in the librarian (in the "Icons" folder) as specified in Lesson 5 (name it "MySphereIcon" and choose the ICNS file format). To learn more about Macintosh® file formats, see Macintosh® vs Windows® icons.
A quick look at the icons stored in the Librarian
The two icons are now stored in the Librarian. The folder "Icons" should be selected and the 2 newly created icons displayed as shown below:
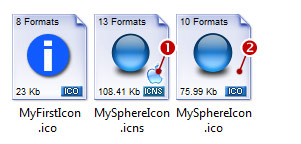
Note that Macintosh icons are displayed with a small overlay symbol which permits to easily distinguish their type (![]() ). The Windows® icons do not have any overlay symbol (
). The Windows® icons do not have any overlay symbol (![]() ).
).
![]()
![]() Lesson 7 - Composing an icon from several image objects
Lesson 7 - Composing an icon from several image objects