
Lesson 7 - Composing an icon from several image objects
In this lesson, we'll create a new icon from several images (we also call these images "Objects") by assembling them in order to create a composite icon. The most famous example of composite icon is the document folder icon:
Using the three objects above, we'll make this icon in minutes using exclusively features included in Axialis IconWorkshop™. The icon will include formats from 256x256 to 16x16 in RGB/A, 256 and 16 colors (based on the recommended formats specified in What is an icon topic).
This folder image has been created by Axialis Team. It's free of charge so you can use them in your own icons (see Sample Icons Terms Of Use).
Create the new icon
First, we're going to create the new icon. When creating a new icon, we choose the first image format to insert in it (usually the largest one). The largest one will be 256x256 RGB/A, so we'll start with this format.
1. Choose File/New/Windows Icon Project or press Ctrl+W.
2. A dialog box opens:

2. In the Project Name edit zone (![]() ), enter the icon project name: "Document Folder". Do not specify any extension.
), enter the icon project name: "Document Folder". Do not specify any extension.
3. In the Image Color Format group (![]() ), select: RGB/Alpha Channel (RGB/A - 32 bits).
), select: RGB/Alpha Channel (RGB/A - 32 bits).
4. In the Image Size group (![]() ), choose: 256x256 (Vista).
), choose: 256x256 (Vista).
5. Click OK, the dialog box closes. The new blank icon document is created, the 256x256 RGB/A image format is selected.
Adding the first object: The folder background
6. To add an object, you must be sure that the librarian is visible. If the librarian window is not visible (![]() ), check the Librarian button in the main toolbar (
), check the Librarian button in the main toolbar (![]() ) or press ESC.
) or press ESC.
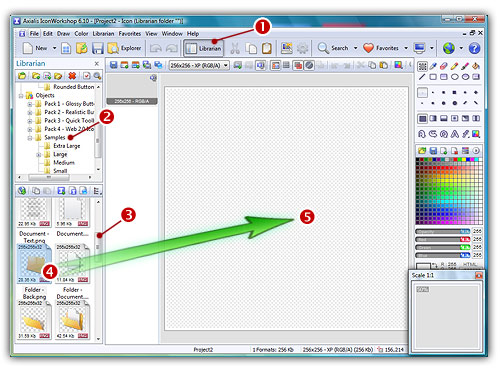
7. Select the folder "Objects/Samples/Large" in the Librarian tree (![]() ). The contents of the folder appears in the zone below. Using the slider (
). The contents of the folder appears in the zone below. Using the slider (![]() ) scroll the window contents until you see the file "Folder Back.png".
) scroll the window contents until you see the file "Folder Back.png".
8. Using drag & drop (![]() ) place the file "Folder -Back.png" in the editor window (
) place the file "Folder -Back.png" in the editor window (![]() ). The object is automatically added to the icon project as a floating selection (
). The object is automatically added to the icon project as a floating selection (![]() below):
below):

Note that this floating selection can be moved by using drag & drop from the inner zone (![]() ). It can also be resized using the handles placed around the selection (
). It can also be resized using the handles placed around the selection (![]() ). In this tutorial we won't modify this selection.
). In this tutorial we won't modify this selection.
Adding the second object: The document
9. We'll perform a similar operation to add the document object. In the same folder, select the object named "Folder -Document .png". Use mouse drag & drop from this object (![]() ) to the icon project window (
) to the icon project window (![]() ):
):
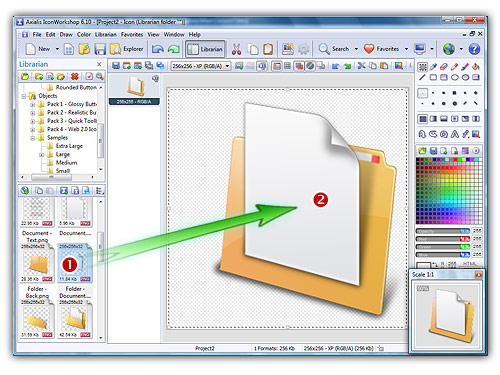
10. The document object is added onto the back pane of the folder already present. This is the way image objects work (click here to learn more). The transparency around the object is used to create a layer-type effect. You can add as many objects as you want on top of each other using this method. Once an object is added you can also resize / move it using the mouse or the arrow keys.
Adding the third object: The folder front
11. We'll perform a similar operation to add the document object. In the same librarian folder, select the object named "Folder - Front.png". Use mouse drag & drop from this object (![]() ) to the icon project window (
) to the icon project window (![]() ). The resulting icon looks like this:
). The resulting icon looks like this:
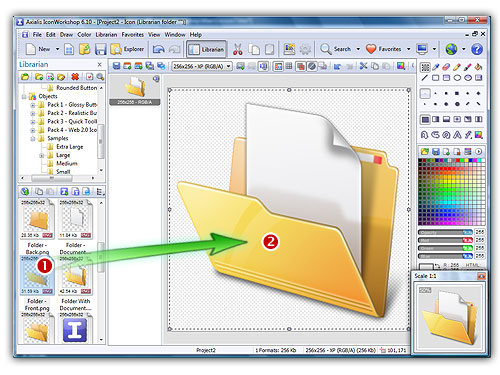
12. The front folder object is opaque (we don't the document object through it). In order to get better results, we're going to make it a little transparent. Select Draw/Adjustments Effects/Opacity or press the "O" key. A dialog box opens. Set the opacity to -20 using either the edit zone (![]() ) or the slider (
) or the slider (![]() ):
):
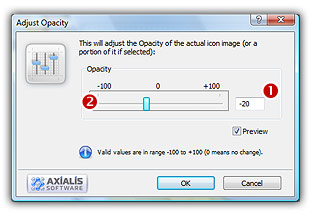
13. When done click OK. The transparency of the front object has been adjusted so that you can slightly see the document through the front panel.
Congratulations! The 256x256 image format is done. Now we're going to create the other formats of the icon from this one.
Creating all the image formats
As we've seen in lesson 4, an icon contains several formats. We'll add them using the fastest method: adding several formats in one operation.
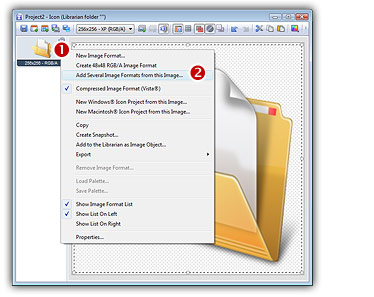
14. Right-click on the 256x256 RGB/A format in the list of available icon formats (![]() on the left of the editor window), a context menu opens, select Add Several Image Formats from This Image (see below
on the left of the editor window), a context menu opens, select Add Several Image Formats from This Image (see below ![]() ).
).
15. A new dialog box opens:
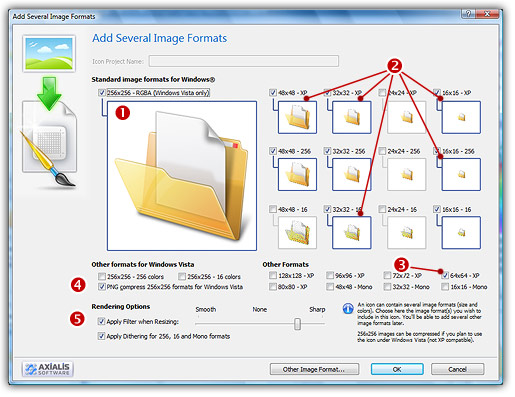
16. The format 256x256 RGB/A (![]() ) is already present in the icon, so selecting it is not necessary (if selected it will be ignored).
) is already present in the icon, so selecting it is not necessary (if selected it will be ignored).
17. Select the following formats to add (click directly on the preview image)
![]() 48x48, 32x32, 16x16 - RGB/A (
48x48, 32x32, 16x16 - RGB/A (![]() )
)
![]() 48x48, 32x32, 16x16 - 256 Colors (
48x48, 32x32, 16x16 - 256 Colors (![]() )
)
![]() 32x32, 16x16 - 16 Colors (
32x32, 16x16 - 16 Colors (![]() )
)
![]() 64x64 - RGB/A (
64x64 - RGB/A (![]() ) is recommended for Windows Vista™
) is recommended for Windows Vista™
18. If you plan to use your icon under Windows Vista™, we recommend you to compress the 256x256 formats. Check the option "PNG Compress 256x256 Formats for Windows Vista™ (![]() )
)
19. To get the best results possible, we recommend you to apply a sharp filter while creating the small images. Select the Apply Filter when Resizing option and adjust the slider as shown in the above image (![]() ).
).
20. When done click OK. The formats are automatically created:

You're done! Congratulations! Now save/add the icon in the librarian in the "Icons" folder (follow the same procedure as lesson 6). If you want to compare the icon you've done with ours, you can open this file: "Icons/Tutorials/Folder - Document.ico" (we also added 24x24 formats).
Going further...
When you make an icon by creating small sizes automatically, sometimes details are lost especially while converting the large 256x256 image into small sizes (32x32 to 16x16). You may need to retouch or simply redo these images. Check the icon we've done and saved as "Icons/Tutorials/Folder - Document 2.ico". It contains different versions for sizes 64x64 to 24x24 and 16x16. You can easily do this using the same method based on objects:
1. Browse the folder "Objects/Samples/Medium". You'll find medium-resolution objects you can use to create sizes 64x64 to 24x24.
2. Browse the folder "Objects/Samples/Small". You'll find small-resolution objects you can use to create sizes 16x16.
Exercises
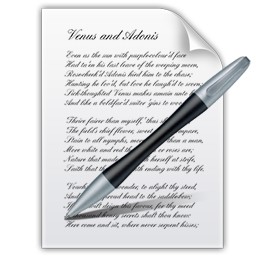
1. Using the following objects: "Objects\Samples\Large\Document.png", "Objects\Samples\Large\Document - Text.png", "Objects\Samples\Large\Pen.png", create this icon:
2. Using the following objects: "Objects\Samples\Large\Document.png", "Objects\Samples\Large\File Types\PSD.png", "Objects\Samples\Large\Document - Picture.png", create this icon:

3. Using the following objects: "Objects\Samples\Large\Screen.jp2", "Objects\Samples\Large\Overlays\Forbidden.jp2" (resize this object in the lower-right corner), create this icon:

![]()
![]() Lesson 8 - Using an an object pack to create an icon
Lesson 8 - Using an an object pack to create an icon