Modify/Extract icons in program files (EXE, DLL)
Axialis IconWorkshop™ permits to modify icons directly in program files like EXE, DLL, OCX... This feature is handy to customize existing applications. However some limitations apply to this feature:
You CAN:
Visualize, Modify, Export, Copy in Clipboard and Add to the Librarian any icon included in a program file.
Save your changes in the same file or export it to icon files or ICL
You CANNOT:
Add or delete icons
Add or delete image formats in icons
![]() We strongly recommend to make a copy of the original program file before modifying it using this feature.
We strongly recommend to make a copy of the original program file before modifying it using this feature.
Modifying an icon included in a program file
1. Choose File/Open and select a program file EXE, DLL, OCX... You can also open an File Browser window (Ctrl+Shift+O) and double click on a program file.
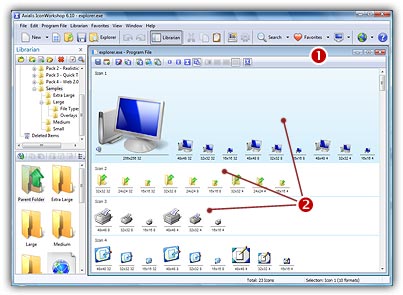
2.The program opens in a document window (![]() ) displaying all the icons it contains. If not already set, we recommend you to choose the display option "All Formats In Raw". In this mode, one icon is displayed on each row with all the formats it contains (
) displaying all the icons it contains. If not already set, we recommend you to choose the display option "All Formats In Raw". In this mode, one icon is displayed on each row with all the formats it contains (![]() ):
):
3. To modify an icon just double click on it or select it and press Enter.
4. The icon opens in an editor window. Just modify it as if it was a standard icon file (don't forget the above limitations though).
5. When done, update it by choosing File/Save or press Ctrl+S. Close the editor window.
6. The icon has been updated in the list (if you modified the displayed format).
7. Repeat steps 3 to 7 for other icons if necessary.
8. Update the program file by choosing File/Save.
Extracting icons from a program file
1. Choose File/Open and select a program file EXE, DLL, OCX... You can also open an File Browser window (Ctrl+Shift+O) and double click on a program file.
2. The program opens in a document window displaying all the icons it contains.
3. Select the icons you wish to extract.
4. Choose Icons/Export as Windows® icons (![]() : choose Icons/Export as Macintosh® icons)
: choose Icons/Export as Macintosh® icons)
5. Select the destination folder and click OK.
6. The icons are extracted as ICO (![]() : ICNS, RSC or BIN as chosen).
: ICNS, RSC or BIN as chosen).
Adding to the Librarian icons from a program file
1. Choose File/Open and select a program file EXE, DLL, OCX... You can also open an File Browser window (Ctrl+Shift+O) and double click on a program file.
2. The program opens in a document window displaying all the icons it contains.
3. Select the icons you wish to add to the librarian. Choose File/Add to the Librarian or press F3.
If the selected item in the librarian is a folder
4. A dialog box opens. Choose either to extract them as separate icons (ICO) or to create an icon library (ICL).
5. Click OK. The icons are extracted as requested.
If the selected item in the librarian is an icon library
4. The icons are immediately added to the selected library.