How to work with Adobe Illustrator
Adobe Illustrator is the industry standard in vector drawing. That's why we made an Illustrator plug-in that will permit you to transfer your vector artworks directly to Axialis Screensaver Producer without creating temporary image files. This great feature will permit you to work efficiently and create high quality screensavers.
To get more information on the Illustrator plug-in, see this topic.
Installing the Adobe Illustrator plug-in
1. Before installing the plug-in we recommend to close the Adobe Illustrator application (if it is opened in background). Choose File Menu/Install/Adobe Illustrator Plug-in...
2. The dialog box Install the Illustrator Transfer Plug-in opens (see below). In the Location edit zone (![]() ), specify the Photoshop plug-in folder. If you don't know the exact folder path, click the browse button (
), specify the Photoshop plug-in folder. If you don't know the exact folder path, click the browse button (![]() ) to choose the folder in a list.
) to choose the folder in a list.
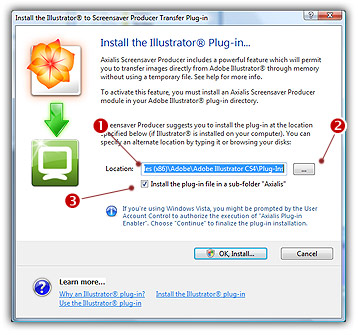
3. If you want to create a sub-folder "Axialis" to install the plug-in module (recommended to organize your folder properly), activate the option "Install in a sub-folder Axialis" (![]() ). Note that creating a sub-folder may fail with some compatible applications.
). Note that creating a sub-folder may fail with some compatible applications.
4. Click OK. When done, a message informs you that the plug-in has been installed.
5. Now you can start your Adobe Illustrator application. If your version of Illustrator is CS4 or more, the command is visible in menu Object/Filters/Axialis Software/Transfer to Axialis Screensaver Producer. If your version is prior to CS4, it is visible in menu Filter/Axialis/Transfer to Axialis Screensaver Producer. Read this for more info on how to use the plug-in filter.
Using the Adobe Illustrator plug-in
To use the Illustrator® to IconWorkshop™ plug-in, you must start the Illustrator® application first. The plug-in is accessible from within Illustrator® only. Before using the plug-in as detailed in next topic, you need to install it on your computer as described above.
1. First of all, launch Illustrator® and open or create a document. The Illustrator file used in this topic can be downloaded here: Axialis-Sphere.ai
2. In the document, select the objects you want to transfer to Screensaver Producer (![]() ). If you don't select objects, the whole document will be transferred. Transparent zones will be converted to raster using RGB with Alpha Channel (
). If you don't select objects, the whole document will be transferred. Transparent zones will be converted to raster using RGB with Alpha Channel (![]() ).
).

![]() You don't need to launch Screensaver Producer before using the plug-in. It will be automatically launched by the plug-in if necessary.
You don't need to launch Screensaver Producer before using the plug-in. It will be automatically launched by the plug-in if necessary.
3. If your version of Illustrator is CS4 or more, the command is visible in menu Object/Filters/Axialis Software/Transfer to Axialis Screensaver Producer. If your version is prior to CS4, it is visible in menu Filter/Axialis/Transfer to Axialis Screensaver Producer (![]() ).
).
4. A dialog box opens (see below). If you have selected some objects in the document, you can choose to export only these objects or the whole document (![]() ).
).

5. During the transfer, the vector objects will be rasterized (i.e. converted to bitmap images composed of pixels). To perform this, you need to specify the Resolution (![]() )of the image to produce in DPI (Dots Per Inch). Based on the size of your vector document and the value you specify here, the size of the final bitmap image will be automatically calculated. For example, if your vector object is 2x2 inches and if you specify 128 DPI, the final image will be 256x256.
)of the image to produce in DPI (Dots Per Inch). Based on the size of your vector document and the value you specify here, the size of the final bitmap image will be automatically calculated. For example, if your vector object is 2x2 inches and if you specify 128 DPI, the final image will be 256x256.
6. Specify a value for the Antialiasing (![]() ). This parameter permits to create a smoother image, especially on edges. The higher, the better, the longer to compute. Finally, specify a Padding value (
). This parameter permits to create a smoother image, especially on edges. The higher, the better, the longer to compute. Finally, specify a Padding value (![]() ) to create a transparent border around the image. This will avoid to have the objects placed directly on the border of the image. A small border permit to create nicer icons, especially when creating the small image sizes.
) to create a transparent border around the image. This will avoid to have the objects placed directly on the border of the image. A small border permit to create nicer icons, especially when creating the small image sizes.
7. When done, click OK. Axialis Screensaver Producer is automatically launched (or activated if running in background) and a dialog box opens (see below).
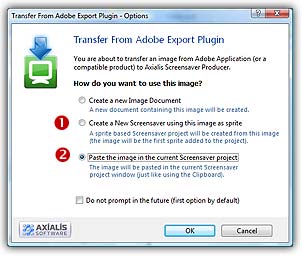
8. Choose Create a New Screensaver using this image as sprite option (![]() ) to create a new screensaver. By choosing this action, you'll add this image as the first sprite in the screensaver. If you want to add this image in an existing (and already opened) screensaver project, select Paste the image option (
) to create a new screensaver. By choosing this action, you'll add this image as the first sprite in the screensaver. If you want to add this image in an existing (and already opened) screensaver project, select Paste the image option (![]() ).
).
9. For example, choose Create a New Screensaver and click OK. A second dialog box opens. Specify the requested information (title, author...) and Click Next. A new screensaver is created with the image added as sprite:

10. The sprite is added in the center of the edit window (![]() ) and is also visible in the sprite list (
) and is also visible in the sprite list (![]() ). Now you can adjust the sprite properties: motion, size & position, collision, transparency... To learn more about sprite screensavers, we recommend you to follow this tutorial.
). Now you can adjust the sprite properties: motion, size & position, collision, transparency... To learn more about sprite screensavers, we recommend you to follow this tutorial.