Lesson 1.3 - Adding a static sprite
In this lesson, we'll add our first sprite in the project: a static sprite. It means that this sprite will not move on the screen. It is useful to add your company logo in a corner of the screen foe example. Also, we'll change its transparency value to create a watermark effect.
Adding the sprite
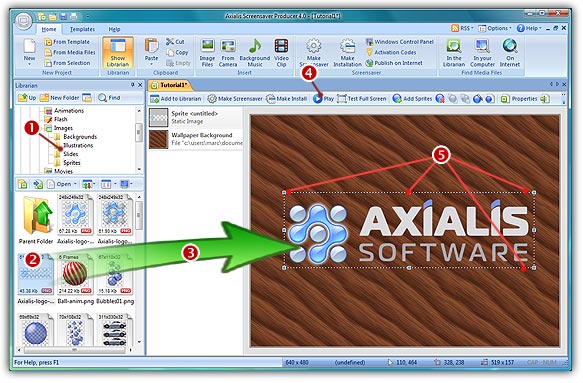
1. In the Librarian window, select the "Media Files\Images\Sprites" folder (![]() ). The files contained in this folder are displayed in the list below.
). The files contained in this folder are displayed in the list below.
2. Select the file "Axialis-logo-text.png" in the list (![]() ) and use a mouse drag & drop to place the file in the middle of the edit area (
) and use a mouse drag & drop to place the file in the middle of the edit area (![]() ). The sprite is added in the project and displayed at scale 1:1 (see below).
). The sprite is added in the project and displayed at scale 1:1 (see below).
Resizing and placing the sprite
3. Now we're going to resize the sprite and place it in the lower-right corner of the screen. First off, check that the project is not in "play" mode. Be sure that the Play button is not activated (![]() ).
).
4. The sprite is displayed with a bounding box and resize eight handles (![]() ). Select the handle that is located in the lower-right corner with the mouse and use drag & drop to resize the sprite. In the lower-left corner of the application window you see a real-time scale indicator. Adjust the size to [40% x 40%] moving the mouse and release the button when done.
). Select the handle that is located in the lower-right corner with the mouse and use drag & drop to resize the sprite. In the lower-left corner of the application window you see a real-time scale indicator. Adjust the size to [40% x 40%] moving the mouse and release the button when done.
TIP: You can use the SHIFT key to keep the proportions of the sprite while resizing. When you press the SHIFT key, the proportion is kept (same percent in width and height).
5. As the end-user screen will probably be larger than 640x480, the sprite exact position will change when the screensaver will be executed fullscreen. We want the sprite to be located and adjusted in the lower-right corner of the screen. That's why we'll change the hot spot relative position (aka. anchor point) of the sprite. By default, it is located in the center of the sprite [50% - 50%]. To be sure the sprite is adjusted in the lower-right corner, we'll specify the hot spot at [100% - 100%]. Double-click on the sprite in the list (![]() ), see below. A dialog opens. In both Rel X and Rel Y zones, specify 100% (
), see below. A dialog opens. In both Rel X and Rel Y zones, specify 100% (![]() ). Click OK to apply (the sprite position change slightly on screen).
). Click OK to apply (the sprite position change slightly on screen).
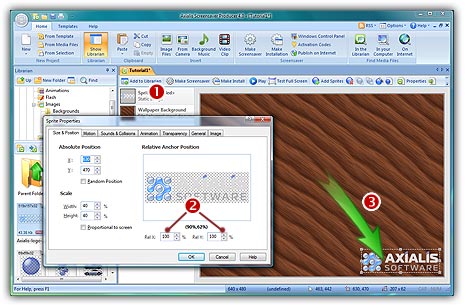
6. Using a mouse drag & drop (grab the sprite by pressing on an opaque region - a ball of the logo for example), move the sprite to the lower-right corner of the screen at location [630, 470] (![]() ).
).
TIPS: To know the exact location of a sprite, look at the bottom of the main application window. On the right side of the status bar, you'll see a coordinate indicator (![]() ). Near this indicator is displayed the exact location of the sprite. You can finely adjust a sprite location by using the keyboard arrow keys. You can also specify the exact location by opening the Properties dialog box (Alt+Enter), select the Size & Position tab and set X and Y in the Absolute Position group.
). Near this indicator is displayed the exact location of the sprite. You can finely adjust a sprite location by using the keyboard arrow keys. You can also specify the exact location by opening the Properties dialog box (Alt+Enter), select the Size & Position tab and set X and Y in the Absolute Position group.
Adjusting sprite opacity and specifying general information
7. We're almost done. Now we'll change the opacity of the sprite in order to show it as a watermark on screen. Double-click on the sprite in the list.
8. A dialog opens. Select the Transparency tab. Using the Overall Opacity slider, specify 50%. Click OK to apply. The sprite is now displayed with a watermark effect.
9. The last operation to do is to specify some information in the sprite properties. This is a boring step but this should always be done to make future modifications easier. Double-click on the sprite in the list, see above. A dialog box opens, select the General tab. In the Name field, specify a short name for the sprite: "Watermark Logo". This name will be displayed in the sprite list. Also, specify a Description of the sprite in the field below.
10. Now that we've added our first sprite, we can take a look at the result full screen. Press F11 or click the Test Full Screen button in the toolbar. The screensaver is executed full screen. Is the sprite well adjusted in the lower-right corner? Excellent! Press a key or move the mouse to end the full screen test.
Lesson 4 - Adding a moving sprite