Lesson 1.5 - Adding an animated sprite
In this lesson, we'll add an animated sprite. It means that this sprite is composed of several frames that will be displayed in sequence to simulate an animation. In our case, this is a spinning ball. Note that there is no link between the animated and the motion properties of a sprite. An animated sprite can be static on screen.
Adding and placing the sprite
1. First, be sure to be in "Stopped" mode. In the Librarian window, select the "Media Files\Images\Sprites" folder (![]() ). The files contained in this folder are displayed in the list below.
). The files contained in this folder are displayed in the list below.
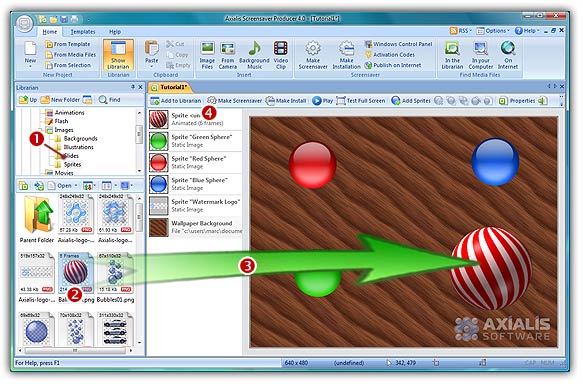
2. Select the file "Ball-anim.png" in the list (![]() ) and use a mouse drag & drop to put the file in the edit area (
) and use a mouse drag & drop to put the file in the edit area (![]() ). Place it in the upper-right corner of the screen at location [450, 320]. The sprite is added in the project and displayed at scale 1:1 (see below). Also, you can see it in the sprite list (
). Place it in the upper-right corner of the screen at location [450, 320]. The sprite is added in the project and displayed at scale 1:1 (see below). Also, you can see it in the sprite list (![]() ).
).
Animating the sprite
3. This sprite is composed of 6 images placed on top of each others. This is what we call a filmstrip. The application has automatically detected this property and displays only the first frame. If you click on the Play button, you'll see the sprite animating (rotating sphere). We want it to animate faster. Double-click on the sprite in the list. A dialog opens.
4. Select the Animation tab. Note that in the Number of Images the application has already specified 6 frames. In the Animation Speed zone, specify 50.
5. When done, click OK. Click on the Play button to see the ball spinning.
Setting the sprite motion parameters
6. Now we're going to make the sprite move on screen. Double-click on the sprite in the list. Select the Motion tab.
7. Like you did for the previous sprites, choose Straight Line and Bouncing on the edges of the screen options. Also, specify -80 for Horizontal and -80 for Vertical values. Click OK when done.
8. We can take a look at the result full screen. Press F11 or click the Test Full Screen button in the toolbar. The screensaver is executed full screen. Press a key or move the mouse to end the full screen test.
Setting the sprite general information
9. Like we did in the previous lesson, the last operation to do is perform is to specify some information in the sprite properties. Double-click on the sprite in the list. A dialog box opens, select the General tab. In the Name field, specify a short name for the sprite: "Spinning Ball". This name will be displayed in the sprite list. Also, specify a Description of the sprite in the field below.
Lesson 6 - Using collision effects