Step 2 of 9 - Specify the installation properties, advanced customization
The install procedure has a built-in multi-language support. You can specify a fixed language or let Install determine the language used by the end user. The install also support a multi-volume configuration. This feature permits you to distribute your package in one large file or in several files which can be copied on a set of floppy disks.
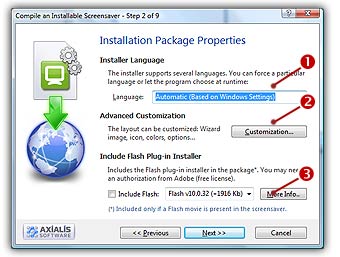
Also, you'll be able to fully customize the installation package (image, icon, window style, colors, options...). The Step 2 dialog box looks like this:
Specify the Language of the Installation Package
1. In the Language field (![]() ), select "Automatic (based on Windows settings)". You can here choose the desired language for the screensaver and install procedure. 8 languages are supported: English, French, Spanish, German, Portuguese, Italian, Dutch and Russian. By selecting Automatic, the install procedure will choose the language by itself based on the end-user Windows language. You can also force a specific language.
), select "Automatic (based on Windows settings)". You can here choose the desired language for the screensaver and install procedure. 8 languages are supported: English, French, Spanish, German, Portuguese, Italian, Dutch and Russian. By selecting Automatic, the install procedure will choose the language by itself based on the end-user Windows language. You can also force a specific language.
Include the Flash Plug-in the Installation Package
To play a Flash movie under Windows the Flash Active-X Web plug-in must be installed. This plug-in is not installed by default at Windows installation. Additionally, even if a Flash plug-in is installed, your movie may require a more recent version.
For all these reasons and in order to maximize the compatibility of your screensaver with existing computers, we recommend that you include the Flash Web plug-in installer in the package. It will silently add or update the flash plug-in if needed. The Flash plug-in installers which are available for inclusion are genuine files from Adobe. They are totally safe for the end user's computer.
Distribution Authorization from Adobe (royalty-free license)
In order to distribute the Flash plug-in installer in your screensaver package, you may need a legal authorization from Adobe. Applying for the Flash Web Player license is a free and quick procedure that can be done online from Adobe website in minutes. Click here to learn more from Adobe website.
2. Check the Include Flash plug-in installer option (![]() ). You can also choose the minimal version of Flash required to play your SWF movie.
). You can also choose the minimal version of Flash required to play your SWF movie.
Advanced Customization of the install package
3. If you want to customize the installation package, click the Advanced Customization button (![]() ). A secondary dialog box opens:
). A secondary dialog box opens:

Customize the installation illustration image
A standard image is used to illustrate the installation wizard but it's possible to customize it. The image will be located at the top of the installation window.
What kind of images can I use to customize my installation package?
To be compatible with the customization feature, the image file must have the JPEG, BMP or PNG format. Also, we recommend you to use an image with the following dimension: Width = 500, Height = 60.
How to create my illustration image?
Create this image using an external application like Photoshop® (professional tool), Paint Shop Pro® (shareware tool) or Gimp® (free tool).
4. Click on the option Use a custom image in the Installation Wizard to activate it (![]() ). The edit fields below are automatically enabled.
). The edit fields below are automatically enabled.
5. In the edit zone (![]() ), enter the full path to your image file on your disk or click the [...] button (
), enter the full path to your image file on your disk or click the [...] button (![]() ) to browse your disks and locate the image file using a standard Windows dialog box. Once the pathname has been entered you see a preview of the image in the window on right (
) to browse your disks and locate the image file using a standard Windows dialog box. Once the pathname has been entered you see a preview of the image in the window on right (![]() ).
).
Customize the installation icon
The install package is a program. Therefore, it contain an icon. This icon is used to display it in Windows File Browser or when you create a Shortcut to it in the Desktop for example. A standard icon is used but it's now possible to customize it. The image will be located at the top of the installation window. To get more information about the icon, read What is an icon topic.
6. Click on the option Use a custom icon for the Installation file to activate it (![]() ). The edit fields below are automatically enabled.
). The edit fields below are automatically enabled.
7. In the edit zone (![]() ), enter the full path to your image file on your disk or click the [...] button (
), enter the full path to your image file on your disk or click the [...] button (![]() ) to browse your disks and locate the icon file using a standard Windows dialog box. Once the pathname has been entered you see a preview of the icon in the window on right (
) to browse your disks and locate the icon file using a standard Windows dialog box. Once the pathname has been entered you see a preview of the icon in the window on right (![]() ).
).
Advanced Customization
8. Click the Display Title and Copyright in the Top Image option (![]() ) if you want a Title Text displayed in the top image. If you don't select this option, only the image will be displayed. This is interesting if you want to create the text in the image using a graphic editor. If you choose this option, you can adjust the text color in the field Text Color (below the option check box).
) if you want a Title Text displayed in the top image. If you don't select this option, only the image will be displayed. This is interesting if you want to create the text in the image using a graphic editor. If you choose this option, you can adjust the text color in the field Text Color (below the option check box).
9. If the Show Install Options is chosen (![]() ), some options will be proposed to the end user in the first screen of the installation wizard. Options are:
), some options will be proposed to the end user in the first screen of the installation wizard. Options are:
Set as Default Windows Screensaver – The user can set the Screensaver as the default.
Open Display Properties After Installation – The user can choose to display the Windows Display Properties dialog box after the installation.
Create a Start Menu Entry – The user can choose to create an entry in the Start menu to launch or uninstall the screensaver.
Create a Desktop Icon – The user can choose to create a Desktop icon (shortcut) to launch the screensaver.
REMARK: If you don’t display these options, the user won’t be able to change them during installation. It does not mean that these features won’t be executed. You can choose to activate some of them (see options below) even if you decide to hide them.
10. If the Open Display Properties after Install is chosen (![]() ), the standard Windows® Display Properties dialog box will be opened at the end of installation procedure. In this window you can select the actual screensaver and set its properties. If you have chosen to activate the Show Install Options feature (see above) the user will be able to change this option.
), the standard Windows® Display Properties dialog box will be opened at the end of installation procedure. In this window you can select the actual screensaver and set its properties. If you have chosen to activate the Show Install Options feature (see above) the user will be able to change this option.
11. If the Create a Start Menu Entry option is chosen (![]() ), an entry in the Windows® Start Menu will be created to launch or uninstall the Screensaver. If you have chosen to activate the Show Install Options feature (see above) the user will be able to change this option.
), an entry in the Windows® Start Menu will be created to launch or uninstall the Screensaver. If you have chosen to activate the Show Install Options feature (see above) the user will be able to change this option.
12. If the Create Desktop Icon option is chosen (![]() ), a shortcut will be created on the Windows® Desktop to easily launch the Screensaver. If you have chosen to activate the Show Install Options feature (see above) the user will be able to change this option.
), a shortcut will be created on the Windows® Desktop to easily launch the Screensaver. If you have chosen to activate the Show Install Options feature (see above) the user will be able to change this option.
13. Your Screensaver contains a comment text. This text is displayed in the Properties Dialog box (a scrolling area). If the Display Comment Text option is chosen (![]() ), this text is also displayed during the installation procedure. This may be useful to inform the user about the Screensaver before it is installed.
), this text is also displayed during the installation procedure. This may be useful to inform the user about the Screensaver before it is installed.
14. If the Include an Uninstall Procedure option is chosen (![]() ), a program to uninstall the screensaver will be installed on the users computer. This will permit the user to easily uninstall the screensaver if necessary. We strongly recommend you include this uninstall procedure.
), a program to uninstall the screensaver will be installed on the users computer. This will permit the user to easily uninstall the screensaver if necessary. We strongly recommend you include this uninstall procedure.
15. If the Propose Uninstall if Already Installed option is chosen (![]() ), the installation wizard will prompt the user to uninstall the Screensaver if it is already present on his computer.
), the installation wizard will prompt the user to uninstall the Screensaver if it is already present on his computer.
REMARK: This feature is different than the above uninstall procedure. It has been implemented to keep compatibility with previous versions. We strongly recommend you to use the new uninstall procedure.
16. When done, click the OK button.
An icon is a graphic image, a small picture or object that represents a file, program, web page, or command. Icons help you execute commands, open programs or documents quickly. To execute a command by using an icon, click or double-click on the icon. It is also useful to recognize quickly an object in a browser list.
That's almost all you need to know if you only use icons. But you want to use (or create) icons for the screensaver customization feature, you need to know more about them.
What are the differences between an image and an icon?
A computer image is a bitmap (composed of pixels) or vector (composed of drawing paths) picture, which can be saved using various formats (BMP, PNG, GIF, JPEG, WMF...). All these formats have several different properties (bitmaps, vectors, compressed, layered, animated...) and can be used to store pictures at any sizes and resolution.
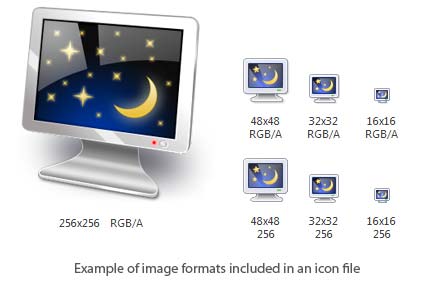
Icons are different from standard images. They are have standard sizes (usually small): 16x16, 32x32, 48x48... One icon is composed of several images. Each of them with a different size and number of colors (mono, 16 colors, 256 colors, 16.8M...). And the most important property of an icon is the ability to include transparent areas. This allows seeing the screen background behind the icon within its square image.
What is the structure of an icon?
As we've seen in previous paragraph, an icon is a group of images of various formats (size and colors). Furthermore, each image can include transparent area. That's why you'll find a transparent color in the drawing palette for 16 or 256 color images and a variable opacity parameter for the new Windows XP format (opacity = 0 means transparent).
What kind of icons can I use to customize my screensaver?
You can use any kind of icons, including those containing PNG compressed images as used in Windows Vista and Windows 7.
How to create my own icons?
Axialis Software has released an icon editor that will permit you to easily create your own icons in a few minutes: Axialis IconWorkshop. This professional tool will permit to create icons with several formats from images in a few clicks. You can download a trial version here and test it for 30 days.
![]() Step 3 - Specify the User License Agreement
Step 3 - Specify the User License Agreement