Create Icons Using Photoshop Templates
In relation to Axialis IconWorkshop, this article offers information on the following topics:
- How do the Photoshop templates work?
- Install the Photoshop-to-IconWorkshop transfer plug-in
- Create a Windows Standard icon
- Create a Windows icon using a 3-image Project Template
- Create your own Photoshop templates
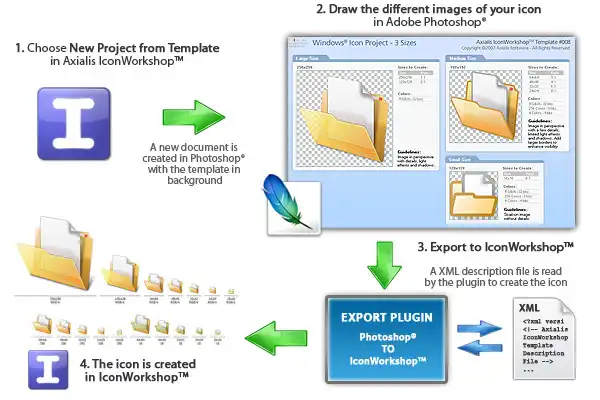
In this tutorial, we'll create 2 icons using Photoshop templates. Templates permit you to use the powerful tools of Photoshop to draw your icon in different formats, then transfer the work to IconWorkshop. Axialis IconWorkshop creates the icon automatically in one step.
A template is a ready-to-use image which contains enpty/transparent square areas where you can draw your icons in different formats. This image is designed to be placed in background of your drawing project. You make your artwork in layers that you add on top of this backround template. You can add as many layers as you want and you can save your project as individual files for future use or modifications. Once your work is done, just export it into IconWorkshop, the image will be temporary flatten and the icon created.
How do the Photoshop templates work?
Select "new icon project from template" in IconWorkshop. Choose one template (10 templates are provided, see below). Adobe Photoshop is launched and a new image document is created with the template image in background. Draw your images, creating layers as necessary. You can save the work as a PSD file for later use. Choose "Export to IconWorkshop". The Axialis plugin is launched, a XML description file is read (you can create your own, see in help) and the icon is created in IconWorkshop. Just retouch it if you want and save it.
How many templates are included in IconWorkshop?
10 templates are included in IconWorkshop. Each template is composed of 2 files: a PNG file with transparency which is the image file on which you'll draw the different sizes of your icon; a XML file describing the template (this is a text file with the same filename, extension XML). You can create your own new templates. Files are located in [Application Data]/Axialis/IconWorkshop/Templates. The 10 templates are:
|
1. Windows Icon - All Formats 2. Windows Vista Icon (256x256,...) 3. Windows XP Icon (48x48,...) 4. Macintosh OSX Icon (128x128,...) 5. Macintosh OSX Tiger Icon (256x256,...) |
6. Macintosh OSX Leopard Icon (512x512,...) 7. Windows Project (2 Sizes) 8. Windows Project (3 Sizes) 9. Macintosh Project (2 Sizes) 10. Macintosh Project (3 Sizes) |
What is the difference between "Simple Icon" and "Icon Project" templates ?
The simple icon templates (numbers 1 to 6) have been designed to permit you to draw all the formats of the icon, including RGB/A, 256 and 16 colors. If a format is left blank, it will not be added to the icon.
The icon project templates (numbers 7 to 10) permit you to create 2 or 3 versions of your icon (based on the template you choose). Then, during the export, the formats are created according to the XML descrition file. Usually, image formats in project templates are created using the following guidelines:
• 512x512, 256x256, 128x128 to 72x72 : Image in perspective with details, light effects and shadows.
• 64x64 to 24x24 : Image in perspective with a few details, limited light effects and shadows. A border is added to enhance visibility.
• 16x16: Flat image without details and large borders.
Axialis IconWorkshop
Create Icons using a Professional Authoring Tool
![]()

- Axialis IconWorkshop is a professional icon authoring tool for creating icons on multiple platforms and devices.
- The tool supports creating icons for Windows, macOS, Unix/Linux, Android, iPhone.
- The interface is designed to increase productivity, with easy accessibility to all tools and a powerful built-in librarian and file explorer.
- Batch processing features are included for creating multiple icons at once.
- The tool includes features such as icon creation from images and image objects to help create professional-looking icons quickly.
- The tool is compatible with industry standards and includes plugins for Adobe products and Microsoft Visual Studio.


Install the Photoshop-to-IconWorkshop transfer plug-in
Before using the as detailed in next topic, you need to install it on your computer. The plug-in can be easily installed from within Axialis IconWorkshopä in one fast and simple operation.
Note
If you've already installed the Photoshop plug-in with a version of IconWorkshop prior to 6.10, you must install it again by following the procedure below. A new export plug-in will be installed in addition to the filter plug-in. The export plug-in will be used with Photoshop Templates.
1. Before installing the plug-in you need to close the Photoshop application (if it is opened in background). Choose File/Install Photoshop Plug-in...
2. The dialog box Install the Photoshop to IconWorkshop Transfer Plug-in opens (see below). In the Location edit zone 1, specify the Photoshop plug-in folder. If you don't know the exact folder path, click the browse button 2 to choose the folder in a list.
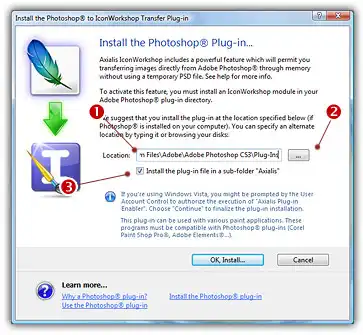
3. If you want to create a subfolder "Axialis" to install the plug-in module (recommended to organize your folder properly), activate the option "Install in a subfolder Axialis" 3. Note that creating a subfolder may fail with some compatible applications.
4. Click OK. When done, a message informs you that the plug-in has been installed.
5. Now you can start your Photoshop application. The plug-in is visible in Filter/Axialis/Transfer To IconWorkshop and File/Export/Export to Axialis IconWorkshop menus. Read this for more info on how to use the plug-in filter.
Create a Windows Standard icon
In this first part, we'll create a simple icon for Windows XP. To do this, we'll use an "Icon Template". This kind of template (see above), permits you to create each format of the icon separatly. A typical Windows XP icon contains 9 or 12 formats: sizes 48x48, 32x32, 16x16 (optional 24x24), each one in colors RGB/A, 256 and 16. As a result, the templates contains 12 areas where you can draw the different formats of the icon. If a drawing area is left blank, the associated format is not created.
In the procedure below, we'll create 3 RGB/A formats: 48x48, 32x32 and 16x16.
1. First, be sure the Photoshop plug-in has been installed (see previous topic). Choose File/New/Icon Project from Photoshop Template/Windows XP Icon (48x48...).
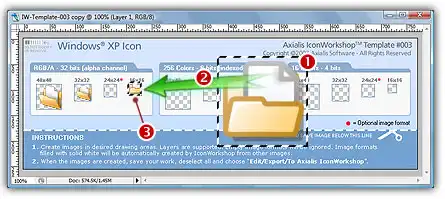
2. Adobe Photoshop opens and a new document is created. Its name is "IW-Template-003 copy". The term "copy" means that this is a new document based on the file "IW-Template-003" but not linked to it. As a result, you won't overwrite the original template image by saving your over it by error (simply by pressing Ctrl+S for instance). It's like a new document containing an image at startup.
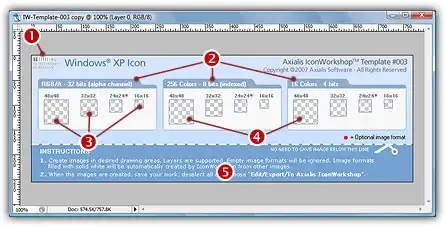
The figure above shows the document window as it has been created in Photoshop. In the upper-left corner 1 there is a barcode to let IconWorkshop identify the number of the template (this permits IconWorkshop to associate the template image with the associated XML file). Do not modify or remove this barcode.
The template is divided in 3 groups 2, one per color mode. We'll draw image formats only for the RGB/A color mode in sizes 48x48, 32x32 and 16x16 3. We'll leave the other formats blank 4. At the bottom of the template you'll find some instructions on how to use the template 5. This part of the template is not used during the export into IconWorkshop and the icon creation. If you want to save your icon project as a separate PSD file, you can remove this part (crop the image above the doted line).
From here, you can simply draw your icons in the associated format zones and go directly to step 7. If you don't want to draw and prefer to use read-to-use sample images, follow steps 3 to 6.
3. Open the file "[Axialis Librarian]\Objects\Samples\Medium\Folder With Document.png". We mean by [Axialis Librarian] the folder where is stored the Axialis Librarian (usually in the My Documents folder).
You can also do this directly from IconWorkshop: in the Librarian, open the folder "Objects\Samples\Medium", right-click on the file "Folder With Document.png". A menu opens, choose "Open With/Adobe Photoshop". The file is opened in a Photoshop document window.
4. Copy/Paste the image of the Folder with Document into the Template (a new layer is created), select it (1). Choose Edit/Transform/Scale and adjust the image into the 48x48 RGB/A square (2). The resulting image should be perfectly adjusted inside the transparent square (3), not over the borders (which will not be exported).
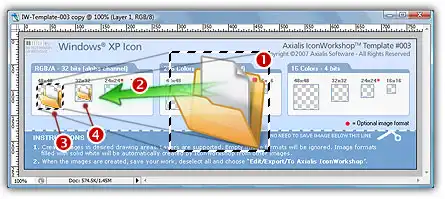
Redo the same operation for the 32x32 RGB/A format (4). In you're an advanced Photoshop user, you can retouch the images to enhance the final result.
5. Now let's create the 16x16 format. We'll use another image which will produce better results in very small sizes (located in subfolder "Small"). Open the file "[Axialis Librarian]\Objects\Samples\Small\Folder With Document.png".
6. Redo the operation similar to step 4 1 and adjust the image 2 into the 16x16 RGB/A square. The result must be perfectly adjusted inside the square (3):
7. Now let's create the icon: In Photoshop, choose File/Export/Export to Axialis IconWorkshop. The template is automatically recognized by IconWorkshop and the icon is created with the 3 formats we've drawn (1):
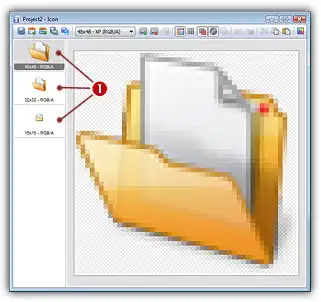
Only the squares with images generated the associated formats. Now if you want to create other formats, you can follow the same procedure as in Lesson 4.
Adding other formats using the template
You can also add new formats from the one you've drawn using the template. For example, let's add the 256 color formats from the RGB/A images we've already drawn:
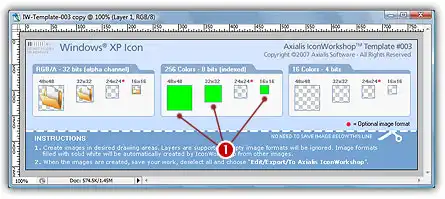
8. Go back to Photoshop and select the document containing the template. Select the layer "Layer 0" (the one containing the template image).
9. Select the Paint Bucket tool: ![]() and using the color you want (we used pure green RGB:0,255,0), fill the 3 squares 48x48, 32x32 and 16x16 in the group 256 colors 1:
and using the color you want (we used pure green RGB:0,255,0), fill the 3 squares 48x48, 32x32 and 16x16 in the group 256 colors 1:
10. Choose File/Export/Export to Axialis IconWorkshop. A new icon document is created with the 256 color formats added. The formats has been automatically created from the largest and most coloured image, in our case 48x48 RGB/A. The problem is that the 16x16 format has also been created from this detailed image, not from the 16x16 image we've already created. Using Icon Project Templates (see below) will solve this problem.
11. Once you have finished to work on an icon template, we recommend you to save the document using the PSD format. This will permit to work again later on the project, preserving all your layers and effects you may have added.
Create a Windows Vista icon using a 3-image Project Template
This second part will permit you to go further by creating an icon using a more professional method. We've seen in previous topic that basic icon templates require to draw all the formats of the icon to get the best results. Using Icon Project Templates, you draw 2 or 3 versions of your icon (depending on the template you use) and IconWorkshop automatically creates the icon formats using pre-defined rules.
For exemple, the template "Windows Project (3 Sizes)" lets you draw 3 images. Use the recommended guidelines below to draw the images. Then, IconWorkshop creates each format of the icon accordingly:
|
Original Template Image |
Drawing Guidelines |
Created Icon Sizes |
|
|
256x256

|
Image in perspective with details, light effects and shadows.
|
256x256, 128x128
|
|
|
192x192

|
Image in perspective with a few details, limited light effects and shadows. Add larger borders to enhance visibility
|
64x64, 48x48, 32x32, 24x24
|
|
|
128x128

|
Flat image without details and a large border.
|
16x16
|
|
This is an advanced method for creating icons but this is the one which produces the most professional results. The final icon contains hi-res images for operating systems which support them such as Windows Vista or MacOS 10.4/10.5. It contains also smaller images which are easily identifiable by the user in all resolutions.
Note that the small sizes are generated from larger original images. For exemple, the 16x16 size is created from a 128x128 image (ratio 8:1). This permits an easier drawing experience and produce better results.
In the procedure below, we'll create a fully featured Windows Vista icon of the image "Folder With Document" that we've already used above.
1. First, be sure the Photoshop plug-in has been installed (see topic above). Choose File/New/Icon Project from Photoshop Template/Windows Project (3 Sizes)
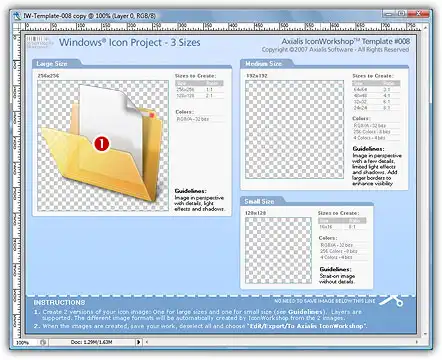
2. Adobe Photoshop opens and a new document is created. Its name is "IW-Template-008 copy":
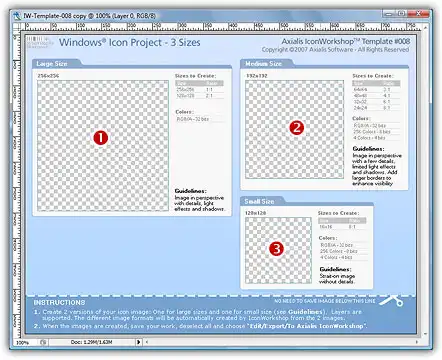
The figure above shows the document window as it has been created in Photoshop. It contains 3 drawing areas where you'll draw the 3 images of your icon: the large size 256x256 1, the medium size 192x192 2 and the small size 128x128 3.
From here, you can simply draw your 3 images in the associated zones and go directly to step 7. If you don't want to draw and prefer to use read-to-use sample images, follow steps 3 to 6.
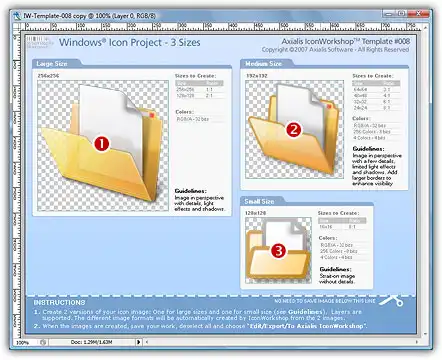
3. Open the file "[Axialis Librarian]\Objects\Samples\Large\Folder With Document.png". We mean by [Axialis Librarian] the folder where is stored the Axialis Librarian (usually in the My Documents folder).
You can also do this directly from IconWorkshop: in the Librarian, open the folder "Objects\Samples\Large", right-click on the file "Folder With Document.png". A menu opens, choose "Open With/Adobe Photoshop". The file is opened in a Photoshop document window.
4. Copy/Paste the image of the Folder with Document into the Template (a new layer is created), select it. Move the image in the 256x256 drawing area. The resulting image should be perfectly adjusted inside the transparent square (1), not over the borders (which will not be exported). The resulting image should look like this:
5. Repeat the procedure for the file "[Axialis Librarian]\Objects\Samples\Medium\Folder With Document.png". Move it into the drawing area 192x192 (2).
6. Repeat the procedure for the file "[Axialis Librarian]\Objects\Samples\Small\Folder With Document.png". Move it into the drawing area 128x128 (3). See below the resulting document window:
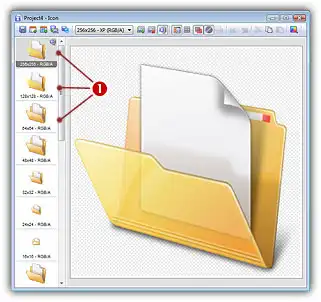
7. Now let's create the icon: In Photoshop, choose File/Export/Export to Axialis IconWorkshop. The template is automatically recognized by IconWorkshop and the icon is created with all the formats as described in the template (1):
8. Various image formats have been created. Simply remove the formats you don't wish to include in your icon. Save the icon.
9. Once you have finished to work on an icon template, we recommend you to save the document using the PSD format. This will permit to work again later on the project, preserving all your layers and effects you may have added.
Create your own Photoshop templates
By default, Axialis Iconworkshop is provided with 10 templates. However, we have designed the system to permit you to create your own ones. The topic below explains in details how you can create templates that will match your specific needs: