Change image size and color depth
During the edition, you can change the size and color depth of the image.
Resize the image
1. Choose Image/Image size.
2. A dialog box opens. Specify the new width and height of the image, click OK.
The canvas and the image will be resized. The image will be expanded or reduced accordingly.
Resize the Canvas
1. Choose Image/Canvas size.
2. A dialog box opens. Specify the new width and height of the canvas, click OK.
Only the canvas will be resized. The image will cropped if necessary.
Convert to RGB with Alpha Channel (32 BPP)
1. Choose Image/Convert to True Colors with Alpha Channel (32 bits).
The image is directly converted to RGB/A without any user action.
Convert to RGB (24 BPP)
1. Choose Image/Convert to True Colors (24 bits).
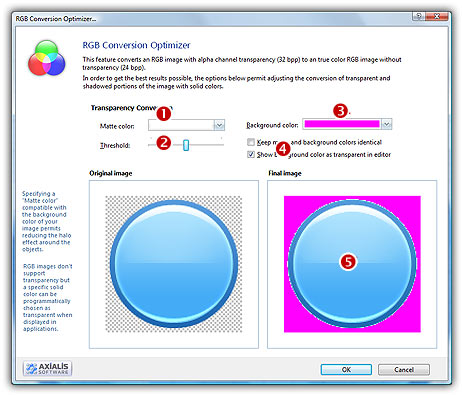
2. If the original image is 8BPP or less, it is directly converted to RGB without user action. If the original image is RGB/A (32BPP), a dialog box opens. This permits optimizing the conversion of the alpha channel to simulated transparency. As 24BPP images does not support transparency, it is in fact a solid color fill using a "background color" which is not used elsewhere in the image (for example pure Magenta or Green). When used in your application, this color will be converted to transparency.
2. In Transparency Conversion, specify the Matte color (![]() ). This color is used to fill the partially transparent portions of the image (such as the object borders or shadows). We recommend to specify a neutral color compatible with the color of the target background. For example if you plan to use your image on a grey toolbar, specify a neutral medium grey color.
). This color is used to fill the partially transparent portions of the image (such as the object borders or shadows). We recommend to specify a neutral color compatible with the color of the target background. For example if you plan to use your image on a grey toolbar, specify a neutral medium grey color.
3. In Threshold (![]() ), adjust the trigger level between the mate color and the background color (transparency). While adjusting the value, you see the result in the preview window (
), adjust the trigger level between the mate color and the background color (transparency). While adjusting the value, you see the result in the preview window (![]() ).
).
4. In Background Color (![]() ), specify the color you wish to use as transparent color (simulated transparency).
), specify the color you wish to use as transparent color (simulated transparency).
5. If you select "keep matte and background colors identical" (![]() ), the 2 colors will be the same. This is useful to create an opaque image without simulated transparency.
), the 2 colors will be the same. This is useful to create an opaque image without simulated transparency.
6. If you select "show background color as transparent in editor", the background color will be replaced by the transparent texture (chessboard) in the editor once converted.
7. Click OK, the image is converted.
Convert to 256 Indexed Colors (8 BPP)
1. Choose Image/Convert to 256 Indexed Colors (8 bits).
2. A dialog box opens. This permits optimizing the conversion of the alpha channel to simulated transparency. As 24BPP images does not support transparency, it is in fact a solid color fill using a "background color" which is not used elsewhere in the image (for example pure Magenta or Green). When used in your application, this color will be converted to transparency.
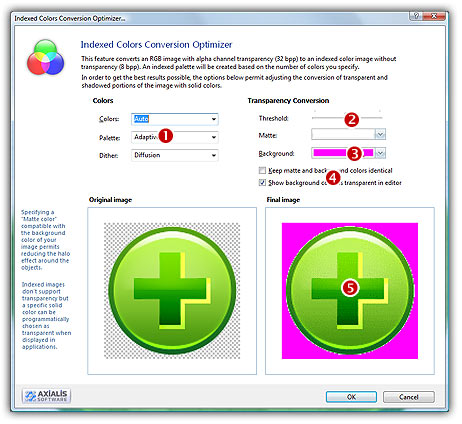
7. In Colors (![]() ), specify the number of colors you wish to use in the image palette. Limited number of colors will result in smaller file but will produce lower image quality. Choose "Auto" if you're not sure about desired the number of colors. While adjusting the value, you see the result in the preview window (
), specify the number of colors you wish to use in the image palette. Limited number of colors will result in smaller file but will produce lower image quality. Choose "Auto" if you're not sure about desired the number of colors. While adjusting the value, you see the result in the preview window (![]() ).
).
8. In Palette, choose the type of palette desired:
Adaptive - The palette will be calculated to get the best results possible (recommended).
Web Safe - This is the default Netscape® Web palette.
Windows - This is the default palette used under old Windows® versions in 256 color screen mode.
Macintosh® OS - This is the default palette used under old Macintosh® OS versions in 256 color screen mode.
9. In Dither, choose "Diffusion" if you want IconWorkshop™ to simulate colors not present in the palette by pixel mixing using the "error diffusion" method. Choose "None" to encode the image without dithering. Diffusion produces the best results but usually creates slightly larger images.
10. In Transparency Conversion, specify the Matte color (![]() ). This color is used to fill the partially transparent portions of the image (such as the object borders or shadows). We recommend to specify a neutral color compatible with the color of the target background. For example if you plan to use your image on a grey toolbar, specify a neutral medium grey color.
). This color is used to fill the partially transparent portions of the image (such as the object borders or shadows). We recommend to specify a neutral color compatible with the color of the target background. For example if you plan to use your image on a grey toolbar, specify a neutral medium grey color.
11. In Threshold (![]() ), adjust the trigger level between the mate color and the background color (transparency).
), adjust the trigger level between the mate color and the background color (transparency).
12. In Background Color (![]() ), specify the color you wish to use as transparent color (simulated transparency).
), specify the color you wish to use as transparent color (simulated transparency).
13. If you select "keep matte and background colors identical" (![]() ), the 2 colors will be the same. This is useful to create an opaque image without simulated transparency.
), the 2 colors will be the same. This is useful to create an opaque image without simulated transparency.
14. If you select "show background color as transparent in editor", the background color will be replaced by the transparent texture (chessboard) in the editor once converted.
15. Click OK, your new image is converted.
Convert to 16 Indexed Colors (4 BPP)
1. Choose Image/Convert to 16 Indexed Colors (4bits).
The image is directly converted without any user action.
Convert to Monochrome (1 Bit)
1. Choose Image/Convert to True Colors with Alpha Channel (32 bits).
The image is directly converted without any user action.