Convert several PNG icons to Windows® icons
An interesting feature of IconWorkshop™ is the ability to create Windows® icons from PNG icons. PNG is an image file format, not really an icon format. Icons usually contain several formats. PNG images contain only one image used as icon. This image is usually a large one (128x128 or 256x256) with alpha channel (RGB/A 32 BPP). This format is used by numerous GUI and applications (Linux KDE, dock bars...). This format is very interesting to create hi-quality RGB/A images in icons.
Using this feature you can Create Several Windows® Icons from PNG files in one operation. This is what we call a batch procedure. We'll perform this task using the built-in IconWorkshop™ explorer.
Select the source PNG images
1. Open a new File Browser window. Choose File/New/File File Browser...
2. When the window is opened, select the folder which contains the PNG images using the tree in the left pane.
3. When done, the PNG files appear (with preview) in the right pane. Select the files you wish to convert to icons. You can use Shift/Ctrl + Mouse to select several files. Use Ctrl+A to select all. Use +/- to select/unselect by specifying filters.
Batch create the Windows® icons
4. Choose File Browser/Batch Create Windows® Icons from Selection or Ctrl+Shift+C.
5. A dialog box opens. In "Standard Image Formats" (![]() ) and "Extra Image Formats" (
) and "Extra Image Formats" (![]() ) choose the image formats you wish to add in the icons.
) choose the image formats you wish to add in the icons.
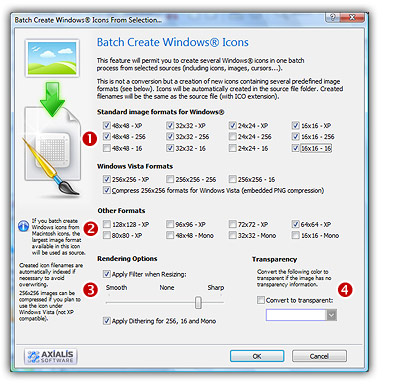
6. In Image Adjustment group (![]() ), you can add a smooth or sharp filter to the image shrinking process. You can also use or not a dithering method to render image using 256 or 16 colors. In Transparency group (
), you can add a smooth or sharp filter to the image shrinking process. You can also use or not a dithering method to render image using 256 or 16 colors. In Transparency group (![]() ), an option permits to use opaque images (i.e. without transparency) and specify a color to make transparent.
), an option permits to use opaque images (i.e. without transparency) and specify a color to make transparent.
7. When done, click OK. The batch operation starts immediately, the hourglass mouse pointer is displayed during the creation. When done the new Windows® icons are added to the folder contents.
![]()