Add a new image format in an icon
This is very important to create several image formats in an icon (especially if you whish to redistribute it) in order to be compatible with all screen configurations (see What is an Icon for more info).
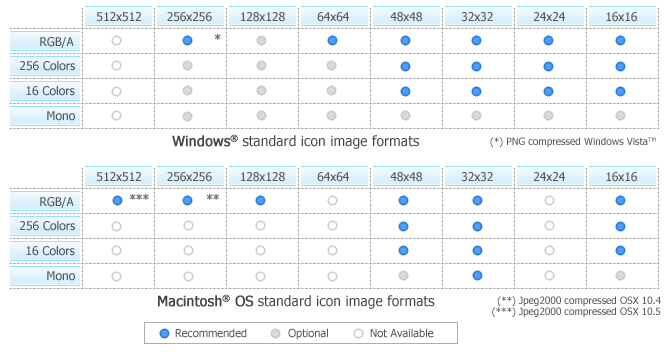
The following table shows the common Windows® and Macintosh® image formats:
If you add 24x24 image formats in your icon, it won't be compatible with Windows® 98 and Windows® 2000. If you use these Windows® versions, the icon will display correctly in Axialis IconWorkshop™ but will be considered as invalid by Windows®.
Macintosh® icon format is not open. You cannot add image formats which are not defined in Macintosh® icon specifications. See above, some image formats are not available.
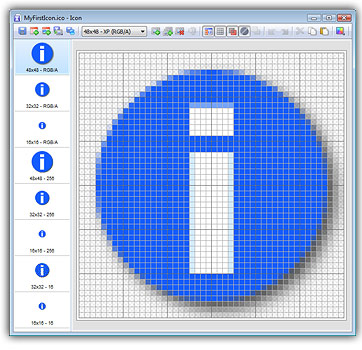
![]() IMPORTANT - All the commands in the procedure specified below are related to Windows® icons. Working with Macintosh® icons is very similar and many commands also exist for Macintosh® icons (the following image informs you about this:
IMPORTANT - All the commands in the procedure specified below are related to Windows® icons. Working with Macintosh® icons is very similar and many commands also exist for Macintosh® icons (the following image informs you about this: ![]() ). In such a case, dialog boxes contents may differ slightly.
). In such a case, dialog boxes contents may differ slightly.
Adding a new image format
1. Choose Draw/New image Format or press "Ins" (![]() : image formats are different for Macintosh® icons)
: image formats are different for Macintosh® icons)
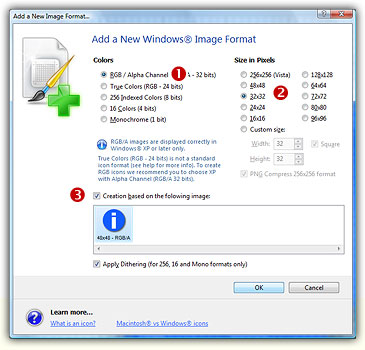
2. In the Colors group, choose the color mode of the new image format:
RGB/Alpha Channel (16.8M - 32 bits). Uses true colors to get the best results. This format will be used only if the icon is displayed under Windows® XP. Also, it uses an additional Alpha Channel to create smooth shades and object borders.
256 Indexed colors (8 bits): Uses a customizable 256 color palette. You will be able to modify this palette to produce smoother gradients or specific colors.
16 colors (4bits): Uses the system standard palette (16 static colors). This is the native Windows® mode..
True colors 16.8M (24 bits) Rarely used, this format may be incompatible with some display drivers.
Monochrome (1 bit): Uses only 2 colors (black and white). This is an obsolete color mode
3. In the Size in Pixels group, choose the size of the new image format:
Standard sizes: 256x256, 64x64, 48x48, 32x32, 24x24, 16x16.
Extra sizes: 128x128, 72x72, 80x80, 96x96.
Custom size: You can specify any size including non square size. If you want the height equal to width, click Square aspect.
4. If you check the "Create a new image based on the following image" option, Axialis IconWorkshop™ will create a new image based on a copy of the selected image format. The image will be resized and the colors will be adjusted if necessary. If the box is not checked, it will create a blank new image. All image formats are displayed in the list.
5. If you check the "Apply Dithering" option, Axialis IconWorkshop™ will dither the resulting image in 256 or 26 color modes. This option permits to use smoother gradients in icons.
Adding quickly a standard image format
This method produces the same result as above using a faster procedure. It is available for standard formats only.
1. Right click on an image format in the list. A menu opens and proposes you to create the next missing format based on the selected image. For example, right-click on the 32x32 XP image format and choose Create 16x16 Win XP Image Format in the menu (see below ![]() ).
).
(![]() : proposed image formats are different for Macintosh® icons)
: proposed image formats are different for Macintosh® icons)
2. The new format is automatically added to the icon.
Adding several images formats in one operation
This method adds several image formats from an existing one in a single operation. It is possible to create standard and extra formats using this method.
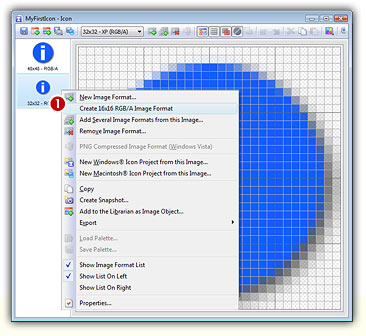
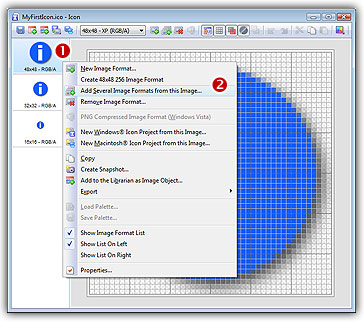
1. Right-click on the format in the list you wish to use as model (![]() on the left of the editor window), a context menu opens, select Add Several Image Formats from This Image (see below
on the left of the editor window), a context menu opens, select Add Several Image Formats from This Image (see below ![]() ).
).
2. A new dialog box opens (![]() : image formats are different for Macintosh® icons):
: image formats are different for Macintosh® icons):
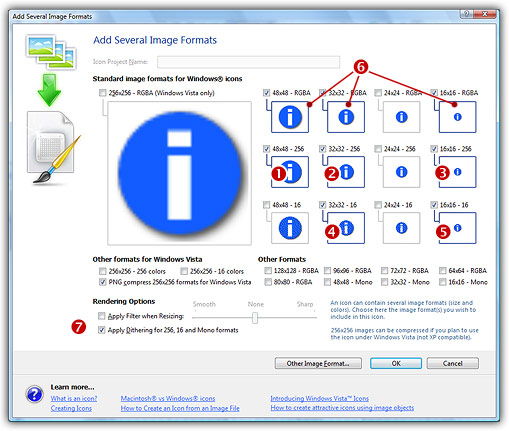
3. Select the formats you wish to add by clicking directly on the preview image (![]() ...
... ![]() )
)
You can just ignore (select or not) the image formats already present in the image. You can also apply or not the dithering option to the 256/16 color images (try ![]() and see the results in the preview images).
and see the results in the preview images).
4. When done click OK. The formats are automatically created: