How to Batch Create PNG images with Transparency from Icons...
Creating PNG images from icons can be very useful. For example, PNG with transparency is the standard icon format for Linux® KDE® Desktop Environment. Also some useful "Dock" applications have been ported to Windows® (clones of Macintosh® OS-X Dock toolbar). Most of these applications also are using 128x128 PNG with transparency as icons. See MobyDock and Y'z Dock websites for more info).
You can either create one PNG image from one icon (see topic How to Create a PNG, BMP or PSD Image with Transparency) or several images from icons in one operation. This is what we call a Batch procedure:
Select the Source Icons
1. Open a new File Browser window. Choose File/New/File File Browser...
2. When the window is opened, select the folder which contains the Source Files using the tree in the left pane.
3. When done, the Source Files appears (with preview) in the right pane. Select the icons you wish to convert to images. You can use Shift/Ctrl + Mouse to select several icons. Use Ctrl+A to select all. Use +/- to select/unselect by specifying filters.
Create the Images
4. Choose File Browser/Batch Create Images from Icons or Ctrl+Shift+V.
5. The dialog box Batch Create Images From Icons opens (see below). In the Icon Format to Extract group (![]() ), choose the image format you wish to extract from the icons. You can choose only one image format. If this exact format does not exists in an icon, the nearest format is chosen.
), choose the image format you wish to extract from the icons. You can choose only one image format. If this exact format does not exists in an icon, the nearest format is chosen.
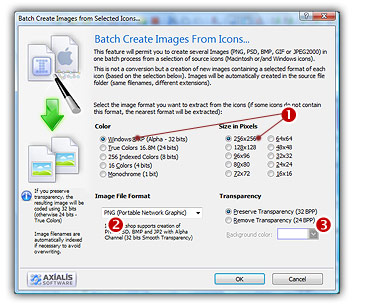
5. In the Image File Format group (![]() ), select the file format you wish to use for the images to create.
), select the file format you wish to use for the images to create.
6. In the Transparency group (![]() ), choose if you wish to create transparent or opaque images. If you choose to preserve transparency, the images will be automatically converted to 32BPP with alpha channel (even if the chosen icon format is 256 or less colors). If you choose to remove transparency, the images will be generated using 24BPP (no alpha channel). In such a case, you must specify a background color (to fill the transparent areas with this color).
), choose if you wish to create transparent or opaque images. If you choose to preserve transparency, the images will be automatically converted to 32BPP with alpha channel (even if the chosen icon format is 256 or less colors). If you choose to remove transparency, the images will be generated using 24BPP (no alpha channel). In such a case, you must specify a background color (to fill the transparent areas with this color).
7. When done, click OK. The batch operation starts immediately, the hourglass mouse pointer is displayed during the creation. When done the new Images are added to the folder contents.
![]() The created images have the same filename as the original document with .PNG, .PSD ot .BMP appended. A smart system has been added to index the files if necessary to avoid overwriting. If this exact chosen format does not exists in an icon, the nearest format is chosen for extraction.
The created images have the same filename as the original document with .PNG, .PSD ot .BMP appended. A smart system has been added to index the files if necessary to avoid overwriting. If this exact chosen format does not exists in an icon, the nearest format is chosen for extraction.