How to create Windows Vista™ compliant icons
In this topic, we'll see how to create a Windows Vista™ compliant icon. Windows Vista™ includes many new features and enhancements. The most visible evolution is the new Graphical User Interface (GUI). A first look at Aero (the codename for the Windows Vista™ user experience) reveals a slicker interface with sharper graphics.
Microsoft Windows Vista™ comes with a new format of icons supporting PNG compression and sizes up to 256x256. The standard Windows Vista™ icons now includes the following image formats (grayed formats are optional):
| 256x256 - RGB/A | 64x64 - RGB/A | 48x48 - RGB/A | 32x32 - RGB/A | 24x24 - RGB/A | 16x16 - RGB/A |
| 256x256 - 256c | 64x64 - 256c | 48x48 - 256c | 32x32 - 256c | 24x24 - 256c | 16x16 - 256c |
| 256x256 - 16c | 64x64 - 16c | 48x48 - 16c | 32x32 - 16c | 24x24 - 16c | 16x16 - 16c |
The problem is: if you simply make the icon and save it in standard Windows® XP ICO format, the resulting file will be 400Kb on disk. The solution is to compress the images. Only the 256x256 images are compressed. The compression scheme used is PNG (Portable Network Graphic) because it has a good lossless ratio and supports alpha channel. The compressed icon sizes are 100Kb to 150Kb.
To get more information on Windows Vistaä Icons, we recommend you to read this topic: Introducing Windows Vista™ Icons
Creating the Windows Vista™ Icon from an existing image
1. In this procedure, we'll use the following image file to create the Windows Vista™ icon: "Down.png" (located in Librarian: "Objects\Pack 2 - Realistic Buttons"). If you can't find the file, download the "Realistic Buttons " pack from Internet.
To get the best results possible, the source image must be 256x256 - RGB/A.
2. Open the Librarian window, go to the folder "Objects\Pack 2 - Realistic Buttons" and open the file "Down.png". It is loaded in an image document window, not an icon editor window, as shown below (![]() ):
):
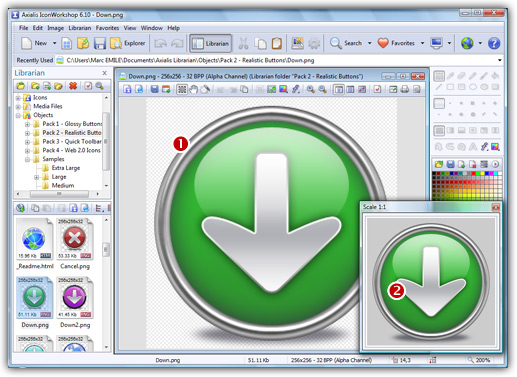
3. If the scale-1:1 preview window is not in 256x256 mode, the preview image will be cropped. It is recommended that you switch to 256x256 preview mode if you want to work with 256x256 Windows Vista™ icons. To switch to this mode, right-click in the preview window, a menu opens. Choose "256x256 Display". The preview window now looks as shown above in floating mode (![]() ).
).
Use the same method to return to the previous state: choose "128x128 Display", remove the "Floating Window" option and use the mouse to dock the window.
4. Select the whole image. Choose Edit/Select All or press Ctrl+A. An animated selection rectangle is now drawn around the image.
5. Choose File/Create Windows® Icon From Selection or press "I". A large dialog box opens. This dialog box will permit you to create all the image formats you want to include in your icon in one simple step:
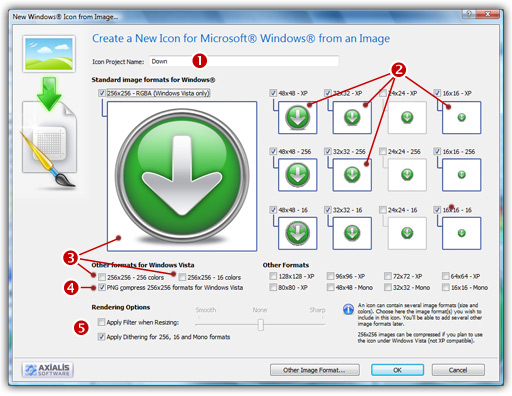
6. Type the Name of the new icon project (![]() ). The root of the image file is proposed by default.
). The root of the image file is proposed by default.
7. Select the images formats to include in the icon (![]() ) by clicking on the images. To create a Windows Vista™ icon, it is recommended that you follow the Windows Vista™ specifications as specified above. Don't forget to add the 256x256 vista formats in RGB/A (Windows® XP), 256 and 16 color modes (
) by clicking on the images. To create a Windows Vista™ icon, it is recommended that you follow the Windows Vista™ specifications as specified above. Don't forget to add the 256x256 vista formats in RGB/A (Windows® XP), 256 and 16 color modes (![]() ).
).
8. To create a fully-compliant Windows Vista™ icon, you'll need to compress the 256x256 formats in PNG. Select the associated option (![]() ).
).
9. You can also choose to apply the dithering option to the 256/16 color images as well as add a filter effect to smooth/sharpen the resulting images in RGB/A mode (![]() ). View the results in the preview images.
). View the results in the preview images.
10. When done, click OK. A new icon project is created in a document window:
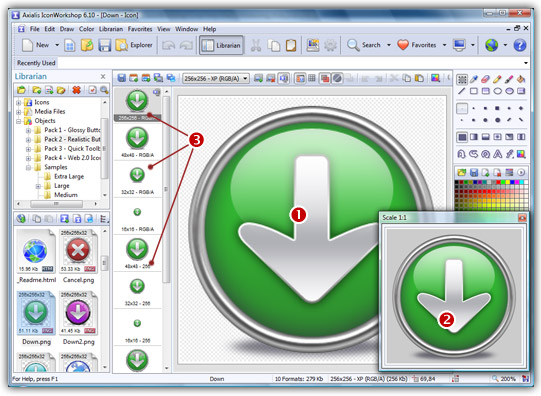
11. The main window with the grid (![]() ) is the edition area where you can retouch the icon. The gray chessboard-like texture behind the icon is the transparent portion of the icon (the alpha channel info has been preserved). The scale 1:1 preview is displayed in the associated window (
) is the edition area where you can retouch the icon. The gray chessboard-like texture behind the icon is the transparent portion of the icon (the alpha channel info has been preserved). The scale 1:1 preview is displayed in the associated window (![]() ).
).
12. All the available formats are displayed in a list (![]() ). You can select them to edit (
). You can select them to edit (![]() ) or preview (
) or preview (![]() ) them. See the application built-in help (press F1) to learn how to add/remove formats or work with this icon project.
) them. See the application built-in help (press F1) to learn how to add/remove formats or work with this icon project.
13. The compressed format (only the 256x256 formats can be compressed) are marked with this overlay PNG compression image: . You can add/remove this option by choosing Draw/Compressed Image Format (Windows Vista™) or by pressing "K". You can also use the local toolbar or a right-click menu.
14. When done, save the icon by choosing Edit/Save or pressing Ctrl+S. The resulting icon size is 150Kb.
![]()
![]() Related Topics
Related Topics