How to transfer an icon to a Macintosh® computer
With Axialis IconWorkshop™ you're able to create Macintosh® icons. To use them under Macintosh® OS, you need to transfer the files using a LAN (local area network)
What file format should I use to transfer an icon?
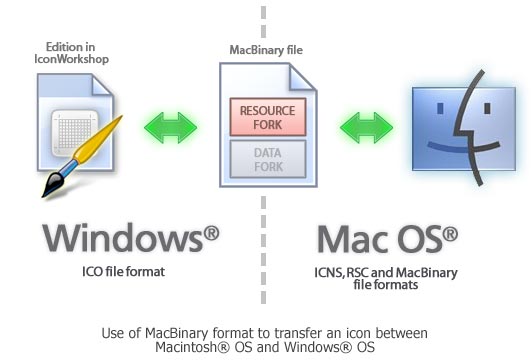
Under Macintosh® files are stored in 2 parts called "Forks". A fork can be empty but at least one must contain data. The two forks cannot be empty.
The Data Fork - This is the file itself, its contents. For example, in a text document, this the text.
The Resource Fork - This is the part that is used by Macintosh® OS to display the file in the Finder or the Desktop. Usually the resource fork contains an icon.
![]() When you simply transfer a file between Windows® and Macintosh®, the resource fork is lost. To transfer the 2 forks you need to use the MacBinary format.
When you simply transfer a file between Windows® and Macintosh®, the resource fork is lost. To transfer the 2 forks you need to use the MacBinary format.
To transfer an icon to Macintosh® you can either convert it to ICNS, RSC or MacBinary:
ICNS - This is the standard Macintosh® icon file format. Only one icon (with several formats) can be saved in this format. This format is the most commonly used.
RSC or RSRC - This is the Macintosh®resource file format. It is used mainly by developers. This format can contain several icons. IconWorkshopä support reading of RSC files with several icons but can write only RSC files with one icon.
MacBinary - This format permits to easily transfer files between Macintosh® and Windows®. For more information on this format, visit this website: http://en.wikipedia.org/wiki/MacBinary![]() .
.
![]()
We strongly recommend to use this file format to transfer your icons to Macintosh® because it is compatible with Macintosh® file system which separate each file in two parts called "forks": The data fork and the resource fork. The data fork contains the data included in the file (a text file for example). The resource fork contains the image or icon which permits to display it on screen. See below for more information on transfer from Windows® to Macintosh®.
Transfer an icon between Windows® OS and Macintosh® OS using MacBinary
To transfer and icon between Windows® and Macintosh®, the easiest method is to use the MacBinary format. This format permits to generate an icon compatible with the Macintosh® OS forks. Once transferred, the icon will be automatically displayed in the Macintosh® Finder and on the Desktop.
The MacBinary format permits to merge the 2 forks in one file handy for transfer, mail attachment or Web publishing. When IconWorkshopä saves an icon in MacBinary format, it writes the icon in the resource fork. The data fork is left empty. As a result, as soon as you receive or see the file in Macintosh®, the icon appears automatically. Then, you can handle it using the standard Finder/MacOS user interface.
In the following procedures, we'll use the MacBinary format to transfer an icon from Windows® to Macintosh®.
Transfer an icon to Macintosh® OS using a LAN (Local Area Network)
Before proceeding, be sure the Macintosh® and the Windows® computer are properly connected to the same LAN. The procedure below was done on Macintosh® OS 10.4 (Tiger).
On the Macintosh® computer
1. Click ![]() and select System Preferences. A window opens. In Internet & Network group, select Sharing. The following window opens:
and select System Preferences. A window opens. In Internet & Network group, select Sharing. The following window opens:
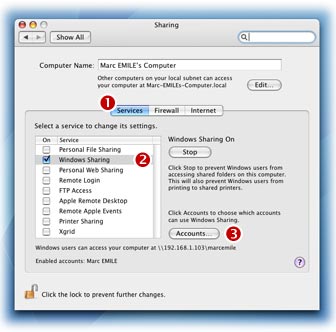
2. Select the Service tab (![]() ), in the list select Windows® Sharing service (
), in the list select Windows® Sharing service (![]() ).
).
3. If necessary, select the user accounts you want to activate (![]() ).
).
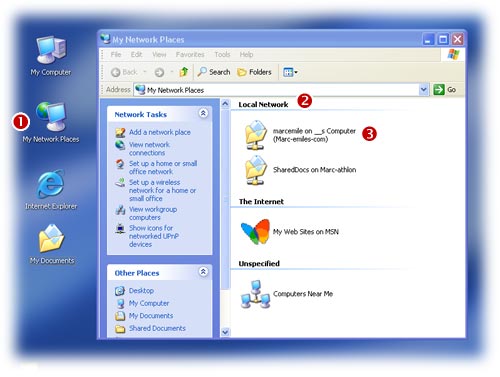
On the Windows® computer
4. Double-click in the icon My Network Places (![]() ). A window opens. In Local Network group (
). A window opens. In Local Network group (![]() ), open the folder which is related to your Macintosh® computer. Browse the folders and locate a target directory (
), open the folder which is related to your Macintosh® computer. Browse the folders and locate a target directory (![]() ).
).
5. In IconWorkshopä, save your Macintosh® icon as MacBinary in the folder that you have located above.
On the Macintosh® computer
6. Launch the Finder and browse the folder where you have saved the BIN file.
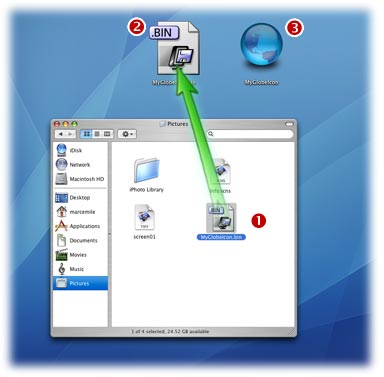
7. Use mouse Drag & Drop to copy or move the file on the Desktop (![]() ). Double click on the BIN file (
). Double click on the BIN file (![]() ), StuffIt Expander® is launched and the icon file is automatically created as resource fork on the Desktop (
), StuffIt Expander® is launched and the icon file is automatically created as resource fork on the Desktop (![]() ). Now you can use freely as a standard Macintosh® icon.
). Now you can use freely as a standard Macintosh® icon.