Normalize several icons (batch processing)
The normalization permits to format several icons in order to produce an uniform set. As a result, after normalization all the icons have the same image formats embedded. This feature is useful if you plan to distribute your icons.
We'll perform this task using the built-in IconWorkshop™ explorer.
Select the icons to normalize
1. Open a new File Browser window. Choose File/New/File File Browser...
2. When the window is opened, select the folder which contains the icons using the tree in the left pane.
3. When done, the files appear (with preview) in the right pane. Select the icons files you wish to normalize. You can use Shift/Ctrl + Mouse to select several files. Use Ctrl+A to select all. Use +/- to select/unselect by specifying filters.
Normalize the icons
4. Choose File Browser/Batch Normalize Icon Formats in Icons or Ctrl+Shift+N.
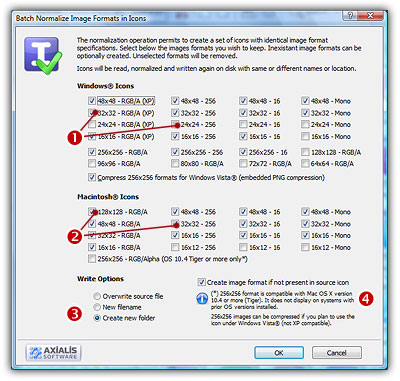
5. A dialog box opens. In "Windows® Icons" group, select the formats you want to include in the Windows® icons (![]() ). In "Macintosh® Icons" group, select the formats you want to include in the Macintosh® icons (
). In "Macintosh® Icons" group, select the formats you want to include in the Macintosh® icons (![]() ).
).
For each icon, the normalization rules are:
The selected formats are created if not present in the icon. In such a case, the largest and most coloured image format is used as source for the creation. This rule applies only if the option "Create image format if not present in source icon" is checked (![]() )
)
The unselected formats are removed if present in the icon.
5. In "Write Options" group (![]() ), choose one of the following options:
), choose one of the following options:
Overwrite source file - The original icon file is replaced by the normalized icon.
New filename - The normalized icon is created using a new filename (original filename plus an index number).
Create new folder - The filenames are identical but created in a new subfolder.
6. When done, click OK. The batch operation starts immediately, the hourglass mouse pointer is displayed during the creation. When done the normalized icons are created.