Save bitmap images for use in web sites
Once you have created or modified an image in IconWorkshop you may want to use it as illustration in a web site. The 2 most widely used image format on the web are GIF and JPEG.
Save the image as GIF
CompuServe GIF image format is widely used in Web pages because the majority of Web browsers recognize it. However this format has some limitations and images need to be optimized to meet Web requirements like size, colors and transparency:
GIF Images don't support partial transparency (alpha channel). It means that either a pixel is transparent, either it isn't.
GIF Images cannot contain more than 256 colors.
GIF Images support reduced palettes. Limited number of colors will result in smaller file but will produce lower image quality.
Axialis IconWorkshop™ permits you to save an image to GIF file formats preserving the transparency areas.
1. Once the image is opened in the IconWorkshop editor, choose File/Save As. The standard Windows save dialog box opens. In the "Save as Type" drop box, choose "CompuServe GIF". Specify the new name and location if needed and click Save.
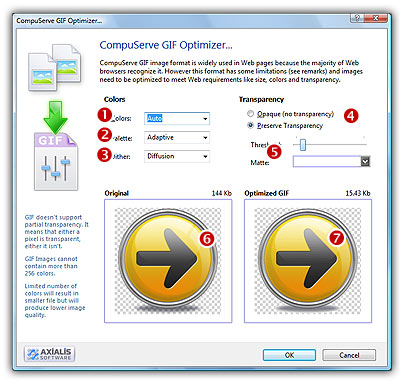
2. A dialog box CompuServe GIF Optimizer opens:
3. In Colors (![]() ), specify the number of colors you wish to use in the image palette. Limited number of colors will result in smaller file but will produce lower image quality. Choose "Auto" if you're not sure about desired the number of colors.
), specify the number of colors you wish to use in the image palette. Limited number of colors will result in smaller file but will produce lower image quality. Choose "Auto" if you're not sure about desired the number of colors.
4. In Palette (![]() ), choose the type of palette desired:
), choose the type of palette desired:
Adaptive - The palette will be calculated to get the best results possible (recommended).
Web Safe - This is the default Netscape® Web palette.
Windows - This is the default palette used under old Windows® versions in 256 color screen mode.
Macintosh® OS - This is the default palette used under old Macintosh® OS versions in 256 color screen mode.
5. In Dither (![]() ), choose "Diffusion" if you want IconWorkshop™ to simulate colors not present in the palette by pixel mixing using the "error diffusion" method. Choose "None" to encode the image without dithering. Diffusion produces the best results but usually creates slightly larger images.
), choose "Diffusion" if you want IconWorkshop™ to simulate colors not present in the palette by pixel mixing using the "error diffusion" method. Choose "None" to encode the image without dithering. Diffusion produces the best results but usually creates slightly larger images.
6. In Transparency (![]() ), specify if you want to preserve transparency or not. Of you choose opaque, the transparent areas of the icon will be converted to solid color (the "Matte" color). If you choose to preserve transparency and encodes your GIF file from a RGB/A images, you may need to adjust the "Threshold" value (
), specify if you want to preserve transparency or not. Of you choose opaque, the transparent areas of the icon will be converted to solid color (the "Matte" color). If you choose to preserve transparency and encodes your GIF file from a RGB/A images, you may need to adjust the "Threshold" value (![]() ) to produce better results on image edges.
) to produce better results on image edges.
7. In Preview, compare the original (![]() ) and the optimized (
) and the optimized (![]() ) images (image quality and size) to find the best adjustments possible.
) images (image quality and size) to find the best adjustments possible.
8. When done, click OK. The image file has been created.
Save the image as JPEG
JPEG image format is widely used in Web pages because the majority of Web browsers recognize it. This format is a commonly used method of compression for photographic images. The degree of compression can be adjusted, allowing a selectable tradeoff between storage size and image quality. JPEG typically achieves 10:1 compression with little perceptible loss in image quality. JPEG supports RGB images but does not support transparency.
1. Once the image is opened in the IconWorkshop editor, choose File/Save As. The standard Windows save dialog box opens. In the "Save as Type" drop box, choose "JPEG". Specify the new name and location if needed and click Save.
2. A dialog box JPEG Optimizer opens:
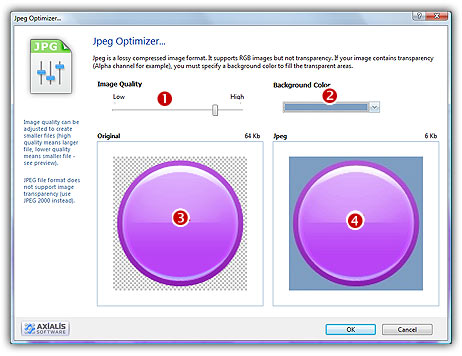
3. In Image Quality (![]() ), specify the quality required for the image. JPEG reduced the image size using a lossy compression. This means that the more the image is compressed, the more the quality is degraded. We recommend to find an optimal position for this setting by looking in the preview window (
), specify the quality required for the image. JPEG reduced the image size using a lossy compression. This means that the more the image is compressed, the more the quality is degraded. We recommend to find an optimal position for this setting by looking in the preview window (![]() ). The file size must be as small as possible while keeping a good image quality.
). The file size must be as small as possible while keeping a good image quality.
4. In Background color (![]() ), select the color used to fill the transparent areas. Use the preview window (
), select the color used to fill the transparent areas. Use the preview window (![]() ) to see the final result before saving.
) to see the final result before saving.