Use an Icon Project Template to create an icon
Before reading this topic, we recommend to learn how the Photoshop® templates work.
The Icon Project Templates (numbers 7 to 10) permit you to create 2 or 3 images of your icon (depending on the template you choose). Each image is designed to match the level of details required for large, medium and small sizes. During the export, the formats are created according to the XML descrition file. Usually, image formats in project templates are created using the following guidelines:
• 1st Image (256x256) --> Formats 256x256, 128x128 to 72x72 : Image in perspective with details, light effects and shadows.
• 2st Image (192x192) --> Formats 64x64 to 24x24 : Image in perspective with a few details, limited light effects and shadows. A border is added to enhance visibility.
• 3rd Image (128x128) --> Format 16x16: Flat image without details and large borders.
By default, 10 templates are included in IconWorkshop, 4 of them are project icon templates (numbers 7 to 10):
|
7. Windows Project (2 Sizes)
8. Windows Project (3 Sizes)
|
9. Macintosh Project (2 Sizes)
10. Macintosh Project (3 Sizes)
|
Tutorial: Create a Windows Vista™ icon using a 3-image Icon Project Template
In this tutorial we'll create an icon using a professional method. We've seen in previous topic that basic icon templates require to draw all the formats of the icon to get the best results. Using Icon Project Templates, you draw 2 or 3 versions of your icon (depending on the template you use) and IconWorkshop automatically creates the icon formats using pre-defined rules.
For exemple, the template "Windows® Project (3 Sizes)" lets you draw 3 images. Use the recommended guidelines below to draw the images. Then, IconWorkshop creates each format of the icon accordingly:
| |
Original Template Image
|
Drawing Guidelines
|
Created Icon Sizes
|
| |
 |
| |
256x256
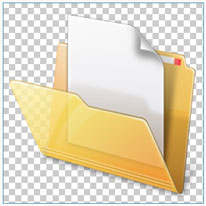 |
Image in perspective with details, light effects and shadows.
|
256x256, 128x128
|
| |
|
| |
192x192
 |
Image in perspective with a few details, limited light effects and shadows. Add larger borders to enhance visibility
|
64x64, 48x48, 32x32, 24x24
|
| |
|
| |
128x128
 |
Flat image without details and a large border.
|
16x16
|
| |
|
This is an advanced method for creating icons but this is the one which produces the most professional results. The final icon contains hi-res images for operating systems which support them such as Windows Vista™ or MacOS 10.4/10.5. It contains also smaller images which are easily identifiable by the user in all resolutions.
Note that the small sizes are generated from larger original images. For exemple, the 16x16 size is created from a 128x128 image (ratio 8:1). This permits an easier drawing experience and produce better results.
In the procedure below, we'll create a fully featured Windows Vista™ icon of the image "Folder With Document" that we've already used above.
1. First, be sure the Photoshop® plug-in has been installed (see topic above). Choose File/New/Icon Project from Photoshop Template/Windows Project (3 Sizes)
2. Adobe Photoshop® opens and a new document is created. Its name is "IW-Template-008 copy":
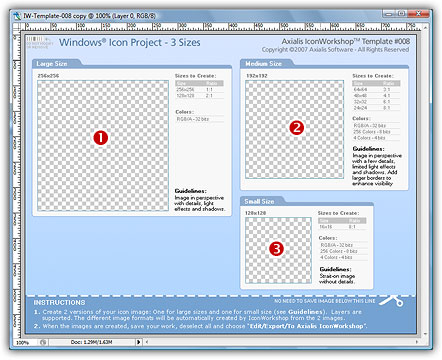
The figure above shows the document window as it has been created in Photoshop®. It contains 3 drawing areas where you'll draw the 3 images of your icon: the large size 256x256 ( ), the medium size 192x192 (
 ) and the small size 128x128 (
 ).
).
From here, you can simply draw your 3 images in the associated zones and go directly to step 7. If you don't want to draw and prefer to use read-to-use sample images, follow steps 3 to 6.
3. Open the file "[Axialis Librarian]\Objects\Samples\Large\Folder With Document.png". We mean by [Axialis Librarian] the folder where is stored the Axialis Librarian (usually in the My Documents folder).
You can also do this directly from IconWorkshop™: in the Librarian, open the folder "Objects\Samples\Large", right-click on the file "Folder With Document.png". A menu opens, choose "Open With/Adobe Photoshop®". The file is opened in a Photoshop document window.
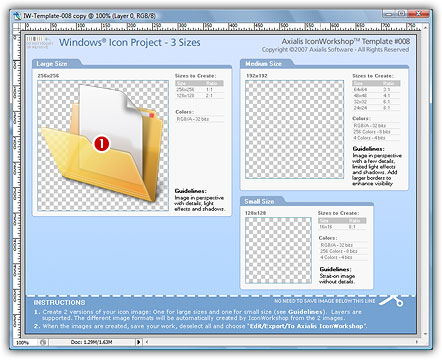
4. Copy/Paste the image of the Folder with Document into the Template (a new layer is created), select it. Move the image in the 256x256 drawing area. The resulting image should be perfectly adjusted inside the transparent square (), not over the borders (which will not be exported). The resulting image should look like this:
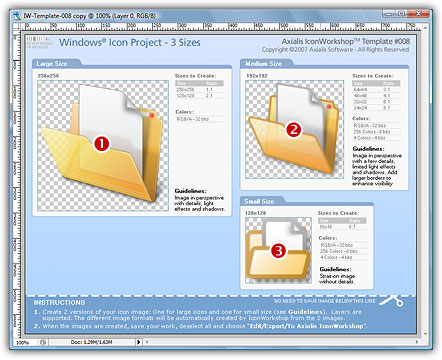
5. Repeat the procedure for the file "[Axialis Librarian]\Objects\Samples\Medium\Folder With Document.png". Move it into the drawing area 192x192 ().
6. Repeat the procedure for the file "[Axialis Librarian]\Objects\Samples\Small\Folder With Document.png". Move it into the drawing area 128x128 (). See below the resulting document window:
7. Now let's create the icon: In Photoshop, choose File/Export/Export to Axialis IconWorkshop. The template is automatically recognized by IconWorkshop and the icon is created with all the formats as described in the template ():
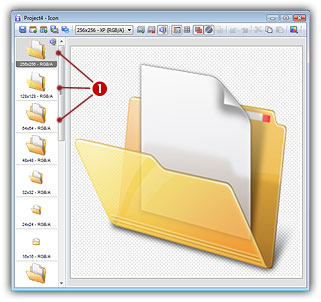
8. Various image formats have been created. Simply remove the formats you don't wish to include in your icon. Save the icon.
9. Once you have finished to work on an icon template, we recommend you to save the document using the PSD format. This will permit to work again later on the project, preserving all your layers and effects you may have added.