Add transparency to an opaque image
Transparency is important when using sprites in screensavers. It permits to display a sprite over a background image without fully hiding it. Parts of the background image are visible through the transparent areas of the sprite. Transparency can be total (1-bit mask, in GIF for example) or partial (8-bit mask, a.k.a Alpha Channel, in PNG or JPEG2000 for example). Partial transparency (RGB/Alpha Channel) produces better results when displaying sprites.
The following image formats support transparency: Photoshop® PSD, PNG, RGB, JPEG 2000 and WMF. GIF support only total transparency. Axialis Screensaver Producer permits to convert images to 32 BPP (RGB/Alpha Channel) which is much more convenient to create sprites.
Add transparency to your image
1. Open your image. Choose the "Create Transparent Areas" Mode: ![]() or press "T". Click in the areas where you want to create transparency.
or press "T". Click in the areas where you want to create transparency.
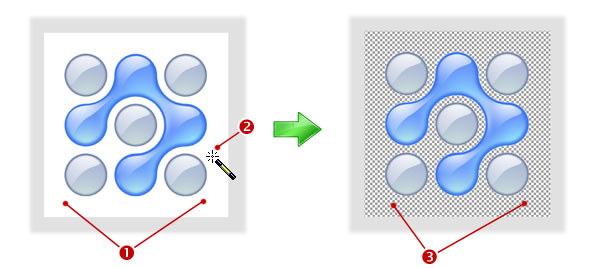
4. For example, the illustration below shows the image "Cursors\Tutorials\Arrow Add - Opaque.png". It is an RGB file without alpha channel, so it does not contains transparency. The background is white (![]() ) and fully opaque. If you create a cursor from this image, it will create a white square around the final cursor, which is not the result we expect.
) and fully opaque. If you create a cursor from this image, it will create a white square around the final cursor, which is not the result we expect.
5. In Transparent Area mode, click in the white background (![]() ). It is automatically converted to a transparent area (the grey chessboard texture
). It is automatically converted to a transparent area (the grey chessboard texture ![]() ). You can repeat the operation to create a sharper frontiere around the pointer:
). You can repeat the operation to create a sharper frontiere around the pointer:
![]() When you create a transparent area, the image is automatically converted in 32-bit color depth (RGB / Alpha Channel).
When you create a transparent area, the image is automatically converted in 32-bit color depth (RGB / Alpha Channel).