Specify the Flash movie
A Flash screensaver can play only one movie. You just have to specify it in the project. Several methods are available though.
Specify the movie from the project window
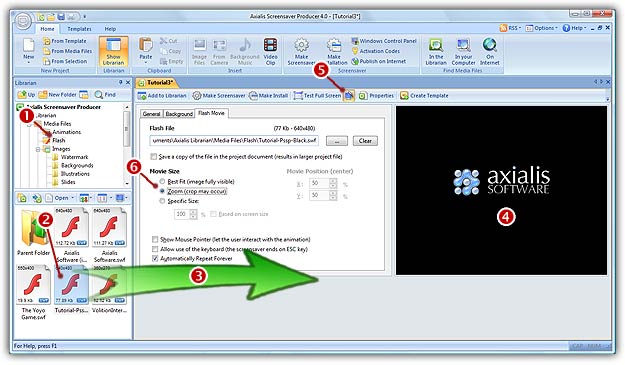
1. Activate the Screensaver Document window.
2. In the Flash Movie dialog box (click the tab if necessary), click on the [...] button. A standard Windows dialog box opens to let you choose the Flash movie file you want to use. Browse your disks, select a file and click Open.
3. The full pathname is added in the Flash File field and you see the movie in the Preview window.
4. If the Save a copy of the file in the Project Document option is checked, the video file will be stored in the Screensaver project (not recommended for large files).
If you check this option, the animation file will be included into the Screensaver file when saved. This option is useful because the animation file doesn't need to be present on your hard disk the next time you'll open the SSP document. The drawback is that the SSP file is larger and space consuming.
If you uncheck this option, the animation file will NOT be included into the Screensaver file when saved. The SSP file is smaller but the video file must be present on your hard disk (at the right location) or you'll get an error the next time you'll open the SSP document.
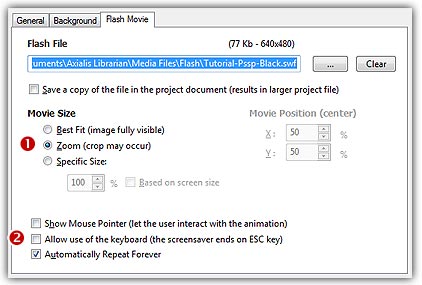
7. In the Movie Size group (![]() ):
):
If you check Best Fit, the Flash movie will be adjusted to the full screen size preserving its original aspect ratio. Using this option, the movie is fully visible. The background may be visible on some screens with different aspect ratios.
If you check Zoom, the Flash movie will be adjusted to the full screen size preserving its original aspect ratio. Using this option, the movie may be cropped on some screen with different aspect rations. The background is never visible.
If you check Specific Size, the Flash movie is displayed at a size based on its original dimensions. The aspect ratio is preserved. In the field below specify the display factor in percents. If you check this option, you can also specify the location of the Flash movie on screen (see below). If you check Based on screen size, the display size is based on the screen size in percent (recommended less that 100%).
5. In the Movie Position group (enabled if you have chosen "Specific Size"):
In the X area, enter here the X coordinate of position of the animation windows on screen (0 means the left side of the screen). This value indicates the position of the center of the animation window.
In the Y area, Enter here the Y coordinate of position of the animation windows on screen (0 means the top of the screen). This value indicates the position of the center of the animation window.
6. If you check Show Mouse Pointer option, the mouse pointer will be visible on screen and the user will be able to interact with the screensaver using the mouse (moves and clicks). The screensaver won't stop on mouse events. A key press will be required to end the screensaver.
7. If you check Allow Use of the Keyboard option, the user will be able to interact with the screensaver using the keyboard (a Flash game for example). Only the ESC key will end the screensaver.
8. If you check Automatically Repeat Forever option, it allows to specify an animation that will be played over and over.
Add a Flash file using Drag & Drop
1. Go to the librarian, expand Media Files and select the Animation folder (![]() ) .
) .
2. Select a Flash file (![]() ) then drag and drop it (
) then drag and drop it (![]() ) to the Screensaver document window:
) to the Screensaver document window:
4. In Flash File field you see the full pathname to the file. Check that this is the correct file.
6. Be sure that you have the Animated Preview option enabled (![]() ). You see the movie in the Preview window (
). You see the movie in the Preview window (![]() ).
).