Install the Adobe Photoshop Plug-in
Using the Adobe Photoshop plug-in, you'll be able to transfer an image or a drawing directly from Photoshop (or any plug-in compatible application) to Screensaver Producer through the memory. Read this topic for more info about the plug-in...
Install the Photoshop plug-in
1. Before installing the plug-in we recommend to close the Photoshop® application (if it is opened in background). Choose File Menu/Install/Adobe Photoshop Plug-in...
2. The dialog box Install the Photoshop Transfer Plug-in opens (see below). In the Location edit zone (![]() ), specify the Photoshop plug-in folder. If you don't know the exact folder path, click the browse button (
), specify the Photoshop plug-in folder. If you don't know the exact folder path, click the browse button (![]() ) to choose the folder in a list.
) to choose the folder in a list.
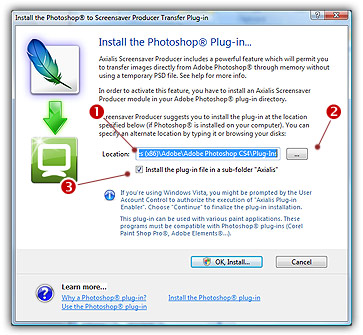
3. If you want to create a subfolder "Axialis" to install the plug-in module (recommended to organize your folder properly), activate the option "Install in a subfolder Axialis" (![]() ). Note that creating a subfolder may fail with some compatible applications.
). Note that creating a subfolder may fail with some compatible applications.
4. Click OK. When done, a message informs you that the plug-in has been installed.
5. Now you can start your Photoshop® application. The plug-in is visible in File/Export/Export to Screensaver Producer menu.
![]() You can install the Plug-in in various other compatible applications. See your application help file for more info on how to proceed. If Photoshop® is installed on your computer, the plug-in folder will be automatically added to the edit zone.
You can install the Plug-in in various other compatible applications. See your application help file for more info on how to proceed. If Photoshop® is installed on your computer, the plug-in folder will be automatically added to the edit zone.
Notes Photoshop CS4 users
• If you have recently installed Photoshop CS4, you must re-install the plug-in (a CS4-compatible version is required).
• The plug-in is compatible with versions x32 and x64 of Photoshop CS4.
• If you install the plug-in in the folder of Photoshop CS4 x64, only the 64 bit version will be installed.
• If you install the plug-in in the folder of Photoshop CS4 x32, you'll be prompted to install the x64 version as well.