Lesson 1.4 - Adding a moving sprite
In this lesson, we'll add sprites that move on screen. We'll also learn how to configure the sprite to make it bounce on the screen borders.
Adding and placing the sprite
1. In the Librarian window, select the "Media Files\Images\Sprites" folder (![]() ). The files contained in this folder are displayed in the list below.
). The files contained in this folder are displayed in the list below.
2. Select the file "Sphere-blue.png" in the list (![]() ) and use a mouse drag & drop to put the file in the edit area (
) and use a mouse drag & drop to put the file in the edit area (![]() ). Place it in the upper-right corner of the screen at location [490, 100]. The sprite is added in the project and displayed at scale 1:1 (see below). Also, you can see it in the sprite list (
). Place it in the upper-right corner of the screen at location [490, 100]. The sprite is added in the project and displayed at scale 1:1 (see below). Also, you can see it in the sprite list (![]() ).
).
TIPS: To know the exact location of a sprite, look at the bottom of the main application window. On the right side of the status bar, you'll see a coordinate indicator (![]() ). Near this indicator is displayed the exact location of the sprite. You can finely adjust a sprite location by using the keyboard arrow keys. You can also specify the exact location by opening the Properties dialog box (Alt+Enter), select the Size & Position tab and set X and Y in the Absolute Position group.
). Near this indicator is displayed the exact location of the sprite. You can finely adjust a sprite location by using the keyboard arrow keys. You can also specify the exact location by opening the Properties dialog box (Alt+Enter), select the Size & Position tab and set X and Y in the Absolute Position group.

Specifying sprite motion parameters
3. Now we're going to make the sprite move on screen. Double-click on the sprite in the list (![]() ), see below. A dialog opens. Select the Motion tab if necessary.
), see below. A dialog opens. Select the Motion tab if necessary.
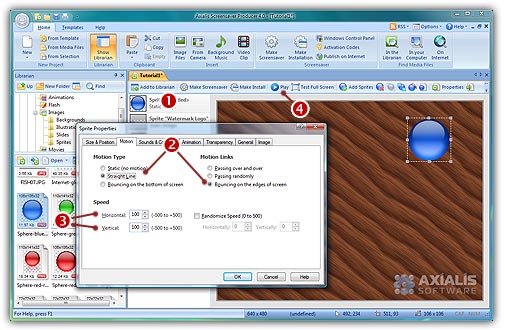
4. Choose Straight Line and Bouncing on the edges of the screen options (![]() ). The first option indicates the type of motion for this sprite. It will move in straight line. The second option we've set will make the sprite bounce each time it will encounter a screen border. Of this option is not set, the sprite continue its path disappearing under the screen border and reappearing on the opposite side.
). The first option indicates the type of motion for this sprite. It will move in straight line. The second option we've set will make the sprite bounce each time it will encounter a screen border. Of this option is not set, the sprite continue its path disappearing under the screen border and reappearing on the opposite side.
5. Now we'll set the direction and speed of the sprite. We can do this by specifying 2 values: The Horizontal and Vertical speeds. By choosing these values (from -500 to +500) we can specify any speed and direction. For the horizontal speed, a negative value makes the sprite move left, a positive value makes it move right. For the vertical speed, a negative value makes the sprite move down, a negative value makes it move up.
Specify -100 in Horizontal speed and +100 in Vertical speed (![]() ).
).
6. When done, click OK. The sprites does not move, nothing has visually changed. This is because the project is in "Stopped" state. The sprites are displayed at their original locations (with resize handles around the selected sprite. To see it move in the edit window, switch to "Play" mode by clicking on the Play/Pause button (![]() ). Do you like what you see? Congratulations, you've made your very first screensaver!
). Do you like what you see? Congratulations, you've made your very first screensaver!
REMARK: In "play" mode (![]() ), the sprites are moving on screen but you cannot adjust them (size and position). You can select them by clicking on them while they're moving but you cannot change their original position and size. Return to "Stopped" mode to do so.
), the sprites are moving on screen but you cannot adjust them (size and position). You can select them by clicking on them while they're moving but you cannot change their original position and size. Return to "Stopped" mode to do so.
7. We can take a look at the result full screen. Press F11 or click the Test Full Screen button in the toolbar. The screensaver is executed full screen. Press a key or move the mouse to end the full screen test.
Specifying sprite general information
8. Like we did in the previous lesson, the last operation to do is perform is to specify some information in the sprite properties. Double-click on the sprite in the list (![]() ), see above. A dialog box opens, select the General tab. In the Name field, specify a short name for the sprite: "Blue Sphere". This name will be displayed in the sprite list. Also, specify a Description of the sprite in the field below.
), see above. A dialog box opens, select the General tab. In the Name field, specify a short name for the sprite: "Blue Sphere". This name will be displayed in the sprite list. Also, specify a Description of the sprite in the field below.
![]() Exercises
Exercises
Repeat the procedure with the image file "Sphere-green.png". Place it in the lower-left corner of the screen at location [150, 380]. Specify a straight line path bouncing on the edges of the screen. Specify horizontal speed to +100 and vertical speed to -100. Name this sprite "Green Sphere".
Do the same exercise with the image file "Sphere-red.png". Place it in the upper-left corner of the screen at location [150,100]. Specify a straight line path bouncing on the edges of the screen. Specify horizontal speed to +100 and vertical speed to +100. Name this sprite "Red Sphere".
Test your screensaver project full screen.
Lesson 5 - Adding an animated sprite