Lesson 3.1 - Creating the new project
In this lesson we'll create a new Flash® based screensaver project and take a look at the editor window.
Create the project
1. Choose File Menu/New or click the New button in the Ribbon toolbar, a dialog box opens. Select the "Slideshow Based Screensaver" type in the list and click Next.
2. Specify the Screensaver Title: "Tutorial3". Also specify your own Description, Author Name, Copyright information and click Next.
A quick tour of the slideshow screensaver project editor window
3. A new project window opens:
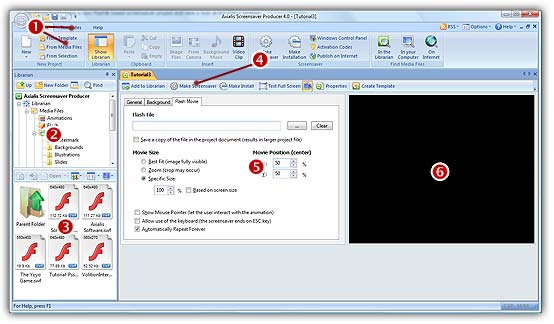
4. In the Application window (![]() ) you see the menu and the main toolbar. This toolbar can be customized by double-clicking or right-clicking on it. When you select a command in this menu or main toolbar, it acts on the selected item or window.
) you see the menu and the main toolbar. This toolbar can be customized by double-clicking or right-clicking on it. When you select a command in this menu or main toolbar, it acts on the selected item or window.
5. In the Librarian (![]() ) you can select the folder that contains the media files (images, animations, music, sounds) that you'll use in your project (
) you can select the folder that contains the media files (images, animations, music, sounds) that you'll use in your project (![]() ).
).
6. The Project document window is named "Tutorial3" (![]() ). The application is multi-document enabled. It means that you can create or open several documents in the working area of the application. A local toolbar is located in the document window. If you click on a button in this toolbar (
). The application is multi-document enabled. It means that you can create or open several documents in the working area of the application. A local toolbar is located in the document window. If you click on a button in this toolbar (![]() ), it acts on the selected item in the document window. This toolbar cannot be customized.
), it acts on the selected item in the document window. This toolbar cannot be customized.
7. The Document window is divided in two parts. In the left side (![]() ) are located the edit dialog boxes that you'll use to set project and slide properties. It is composed of 3 windows that you can activate by clicking on the associated tabs: General, Background and Flash Movie. In the right side (
) are located the edit dialog boxes that you'll use to set project and slide properties. It is composed of 3 windows that you can activate by clicking on the associated tabs: General, Background and Flash Movie. In the right side (![]() ), a preview window is available.
), a preview window is available.
Lesson 2 - Defining the background