Lesson 1.1 - Creating the new project
Before starting this Quick Tutorial, we recommend you to read the two following topics: What is a Screensaver? and The User Interface.
In this lesson we'll create a new sprite based screensaver project and take a look at the editor window.
Creating the project
1. Choose File Menu/New or click the New button in the Ribbon toolbar, a dialog box opens. Select the "Sprite Based Screensaver" type in the list and click Next.
2. A 2nd dialog box opens. Select the optimal screen size of your screensaver. This size will be used during the screensaver creation. The screensaver will be resized to match the screen resolution of the end-user's screen at runtime. This option cannot be changed later. Select 640x480.
3. Select the type of background you wish for the screensaver. This option can be changed later during the screensaver edition. Select Color Gradient and keep the proposed blue gradient. When done, click Next.
4. A 3rd dialog box opens which permits adding sprites. For this tutorial we won't add any initial sprite, so click Next.
5. A 4th dialog box opens. Specify the Screensaver Title: "Tutorial1". Also specify your own Description, Author Name, Copyright (![]() ) information and click Finish.
) information and click Finish.
A quick tour of the screensaver project editor window
6. A new project window opens:
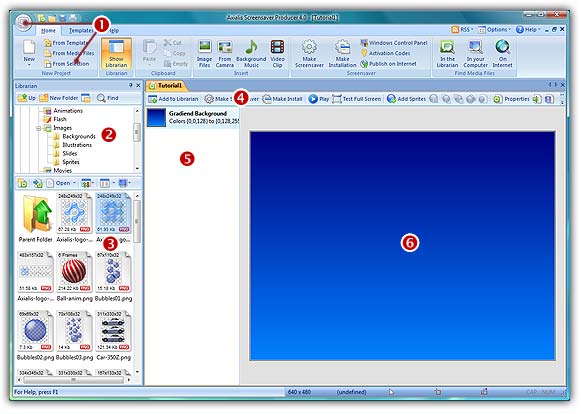
7. In the Application window (![]() ) you see the File File Menu and the Ribbon toolbar. When you select a command in this menu or toolbar, it acts on the selected item or window.
) you see the File File Menu and the Ribbon toolbar. When you select a command in this menu or toolbar, it acts on the selected item or window.
8. In the Librarian (![]() ) you can select the folder that contains the media files (images, animations, music, sounds) that you'll use in your project (
) you can select the folder that contains the media files (images, animations, music, sounds) that you'll use in your project (![]() ).
).
9. The Project document window is named "Tutorial1" (![]() ). The application is multi-document enabled. It means that you can create or open several documents in the working area of the application. A local toolbar is located in the document window. If you click on a button in this toolbar (
). The application is multi-document enabled. It means that you can create or open several documents in the working area of the application. A local toolbar is located in the document window. If you click on a button in this toolbar (![]() ), it acts on the selected item in the document window.
), it acts on the selected item in the document window.
10. The Document window is divided in two parts. On the left side (![]() ), you see the list of sprites included in the project (actually no sprite) as well as a Background properties element. Sprites you'll add in the project will be added in this list. Each sprite is placed in an invisible layer so that sprites on top of the list overlap sprites that are placed below. Sprite order can be rearranged by drag & drop (in the list) but the background element is always placed at the bottom.
), you see the list of sprites included in the project (actually no sprite) as well as a Background properties element. Sprites you'll add in the project will be added in this list. Each sprite is placed in an invisible layer so that sprites on top of the list overlap sprites that are placed below. Sprite order can be rearranged by drag & drop (in the list) but the background element is always placed at the bottom.
11. On the right side (![]() ), you see the editor area. Actually you see the default background (it can be customized). Also, this area is WYSIWYG enabled. It means "What You See Is What You Get". Each sprite is visible and moves in this area the same way it will move in the final screensaver. But that's not all. You can also modify the sprites in this area using your mouse. It is a real editor window, not only a preview window.
), you see the editor area. Actually you see the default background (it can be customized). Also, this area is WYSIWYG enabled. It means "What You See Is What You Get". Each sprite is visible and moves in this area the same way it will move in the final screensaver. But that's not all. You can also modify the sprites in this area using your mouse. It is a real editor window, not only a preview window.
This editor window as well as all values used in the project (coordinates, speeds) are based on the size of the project. In our case, the size of the project is 640x480: [0,0] in the upper-left corner and [639,479] in the lower-right corner.
12. At the bottom of the main window, you see some important informations about the project (mouse coordinates, sprite size...).
Lesson 2 - Defining the background