Create a new Macintosh® icon project
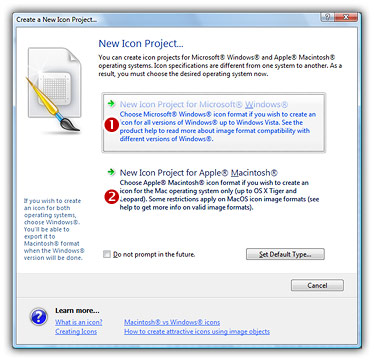
When you create a new icon project, you first select the type of the icon which is either Windows® or Macintosh®. The second step is to choose the first image format you wish to include in the icon. An icon contains several image formats. Usually you start to create the largest one then create the others from this one.
Choosing the icon project type
1. Choose File/New/Icon Project or press Ctrl+N. A new dialog box opens:
2. Axialis IconWorkshop™ support both Windows® and Macintosh® icons (see format comparison to learn more). Select the Apple Macintosh® (![]() ) option.
) option.
Defining the first image format
If you have chosen to create a Macintosh® icon project, a second dialog box opens. An icon can contain several image formats (size and colors). In this dialog, you specify the properties of the first image format you wish to include in this icon. You'll be able to add several other image formats later. See Creating a new image format in an icon.
3. In Project Name (![]() ), type the name of the project without extension.
), type the name of the project without extension.
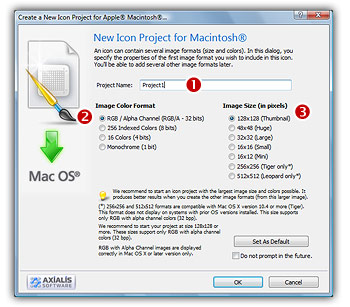
4. In the Colors group (![]() ), choose:
), choose:
RGB Alpha Channel (RGB/A - 32 bits). Uses true colors to get the best results. This format will be used only if the icon is displayed under Macintosh® OSX. It uses an additional alpha channel to create smooth shades and object borders. We strongly recommend you to start creating an icon with this color mode
256 Indexed colors (8 bits): Uses a fixed 256 color palette.
16 colors (4bits): Uses the system standard palette (16 static colors). This is the native Windows® mode.
Monochrome (1 bit): Uses only 2 colors (black and white).
5. In the Size in Pixels group (![]() ), choose:
), choose:
16x16, 24x24, 32x32, 48x48, 128x128... 256x256 is used under Macintosh® OSX 10.4 (Tiger) or more only.
![]() An icon can contain several image formats (size and colors). In this dialog, you specify the properties of the first image format you wish to include in this icon. You'll be able to add several other image formats later. See Creating a new image format in an icon.
An icon can contain several image formats (size and colors). In this dialog, you specify the properties of the first image format you wish to include in this icon. You'll be able to add several other image formats later. See Creating a new image format in an icon.
6. If you want to use default settings for new icon with current dialog settings, click Set As Default. This is useful if you have chosen not to be prompted (with this dialog box) when creating a new icon.
7. You can ask Axialis IconWorkshop™ to bypass the new icon dialog box. Choose Do not prompt in the Future or choose Edit/Preferences and in General tab, check "Create a new icon project window" option. In this case the new icon will always have the default settings.
![]() We recommend you to start with the largest and most coloured image you plan to include in the icon. For example 48x48 RGB/A
We recommend you to start with the largest and most coloured image you plan to include in the icon. For example 48x48 RGB/A