How to create attractive icons using image objects
Graphics are among the primary ways of advertising the sale of goods or services. This is true for computing when designing software icons or website interfaces. The primary solution is to draw icons using either an image or vector editor. Then, when the image is done, use Axialis IconWorkshop™ to convert this image to an icon. Also, if you don't want to use an external image editor, Axialis IconWorkshop™ contains some drawing tools that permit you to draw your own icons. But most of us are not graphic designers and we have a problem when it comes to create attractive icons or web graphics.
The question is: "How to create attractive custom icons without drawing skills?" Image Objects are the answer.
The solution is to use a set of image objects already done by a skilled computer graphic artist, and assembling them together to create a final artwork that will match your needs. Using a set of existing image objects the possibilities are almost infinite. You can create many different icons or graphics simply by adjusting various parameters of each object like Hue (teint), Saturation, Brightess, Contrast, Size, Opacity and more.
For example, using 6 image objects from our Glossy Buttons object pack, you can easily create an attractive help icon:
![]()
This association can be easily done with Axialis IconWorkshopä using a few mouse clicks and drag-and-drops. Creating different versions of an icon is very easy with this pack. See below some examples of the help icon made in a few minutes simply using the mouse and without drawing one pixel (non-exhaustive list of course!):

Object Packs are libraries containing a large number of image objects made by a professional designer. We regularly publish new objects packs that you can download on Internet. To create your icons, you just have to assemble basic objects together. See below examples of icons made using the Glossy Objects pack:
![]()
To get more information on Image Objects and Packs, we recommend you to read these topics:
![]() Downloading Object Packs from Internet
Downloading Object Packs from Internet
![]() To follow this tutorial, you need to have the "Glossy Buttons" object pack installed in the librarian. Search the Librarian for the folder "Objects\Pack 1 - Glossy Buttons"). This pack is included in Axialis IconWorkshop 6.0 or more. If you can't find the folder, download the "Glossy Buttons" pack from Internet.
To follow this tutorial, you need to have the "Glossy Buttons" object pack installed in the librarian. Search the Librarian for the folder "Objects\Pack 1 - Glossy Buttons"). This pack is included in Axialis IconWorkshop 6.0 or more. If you can't find the folder, download the "Glossy Buttons" pack from Internet.
Defining, Creating the Icon Project
Before using the image objects, we need to create a new icon project. An icon contains several image formats (see "What's an Icon?") so we need to define all these formats before going on.
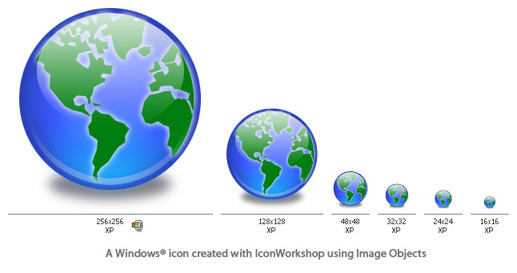
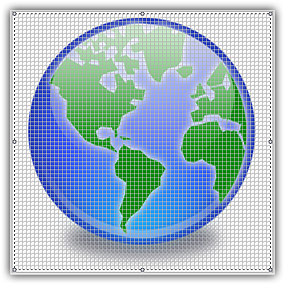
We'll create an icon compatible with Windows Vistaä (256x256 format), Windows® XP; (48x48, 32x32, 24x24 and 16x16 formats) and Dock Bar![]() applications (128x128 format). To simplify the project, we won't add indexed color formats (256, 16 colors). Using the objects we'll make a "Glossy Earth" icon with bottom shadow. The resulting icon will look like this:
applications (128x128 format). To simplify the project, we won't add indexed color formats (256, 16 colors). Using the objects we'll make a "Glossy Earth" icon with bottom shadow. The resulting icon will look like this:
The largest image format is 256x256 XP (ie RGB with alpha channel). To get the best results, we'll start the project with this new format and work with it to assemble the objects. When finished, we'll create all the other formats using this 256x256 format as template. Let's create our new icon project:
1. Launch Axialis IconWorkshop™. Choose File/New/Windows® Icon Project or press Ctrl+W. A dialog box opens:
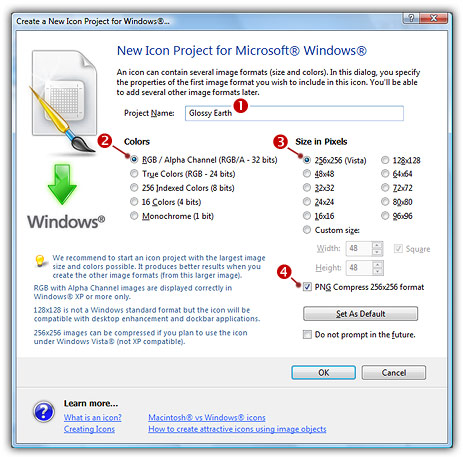
2. Type the name of the project (![]() ): "Glossy Earth".
): "Glossy Earth".
3. Now specify the format of the first image to add in the project: In Colors, choose "Windows ® XP with Alpha Channel (RGB/A 32 bits)" (![]() ). In Size in Pixels, choose and "256x256 (Windows Vista™)"Glossy Earth" (
). In Size in Pixels, choose and "256x256 (Windows Vista™)"Glossy Earth" (![]() ).
).
4. As we want the 256x256 format to be used under Windows Vista™, we choose to compress it as PNG: Click the option "Compress 256x256 Windows Vista™ format" (![]() ). To learn more about Windows Vistaä icons, read this article: "Introducing Windows Vista™ Icons".
). To learn more about Windows Vistaä icons, read this article: "Introducing Windows Vista™ Icons".
5. When done, click OK. A new icon project window is created (![]() ):
):
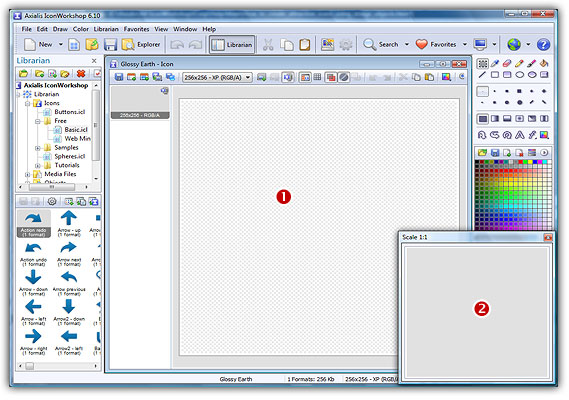
6. If the scale-1:1 preview window is not in 256x256 mode, the preview image will be cropped. It is recommended that you switch to 256x256 preview mode to work with 256x256 Windows Vista™ icons. To switch to this mode, right-click in the preview window, a menu opens. Choose "256x256 Display". The preview window now looks as shown above in floating mode (![]() ).
).
Use the same method to return to the previous state: choose "128x128 Display", remove the "Floating Window" option and use the mouse to dock the window.
Building the Icon Using Image Objects
This is the most important part of the project. The time has come to be creative! No problem it's easy and fun with IconWorkshopä. Before we start, don't forget that each step of the creation can be undone/redone (Ctrl+Z/Ctrl+Y) up to 16 steps back.
7. In the Librarian window (choose View/Librarian if it is not visible), select the "Objects/Pack 1 - Glossy Buttons/Circle" folder (![]() ). A list of available object is displayed in the contents window below (
). A list of available object is displayed in the contents window below (![]() ). Find the "Circle - Blue.png" file and select it (
). Find the "Circle - Blue.png" file and select it (![]() ).
).
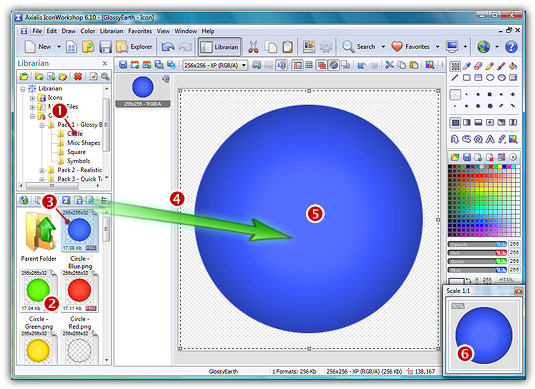
8. When done, use a mouse Drag-and-Drop to add it into the project as shown above (![]() ). The object is added to the project as a floating selection (
). The object is added to the project as a floating selection (![]() ). Take a look at the quality of the artwork in the Scale 1:1 window (
). Take a look at the quality of the artwork in the Scale 1:1 window (![]() ).
).
Congratulation! you've just added your first image object to your project! As you can see it's very easy and intuitive. Now let's continue and add other objects to build the icon.
![]() IMPORTANT - To follow the next steps, the "Preserve Transparency" option must be set (press "T" or select Draw/Preserve Transparency). If this option is not set, the transparency will not be kept each time you add a new image object and the objects already added will be fully replaced.
IMPORTANT - To follow the next steps, the "Preserve Transparency" option must be set (press "T" or select Draw/Preserve Transparency). If this option is not set, the transparency will not be kept each time you add a new image object and the objects already added will be fully replaced.
9. From the Librarian, select the file "Circle Inner Light.png" and add it to the project using the same method. The resulting image now includes a cyan light effect as shown below:
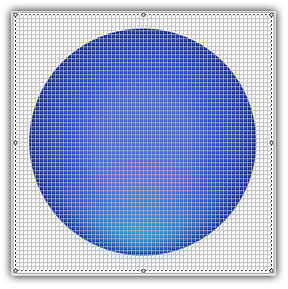
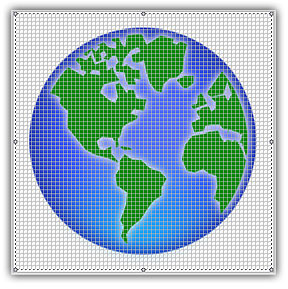
10. To create the Earth image, we now add the map object. From the librarian, select the file "World Map.png" and add it to the project using the same method. The resulting image looks like below:

11. The result is good but we want to make it even better. We can increase the realism by changing the color of the map to green. To do so, IconWorkshopä has a feature to adjust the Hue/Saturation/Brightness of an image. Choose Draw/Adjustments-Effects/Hue-Saturation or press "U". A dialog box opens:
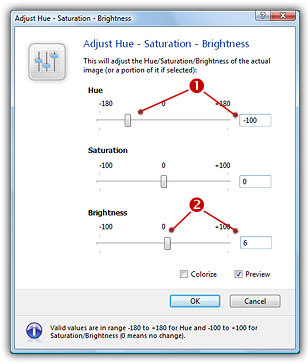
12. Set the Hue to "-100" either using the slider or by typing the value (![]() ). It "shifts" the colors of the floating image in the spectrum. As a result, the map is now green. Also, we slightly increase the Brightness of the map by specifying "6" (
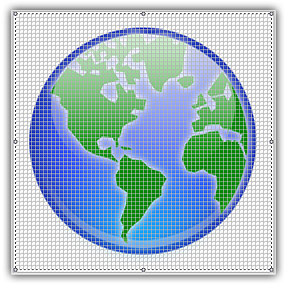
). It "shifts" the colors of the floating image in the spectrum. As a result, the map is now green. Also, we slightly increase the Brightness of the map by specifying "6" (![]() ). You can see the results in real-time in the Preview 1:1 window. When done click OK. Now the map is green:
). You can see the results in real-time in the Preview 1:1 window. When done click OK. Now the map is green:
13. Do you recall the name of the icon? Yes, "Glossy Earth"! So, let's add the glossy effects. First, using the same drag-and-drop method as above, we add the object "Circle Effect 3.png". Then to increase the effect, we add the object "Circle Effect 6.png". Now it looks like this:
14. Now the final touch: the shadow. We want to add a shadow at the bottom and under the earth. This will produce an interesting effect, just like if the globe was laid on a white horizontal plan.
First, we need to move the whole Earth 10 pixels up (just to leave more space for shadow at the bottom of the image). Important: To do so, we must select the whole image. Actually, only the last object we've added is selected. Choose Edit/Select All or press Ctrl+A. There is no visual change but now you're ready to move the whole image.
To move the image, you can use the mouse (with a drag-and-drop) or use the arrow keys of the keyboard. To move the image 10 pixels up, hit UpArrow 10 times or press Shift+UpArrow. The resulting selection rectangle is now 10 pixels outside the top of the editor area.
15. We can now add the shadow. Select the object "Circle Shadow.png" in the librarian and add it to the project. The resulting image looks like this:

16. Obviously, there is a problem: The shadow is in front of the Earth Globe! The solution is as easy as a keystroke: Press the End key or choose Edit/Set Floating Selection to Background.
You're done! The resulting image should look like this:
Finalizing the Icon by Creating All the Formats
Now that the largest image is done (256x256 RGB/A), we'll create all the other formats of the icons from this one. This is done in one step with Axialis IconWorkshop™ Professional Edition. Using the Personal Edition, you need to create each format manually (see product help for more info).
17. Choose Draw/Add Several Image Formats from This Image or press "V". A dialog box opens:
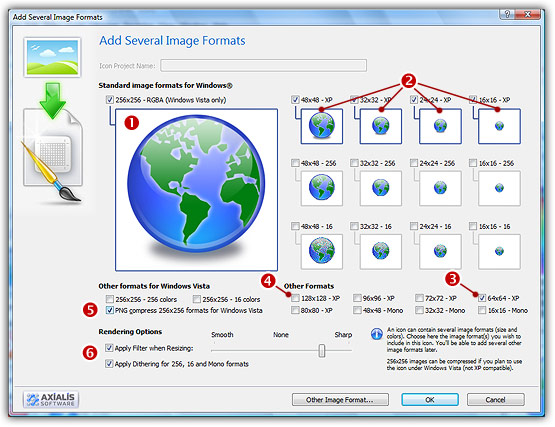
18. Select the images formats to include in the icon (![]() /
/ ![]() ) by clicking on the associated check boxes. Follow the specifications as we defined them above.
) by clicking on the associated check boxes. Follow the specifications as we defined them above.
19. You can also choose to apply the dithering option to the 256/16 color images as well as add a filter effect to smooth/sharpen the resulting images in RGB/A mode (![]() ). View the results in the preview images.
). View the results in the preview images.
20. When done, click OK. The new formats are automatically created and added to the project (![]() ):
):
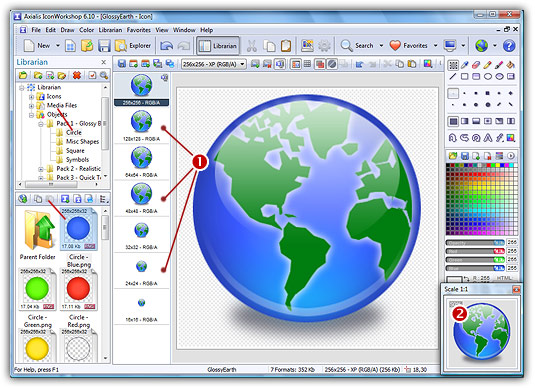
21. Take a moment to admire your work :) Click on the various formats (![]() ) and see the resulting icon at scale 1:1 in the preview window (
) and see the resulting icon at scale 1:1 in the preview window (![]() ). You can change the background lightness of the Scale 1:1 window simply by clicking in it using the left button of the mouse. It will permit you to see how the icon is displayed on different backgrounds with different lightness.
). You can change the background lightness of the Scale 1:1 window simply by clicking in it using the left button of the mouse. It will permit you to see how the icon is displayed on different backgrounds with different lightness.
22. Save your icon: Choose File/Save or press Ctrl+S. It will be saved as Windows® ICO format.
Congratulations! You've created your first icon from Image Objects. There is no limit to your creativity using these objects. You can resize them, changing their color, their opacity and more. You can even create your own objects by combining existing ones.
Creating a Macintosh® version of the icon
You can also save your Windows® icon as Macintosh® format. When the icon is finished (step 22 above), choose File/Save as Macintosh®Icon or press Ctrl+Alt+S.
![]() By doing this, some icon formats which are not available for Macintosh® icons will be removed. In the example above, format 24x24 will be removed. An information message will be displayed.
By doing this, some icon formats which are not available for Macintosh® icons will be removed. In the example above, format 24x24 will be removed. An information message will be displayed.