
Lesson 1 - Creating a new icon from scratch
In this lesson, we'll create a new blank icon and take a look at the Icon Editor window.
Start the new icon project
1. Axialis IconWorkshop™ support both Windows® and Macintosh® icons (see format comparison to learn more). We'll start this tutorial by creating a Windows® icon. Choose File/New/Windows Icon Project or press Ctrl+W.
2. A dialog box opens.
2. In the Project Name edit zone (![]() ), enter the icon project name: "MyFirstIcon". Do not specify any extension.
), enter the icon project name: "MyFirstIcon". Do not specify any extension.
3. In the Colors group (![]() ), select: RGB / Alpha Channel (RGB/A - 32 bits). This format will be used only if the icon is displayed under Windows® XP, Windows Vista or superior. This format uses an additional Alpha Channel to create smooth shades and object borders (see what is an icon to learn more).
), select: RGB / Alpha Channel (RGB/A - 32 bits). This format will be used only if the icon is displayed under Windows® XP, Windows Vista or superior. This format uses an additional Alpha Channel to create smooth shades and object borders (see what is an icon to learn more).
![]() We strongly recommend to start creating icons with the RGB/A color mode. Yes, even if you don't have Windows® XP or Vista, this is easier to start working in this mode then create the other image formats from this one. Also, if you upgrade to Windows® XP or Vista in the future all your icons will display using this smooth mode. Of course, if you plan to redistribute your icons, this color mode is highly recommended.
We strongly recommend to start creating icons with the RGB/A color mode. Yes, even if you don't have Windows® XP or Vista, this is easier to start working in this mode then create the other image formats from this one. Also, if you upgrade to Windows® XP or Vista in the future all your icons will display using this smooth mode. Of course, if you plan to redistribute your icons, this color mode is highly recommended.
4. In the Size in Pixels group (![]() ), choose: 48x48. In this tutorial, we start using this size since this is the largest size supported by default in Windows® XP (on the Desktop).
), choose: 48x48. In this tutorial, we start using this size since this is the largest size supported by default in Windows® XP (on the Desktop).
![]() We strongly recommend you to starting icons using the largest image size. It's easier to draw a large image then create the other formats from this one. Additionally, the smaller formats will be created with better results (shrinking an image always produces better visual results). See what is an icon to learn more about icon formats.
We strongly recommend you to starting icons using the largest image size. It's easier to draw a large image then create the other formats from this one. Additionally, the smaller formats will be created with better results (shrinking an image always produces better visual results). See what is an icon to learn more about icon formats.
5. Click OK, the dialog box closes.
A Quick Tour of the Editor Window
6. This new Editor Window opens:
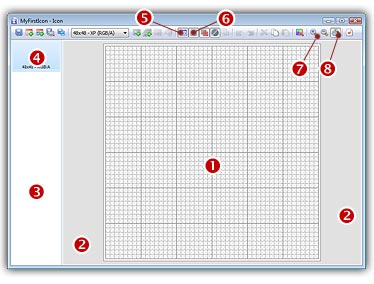
The Drawing Area (![]() ) permits you do draw your icon image. This area use the 2 mouse buttons to draw: Left button for the Foreground Color, Right button for the Background Color. As a result, you cannot right-click in the drawing area to open a local context menu. To open a local menu, right-click around the drawing area (
) permits you do draw your icon image. This area use the 2 mouse buttons to draw: Left button for the Foreground Color, Right button for the Background Color. As a result, you cannot right-click in the drawing area to open a local context menu. To open a local menu, right-click around the drawing area (![]() ) or in the Image Format list (
) or in the Image Format list (![]() ).
).
The Image Format List (![]() ) shows all the image formats available in your icon (only 1 image for the moment). The selected image (
) shows all the image formats available in your icon (only 1 image for the moment). The selected image (![]() ) format is always displayed in the Drawing Area. You can show/hide this list (Press "I" or choose View/Icon Image Formats/Show). You can also place it on the left or right side of the Edit Window (choose View/Icon Image Formats/Left or Right).
) format is always displayed in the Drawing Area. You can show/hide this list (Press "I" or choose View/Icon Image Formats/Show). You can also place it on the left or right side of the Edit Window (choose View/Icon Image Formats/Left or Right).
The Local Toolbar includes many commands. For now, just try to click the Image Format List show/hide button (![]() ). You can also show/hide the Grid in the drawing editor (
). You can also show/hide the Grid in the drawing editor (![]() ). Actually the Zoom Factor is automatically based on the window size (
). Actually the Zoom Factor is automatically based on the window size (![]() ). but you can change it manually by clicking on + or - (
). but you can change it manually by clicking on + or - (![]() ).
).
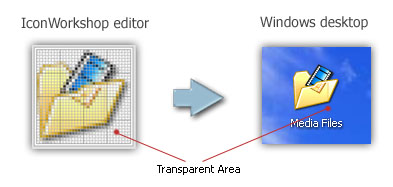
7. The Drawing Area displays a special texture (like a chessboard). This texture indicates a transparent area. Actually, as you have not drawn anything, the icon is fully transparent. Transparent areas allow to see the screen background behind the icon within its square image (see illustration below).
8. This texture can be customized to meet your needs. Choose Edit/Preferences or press "F2". A dialog box opens, choose the Editor tab:
First, you can modify the size of the Transparency chessboard squares (![]() ). Then, to change the colors of the texture you can either select a predefined scheme (
). Then, to change the colors of the texture you can either select a predefined scheme (![]() ) or choose custom colors (
) or choose custom colors (![]() ). You can see the changes in the preview area (
). You can see the changes in the preview area (![]() ).
).
Changing the Grid aspect may also be interesting (![]() ). To finish, you can activate or deactivate a feature which permits to draw stronger (darker) lines at fixed intervals. By default this interval is 8 (
). To finish, you can activate or deactivate a feature which permits to draw stronger (darker) lines at fixed intervals. By default this interval is 8 (![]() ).
).
When done, click OK.
![]()
![]() Lesson 2 - Drawing an icon using the built-in tools
Lesson 2 - Drawing an icon using the built-in tools