Lesson 2 - Drawing an icon using the built-in tools
In this lesson, we'll start drawing a basic information image (a blue filled circle with a "i" letter drawn inside), using some of the available tools.
Selecting a tool, a color and drawing
1. Click the Filled Ellipse drawing tool (![]() ) or Draw/Drawing Tools/Filled Ellipse:
) or Draw/Drawing Tools/Filled Ellipse:
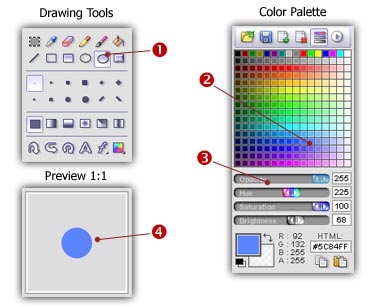
2. Left-click the Blue Color (#3F6FFF) we'll use to draw the circle in the color swatches (![]() ). Check that the drawing Opacity is 255 (
). Check that the drawing Opacity is 255 (![]() ).
).
3. Using the Left Mouse Button, start drawing your circle from coordinates (3,3) to (44,44). Press SHIFT key while drawing to create a circle (width = height) rather than an ellipse. The circle is dynamically drawing while moving the mouse. When you release the mouse button, the circle border is automatically smoothed. It works only with RGB/AP image formats. It can be enabled/disabled by pressing "E" (Smooth Edges in the local toolbar).
4. When done, you see the blue circle in the drawing area and in the Preview 1:1 floating palette (![]() ).
).
5. Ooops! If you made a small error while drawing, you can Undo what you did. Choose Edit/Undo or press Ctrl+Z or Alt+Backspace. Now you can try again.
Drawing a letter in the circle
6. To do so, Axialis IconWorkshop™ includes a Text feature. First select White Color (255,255,255) in the color swatches (the procedure is similar to ![]() you did before).
you did before).
7. Click the Text tool (a 'A' letter button at the lower-right corner of the Drawing Tools). A Dialog box opens:
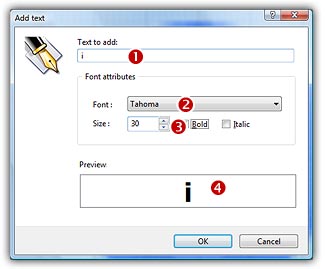
8. In the Text to add zone (![]() ), type the "i" letter. In the Font list (
), type the "i" letter. In the Font list (![]() ), choose "Tahoma". In the Size zone, choose 30 and click Bold (
), choose "Tahoma". In the Size zone, choose 30 and click Bold (![]() ). You can check the result in the preview zone (
). You can check the result in the preview zone (![]() ). When done, click OK.
). When done, click OK.
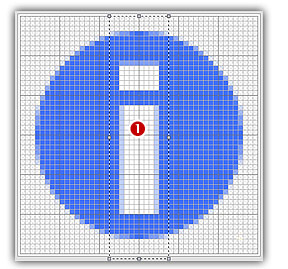
9. A large selection box has been added in the upper-left corner on the drawing area. This selection contains the large "i" letter drawn in white. This is a floating selection that can be moved over the existing image.
10. Move the mouse pointer over this selection area. The pointer automatically switches to a four-arrow cursor (![]() ). Now left-click in this area (keep the button pressed) and move your mouse to the center on the Drawing Area in order to get the following result (
). Now left-click in this area (keep the button pressed) and move your mouse to the center on the Drawing Area in order to get the following result (![]() ):
):
11. You can apply the floating selection by click left-clicking anywhere.
CONGRATULATIONS! you've created your first icon image!
![]()
![]() Lesson 3 - Adjusting the icon image
Lesson 3 - Adjusting the icon image