How to create a rotating animated image
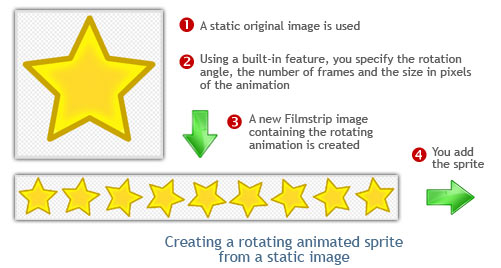
In this tutorial, we'll see how to make a rotating image from a static image. This feature is useful to create a rotating animated sprite in a screensaver. First we'll create a filmstrip containing the rotating animation, then we'll add this filmstrip in the screensaver. It will be automatically recognized as an animated sprite by the application:
![]()
Opening the static image
1. Choose "File Menu/Open", browse your folders and select your image file (Windows® standard dialog box).
or
Choose "File Menu/Browse Files" or press Ctrl+Alt+O. A built-in Axialis File Browser window opens. Browse your disks, see the thumbnail preview and double-click the image file you wish to open.
2. For example, open the file located in the librarian: "Media Files\Images\Sprites\Star.png". The image file opens in a document window.
![]() Axialis Screensaver producer will convert images to 32 bpp with transparency when possible, which is much more convenient to create cursors. The following image formats can include transparency: Photoshop® PSD, PNG, RGB, GIF, JPEG 2000 and WMF.
Axialis Screensaver producer will convert images to 32 bpp with transparency when possible, which is much more convenient to create cursors. The following image formats can include transparency: Photoshop® PSD, PNG, RGB, GIF, JPEG 2000 and WMF.
3. If your image is opaque, you can create transparent areas. Using the following tutorial, you can easily transform the white background to transparency: Add Transparency to an Opaque Image.
Creating the rotating animated filmstrip
4. In the Local Toolbar, choose Transform/Create a Rotating Filmstrip. A dialog box opens:
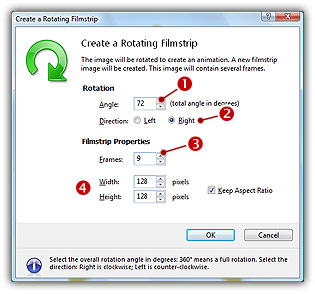
5. In Angle (![]() ), specify the total rotation angle in degrees "72". In our case, we don't need to specify 360 to simulate a full rotation. Our image is a 5-branch star, so specifying "72" will do the trick. This will permit to reduce the number of frames in the animation.
), specify the total rotation angle in degrees "72". In our case, we don't need to specify 360 to simulate a full rotation. Our image is a 5-branch star, so specifying "72" will do the trick. This will permit to reduce the number of frames in the animation.
6. In Direction (![]() ), specify Right (clockwise) or Left (counter-clockwise). In our case, we'll choose "Right".
), specify Right (clockwise) or Left (counter-clockwise). In our case, we'll choose "Right".
7. In Frames (![]() ), specify the number of frames of the filmstrip. In our case, "9" will be sufficient because we have a 72° rotation (8° for each frame). If you want to make a smooth 360° animation, you must specify at least 24 frames.
), specify the number of frames of the filmstrip. In our case, "9" will be sufficient because we have a 72° rotation (8° for each frame). If you want to make a smooth 360° animation, you must specify at least 24 frames.
8. You can also keep the size of the original image, or reduce it. In our case we'll reduce it to 128x128 for each frame (![]() ), which is sufficient to create a 32x32 cursor (the original image was 256x256).
), which is sufficient to create a 32x32 cursor (the original image was 256x256).
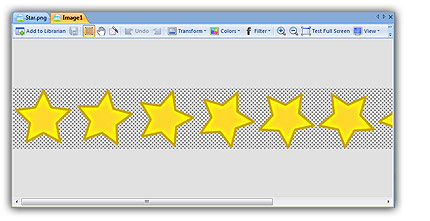
9. Click OK, a new document is created containing the filmstrip:
Adding the animated sprite in the screensaver
10. Select Home/Clipboard/Copy (Ctrl+C).
11. Open or select the Screensaver Document window.
12. Select Home/Clipboard/Paste (Ctrl+V). The new animated sprite is added.