Step 3 of 6 - Customize icon and dialog box image
A screensaver is a program (see What is a screensaver). Therefore, it contain an icon. This icon is used to display it in Windows File Browser or when you create a Shortcut to it in the Desktop for example. A standard icon is used but it's now possible to customize it.
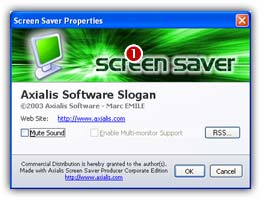
Also, your screensaver contains a "Customize" dialog box. You can customize the illustration image that is included in this window.
What is an icon?
An icon is a graphic image, a small picture or object that represents a file, program, web page, or command. Icons help you execute commands, open programs or documents quickly. To execute a command by using an icon, click or double-click on the icon. It is also useful to recognize quickly an object in a browser list.
That's almost all you need to know if you only use icons. But you want to use (or create) icons for the screensaver customization feature, you need to know more about them.
What are the differences between an image and an icon?
A computer image is a bitmap (composed of pixels) or vector (composed of drawing paths) picture, which can be saved using various formats (BMP, PNG, GIF, JPEG, WMF...). All these formats have several different properties (bitmaps, vectors, compressed, layered, animated...) and can be used to store pictures at any sizes and resolution.
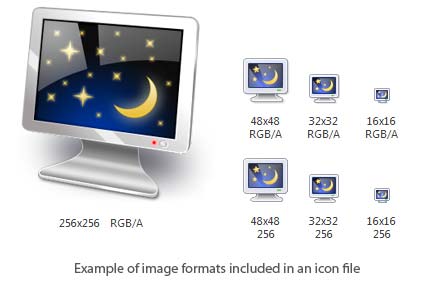
Icons are different from standard images. They are have standard sizes (usually small): 16x16, 32x32, 48x48... One icon is composed of several images. Each of them with a different size and number of colors (mono, 16 colors, 256 colors, 16.8M...). And the most important property of an icon is the ability to include transparent areas. This allows seeing the screen background behind the icon within its square image.
What is the structure of an icon?
As we've seen in previous paragraph, an icon is a group of images of various formats (size and colors). Furthermore, each image can include transparent area. That's why you'll find a transparent color in the drawing palette for 16 or 256 color images and a variable opacity parameter for the new Windows XP format (opacity = 0 means transparent).
What kind of icons can I use to customize my screensaver?
You can use any kind of icons, including those containing PNG compressed images as used in Windows Vista and Windows 7.
How to create my own icons?
Axialis Software has released an icon editor that will permit you to easily create your own icons in a few minutes: Axialis IconWorkshop. This professional tool will permit to create icons with several formats from images in a few clicks. You can download a trial version here and test it for 30 days.
Customize the screensaver icon
1. The Step 3 dialog box looks like this:
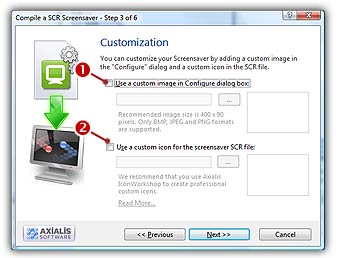
2. Click on the option Use a custom icon for the screensaver SCR file to activate it (![]() ). The edit fields below are automatically enabled.
). The edit fields below are automatically enabled.
3. In the edit zone, enter the full path to your ICO file on your disk or click the [...] button to browse your disks and locate the file using a standard Windows dialog box.
4. Once the pathname has been entered you see a preview of the icon image in the window on right.
5. If this is the right icon, click Next. If the icon has the correct format (see specs above), you can continue the compilation wizard.
Customize the screensaver image
The screensaver that you'll create will contain a Customize dialog box. The application permits you to customize the illustration image that is included in this window (![]() ):
):
What kind of images can I use to customize my screensaver?
To be compatible with the customization feature, the image file must have the JPEG, BMP or PNG format. Also, we recommend you to use an image with the following dimension: Width = 400, Height = 90.
How to create my illustration image?
Create this image using an external application like Photoshop® (professional tool), Paint Shop Pro® (shareware tool) or Gimp® (free tool).
1. The Step 3 dialog box looks like this:
2. Click on the option Use a custom image in Configure dialog box to activate it (![]() ). The edit fields below are automatically enabled.
). The edit fields below are automatically enabled.
3. In the edit zone, enter the full path to your image file on your disk or click the [...] button to browse your disks and locate the file using a standard Windows dialog box.
4. Once the pathname has been entered you see a preview of the image in the window on right.
5. If this is the right image, click Next. You can continue the compilation wizard.
![]() Step 4 - Specify the splash screen parameters
Step 4 - Specify the splash screen parameters