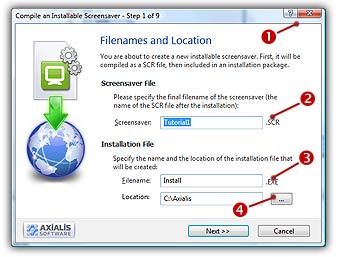
Step 1 of 9 - Specify the filename and location of the install package
Once your project is created, you must compile your screensaver in order to be installed on the end-user computer. The file that will be created is compatible with Windows Screensavers. But this file is not easy to install on a computer for a beginner. That's why we strongly recommend you to create an installation package. Furthermore, a few additional options are available when you compile an installation package.
During this process, the project will be compiled as a temporary SCR file and it will be compressed and included in an easy-to-use installation package (EXE file).
IMPORTANT: Once created, the SCR file can't be modified or decompiled. We recommend you to save your project to a SSP file before compiling it. Don't loose your SSP file!
1. Open a screensaver project and choose Make Installation (Shift+F4). A dialog box opens (see below).
Specify the Filename and Location of the Install file to create
2. In the Screensaver field (![]() ), specify the name of the SCR file to create (do not specify the SCR extension). You can keep the proposed name. This is the filename that will be installed on the end-user computer. This file will not be created on your computer during this compilation. It will be embedded in the install package.
), specify the name of the SCR file to create (do not specify the SCR extension). You can keep the proposed name. This is the filename that will be installed on the end-user computer. This file will not be created on your computer during this compilation. It will be embedded in the install package.
3. In the Filename field (![]() ), specify the name of the Install file to create (usually Install.exe). Do not specify the EXE extension.
), specify the name of the Install file to create (usually Install.exe). Do not specify the EXE extension.
4. In the Location field (![]() ), specify the folder where you want to create the install file on your computer. You can use the button [...] to browse your folders.
), specify the folder where you want to create the install file on your computer. You can use the button [...] to browse your folders.
5. When done, click Next.
![]() Step 2 - Specify the installation properties
Step 2 - Specify the installation properties