Batch create several cursors from images
This article provides information on the following topics:
• Opening the folder containing the images in the Axialis File Browser
• Creating the Animated Cursors
Using this feature you can Create Several Static or Animated Cursors from existing images in one operation. This is what we call a batch procedure. We'll perform this task using the built-in CursorWorkshop File Browser.
In this tutorial, we'll use a set of 10 images in 128x128 PNG format. We'll create the 5 first cursors in Static CUR format and the 5 others in Animated ANI format.
Opening the folder containing the images in the Axialis File Browser
Axialis CursorWorkshop, like all the Axialis products, contains a built-in file browser that permits to do all kinds of file operations associated with the application. We use to call this File Browser "Axialis Media File Browser". It looks like the Windows Browser, has different views including a great thumbnail mode with fast preview and permits various operations on files like copy/move/rename...
All the batch functions are available from the Axialis File Browser window. That's the reason why we'll start this tutorial by opening the folder which contains the images in this file browser, even if those files are located in the Librarian.
1. First, you
must be sure the librarian is visible.
If the librarian window is not visible, check the Librarian button in
the main toolbar (![]() ) or press ESC.
) or press ESC.
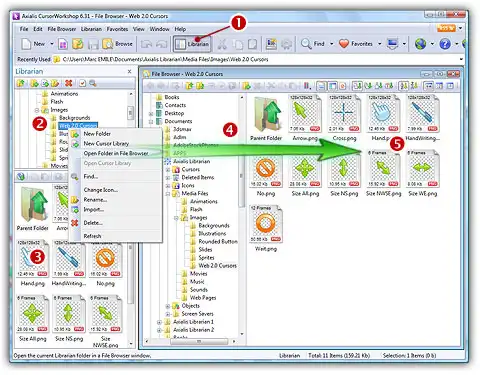
2. Select the "Media Files/Images/Web 2.0 Cursors" folder (![]() ). In the thumbnail preview list (below), you
see all the files included in the folder (
). In the thumbnail preview list (below), you
see all the files included in the folder (![]() ).
).
3. Right-click
in the librarian tree, a menu opens. Choose the command "Open
Folder in File Browser" (![]() ). A new File Browser window
opens in the working area (
). A new File Browser window
opens in the working area (![]() ) and the folder contents is automatically
displayed. You see all the images displayed in thumbnail mode with preview.
If this is not the case, be sure to select in menu: "File Browser/Display/Large
Cursors" and "File Browser/Display/Auto
Preview".
) and the folder contents is automatically
displayed. You see all the images displayed in thumbnail mode with preview.
If this is not the case, be sure to select in menu: "File Browser/Display/Large
Cursors" and "File Browser/Display/Auto
Preview".
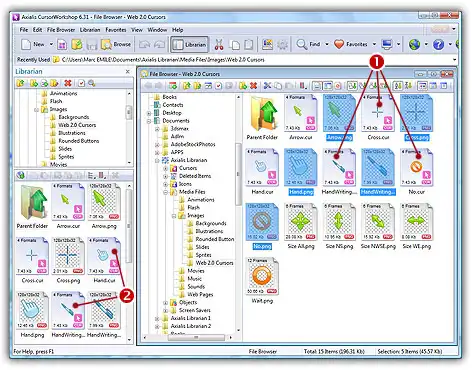
4. In the File Browser window, select the 5 static images in the list. To do this, click on the first image, press the SHIFT key (keep it pressed) and click on the 5th image. Files from "Arrow.png" to "No.png" are static.
![]() You can easily distinguish static images from animated images in thumbnail mode: The static images have the size and color depth displayed. The animated images have the number of frames displayed.
You can easily distinguish static images from animated images in thumbnail mode: The static images have the size and color depth displayed. The animated images have the number of frames displayed.
5. Right-click on one of the selected images, a menu opens. Select the command "Batch Create Static Cursors from Selection...".
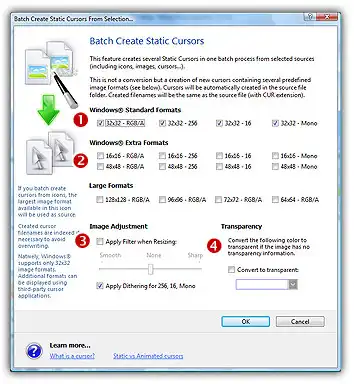
6. A dialog
box opens. In Windows Standard Formats (![]() ), select the 4 available formats. In Windows Extra Formats and Large Formats (
), select the 4 available formats. In Windows Extra Formats and Large Formats (![]() ) you can select additional formats that are not yet supported by Windows. We don't recommend you to select them for the moment. In Image Adjustment (
) you can select additional formats that are not yet supported by Windows. We don't recommend you to select them for the moment. In Image Adjustment (![]() ), you can add smooth/sharp filters during the image downscaling. In Transparency group (
), you can add smooth/sharp filters during the image downscaling. In Transparency group (![]() ), an option permits to use opaque images (i.e. without
transparency) and specify a color to make transparent.
), an option permits to use opaque images (i.e. without
transparency) and specify a color to make transparent.
7. When done
click OK. All the cursors are created
and added to the same folder (see below ![]() ). Names are preserved,
only the extension is changed to CUR. The Librarian is updated accordingly
since this is the same folder (
). Names are preserved,
only the extension is changed to CUR. The Librarian is updated accordingly
since this is the same folder (![]() ):
):
Now we're going to create animated cursors from filmstrip PNG images. A filmstrip is a wide image containing an animation composed of several different images placed side-by-side. If you want to have a better idea of what is a filmstrip, double click on the file "Wait.png". The image opens in a separate document window. You can clearly see that the image contains several frames composing an animation. The size of the image is 1536x128 = 12 x 128x128 images. Close the image document before proceeding.
8. In the File Browser window, select the 5 last images in the list (animated images). Use the same method as above.
9. When the images are selected, Right-click on one of them, a menu opens. Select the command "Batch Create Animated Cursors from Selection".
10. A dialog
box opens. In group Colors (![]() ) choose "RGB with Alpha Channel" and in Size in Pixels (
) choose "RGB with Alpha Channel" and in Size in Pixels (![]() ) choose 32x32.
) choose 32x32.
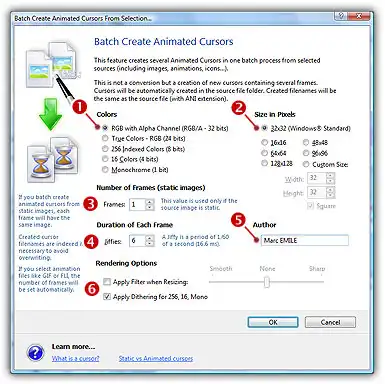
In Number of Frames (![]() ), don't change the default value "1". This value is used for the source images which are static. This is not our case since the source images are animated. In Duration (
), don't change the default value "1". This value is used for the source images which are static. This is not our case since the source images are animated. In Duration (![]() ), specify "6" Jiffies (approximately 100 ms per frame). In Author (
), specify "6" Jiffies (approximately 100 ms per frame). In Author (![]() ), you can specify the name of the author if any. ANI files can contain 2 information strings: Name and Authors. In Image Adjustment (
), you can specify the name of the author if any. ANI files can contain 2 information strings: Name and Authors. In Image Adjustment (![]() ), you can add smooth/sharp filters during the image downscaling.
), you can add smooth/sharp filters during the image downscaling.
11. When done
click OK. All the animated cursors
are created and added to the same folder
(![]() ). Names are preserved, only the
extension is changed to ANI. The Librarian is updated accordingly since
this is the same folder:
). Names are preserved, only the
extension is changed to ANI. The Librarian is updated accordingly since
this is the same folder:

12. Let's take a look at a newly created cursor. Double-click on a animated cursor, for example "Wait.ani" and check the animation.
![]() Note that batch procedures don't permit to specify the hot spots which are set to (0,0) by default. You need to specify them manually by opening each cursor if necessary.
Note that batch procedures don't permit to specify the hot spots which are set to (0,0) by default. You need to specify them manually by opening each cursor if necessary.