Import an image into an icon project
To increase your productivity in creating icons, you may need to import images in your project. Several methods are available IconWorkshopä to perform this operation. Some image formats support 32 BPP alpha channel transparency which is very interesting to create hi-quality RGB/A images in icons. The following image formats are supported:
BMP - Windows®bitmap (32 BPP alpha channel transparency supported).
PNG - Portable Network Graphic (32 BPP alpha channel transparency supported).
PSD - Photoshop (32 BPP alpha channel transparency and layers supported).
JP2 - JPEG 2000 (32 BPP alpha channel transparency supported).
JPG - JPEG
TGA - Targa
GIF - Compuserve GIF
Others - Various other formats supported: TIFF, PCD (PhotoCD), PIC (Apple PICT), PCX (Zsoft), WMF (Windows® MetaFile)
Using the image import function
1. Choose File/Import/Image or press Shift+Ctrl+I. A standard Windows® file open dialog box opens.
2. Select a file to import and click Open. It imports the image in your icon. The image colors will be automatically adjusted to match the icon format specifications (automatic conversion to 256 colors for example).
4. You can also create a new icon from the selected portion of the image (See Create a Windows® icon from an image or Create a Macintosh® icon from an image).
![]() If the image to be imported does not have the same color palette as the icon in the current edit window, Axialis IconWorkshopä asks you if you want to replace the current icon palette by the palette attached to the image being pasted.
If the image to be imported does not have the same color palette as the icon in the current edit window, Axialis IconWorkshopä asks you if you want to replace the current icon palette by the palette attached to the image being pasted.
Using drag & drop from the Librarian
The most productive way to create an icon is to use drag & drop from the librarian to add objects (images ready to add in an icon) in your icon project. Using this method you can create a "composite" icon in a few minutes. The most famous example of composite icon is the document folder icon:

Using the three objects above, we'll make this icon in minutes using exclusively features included in Axialis IconWorkshop™. The icon will include formats from 256x256 to 16x16 in RGB/A, 256 and 16 colors (based on the recommended formats specified in What is an icon topic).
This folder image has been created by Axialis Team. It's free of charge so you can use them in your own icons (see Sample Icons Terms Of Use).
The procedure below starts from a new project but it works also with an existing project. We recommend you to start with the largest icon image that you plan to add in your icon (here 256x256 RGB/A). Then you'll be able to add the other formats easily using this first one as model.
1. Choose File/New/Icon Project or press Ctrl+N. A new dialog box opens:
2. Select the Windows® or Macintosh®. click OK. A second dialog box opens. In the Project Name edit zone (![]() ), enter the icon project name: "Document Folder". Do not specify any extension.
), enter the icon project name: "Document Folder". Do not specify any extension.
3. In the Colors group (![]() ), select: Windows® XP with Alpha Channel (RGB/A - 32 bits).
), select: Windows® XP with Alpha Channel (RGB/A - 32 bits).
4. In the Size in Pixels group (![]() ), choose: 256x256.
), choose: 256x256.
5. Click OK, the dialog box closes. The new blank icon document is created, the 256x256 RGB/A image format is selected.
6. To add an object, you must be sure that the librarian is visible. If the librarian window is not visible (![]() ), check the Librarian button in the main toolbar (
), check the Librarian button in the main toolbar (![]() ) or press ESC.
) or press ESC.
![]() We recommend you to create a collection of objects in the librarian that you'll use in your future projects. Some sample objects (copyright-free) are included in the "Objects/" sub-folder of the Librarian. We'll use them in this topic.
We recommend you to create a collection of objects in the librarian that you'll use in your future projects. Some sample objects (copyright-free) are included in the "Objects/" sub-folder of the Librarian. We'll use them in this topic.
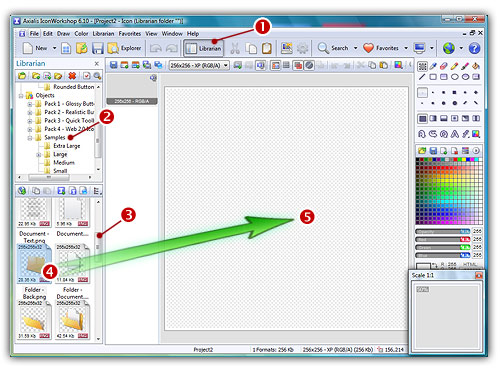
7. Select the folder "Objects/Samples/Large" in the Librarian tree (![]() ). The contents of the folder appears in the zone below. Select an object in the folder contents. For example, using the slider (
). The contents of the folder appears in the zone below. Select an object in the folder contents. For example, using the slider (![]() ) scroll the window contents until you see the file "Folder - Back.png".
) scroll the window contents until you see the file "Folder - Back.png".

Note that this floating selection can be moved by using drag & drop from the inner zone (![]() ). It can also be resized using the handles placed around the selection (
). It can also be resized using the handles placed around the selection (![]() ). Here is the list of operations you can perform on this object:
). Here is the list of operations you can perform on this object:
Now do the same to add other objects. If you want to learn step-by-step how to create the above Document Folder, read this part of the tutorial: Lesson 7 - Composing an icon from several image objects
Using the Photoshop® image transfer plug-in
If you work with Adobe® Photoshop® we recommend you to use the transfer plug-in included in IconWorkshop™. It permits you to transfer images with Alpha Channel directly from Photoshop® into IconWorkshop™ without using a temporary file.
To learn how to use the Photoshop® plug-in, read these topics:
![]() Install the Photoshop® plug-in
Install the Photoshop® plug-in