Make professional icons in image strips with object packs
When an image strip is opened for edition, you can work with it as you do with icons. However, if you want to create professional images for your toolbars, you must create sharp and crisp icons. If you're not satisfied by the result of your drawing, we recommend to give a try at Image Object Packs, especially "Pack #6 - Lite Toolbars" which has been specially designed to create perfect-looking icons in 16x16, 24x24 and 32x32 toolbars.
To learn more about image objects, we recommend reading this topic: "What is an image object?".
Adding objects in an existing image strip
We'll see how to modify an image strip that already exists in a project. The procedure below uses an image strip provided as example in the Librarian.
Remark: To follow the procedure below, you need the object pack #6 "Lite Toolbars". Only a limited tryout version is provided in the Librarian. You can download the full version containing all the objects on our website (available to registered users of IconWorkshop): Download Image Object Pack #6 - Lite Toolbars
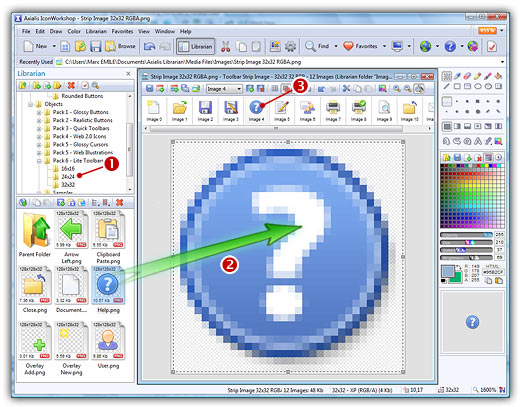
1. To open the sample image strip, you must be sure that the librarian
is visible. If the librarian
window is not visible (![]() ), check the Librarian button in the
main toolbar or press ESC.
), check the Librarian button in the
main toolbar or press ESC.
2. Select the
folder "Media Files/Samples" in
the librarian tree (![]() ), the icons included in the library
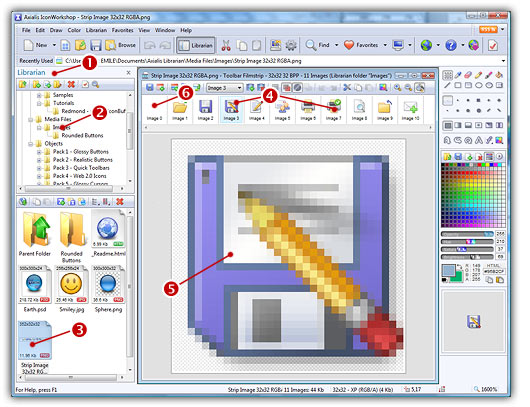
appear in the list below. Double click on the file "image strip 32x32 RGBA.png" (
), the icons included in the library
appear in the list below. Double click on the file "image strip 32x32 RGBA.png" (![]() ). It opens in a document window as an image strip for toolbars. IconWorkshop has detected that it was an image strip and opened it in a special editor window similar to the icon editor. The difference is that all the images are located in a list at the bottom of the window and that they all have the same format.
). It opens in a document window as an image strip for toolbars. IconWorkshop has detected that it was an image strip and opened it in a special editor window similar to the icon editor. The difference is that all the images are located in a list at the bottom of the window and that they all have the same format.
3. Select the different images by clicking on them or using the arrow keys (![]() ). The selected image is automatically opened in the editor window below (
). The selected image is automatically opened in the editor window below (![]() ). Now you can draw and modify the images as you did with icons. As you may have noticed, the first image has been left blank (
). Now you can draw and modify the images as you did with icons. As you may have noticed, the first image has been left blank (![]() ). We'll populate it using an Axialis Image Object Pack called "Lite Toolbar". This pack has been designed to create perfect looking icons for toolbars at sizes 16x16, 24x24 and 32x32. A tryout version, which has a limited number of objects is included in the Librarian.
). We'll populate it using an Axialis Image Object Pack called "Lite Toolbar". This pack has been designed to create perfect looking icons for toolbars at sizes 16x16, 24x24 and 32x32. A tryout version, which has a limited number of objects is included in the Librarian.
4. Select the first blank image "Image 0" (indexes start at 0 for compatibility with source codes). In the Librarian, open the folder "Objects/Pack 6 - Lite Toolbars/32x32" (see below ![]() ). Images in this folder have been optimized for use in 32x32 toolbars. We don't recommend to use them for other toolbar sizes. Use the other folders "24x24" or "16x16" for smaller sizes.
). Images in this folder have been optimized for use in 32x32 toolbars. We don't recommend to use them for other toolbar sizes. Use the other folders "24x24" or "16x16" for smaller sizes.
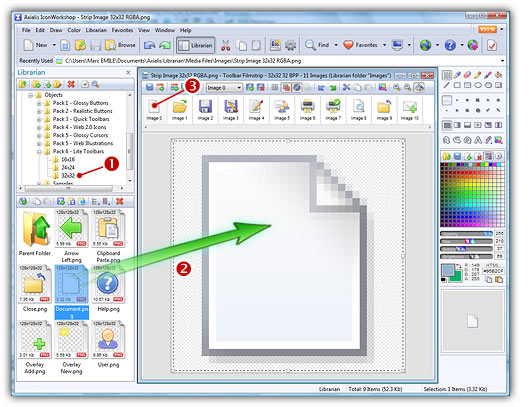
5. Using drag & drop, add the image "Document.png" in the editor (![]() ). It is automatically updated in the image list (
). It is automatically updated in the image list (![]() ).
).
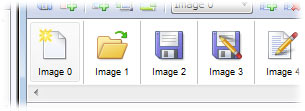
6. Redo the procedure for image "Overlay New.png". Now you should have the following icon as "Image 0":
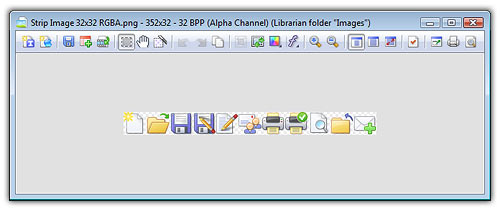
6. Save your document File/Save (Ctrl+S). The file "Media Files\Images\image strip 32x32 RGBA.png" is updated. During this operation, the different images have been assembled together to recreate the image strip. If you want to see the full bitmap image in its real format, select File/Reload as Image or click on the following button (local toolbar in the document window): ![]() . The image is reloaded in a standard image document window as shown below:
. The image is reloaded in a standard image document window as shown below:
7. Let's come back to the previous edition mode. Select File/Reload as image strip or click on the following button (local toolbar in the document window): ![]() .
.
8. Now we'll add a new icon in the image strip. In the list of images, select "Image 4", right-click and choose "Insert Image" (Ins). A new blank image is inserted. In the Librarian, select folder "Objects/Pack 6 - Lite Toolbars/32x32" (![]() ) and using drag & drop, add the file "Help.png" in the icon editor (
) and using drag & drop, add the file "Help.png" in the icon editor (![]() ). The icon is updated in the list (
). The icon is updated in the list (![]() ):
):
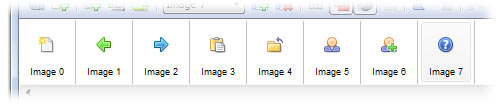
9. This icon is perfect but we'd like to move it at the last position in the strip. Using a drag & drop, move it after the last one in the list. You see a bold insert point moving with the mouse position. The list is scrolling if the last image is not visible in the document window. The resulting image strip should look like this:

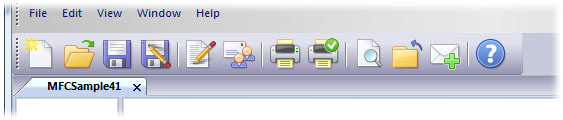
10. Save your document, you're done. See below a screenshot of the type of toolbar you can implement in your application with this image strip:
Adding objects in a new image strip
We've seen how to modify an existing image strip. In this part we'll create a new image from scratch, then populate it with image objects. We'll choose to create an image strip for 16x16 icons. That way, you'll appreciate the quality of the final artwork using our object packs.
1. Select File/New/Image Strip for Toolbar, a dialog box opens:
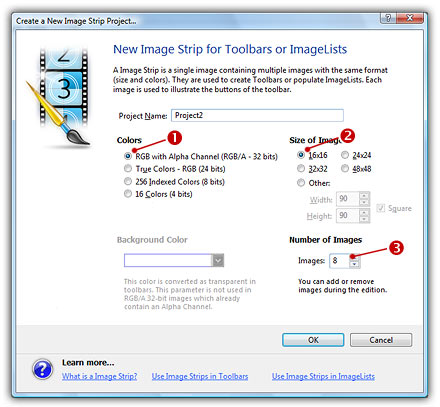
2. In colors, select RGB with Alpha Channel (![]() ), in Size of Image, select 16x16 (
), in Size of Image, select 16x16 (![]() ).
).
3. We'll start with 8 images, so select 8 in Number of Images (![]() ). Click OK, the new document is created.
). Click OK, the new document is created.
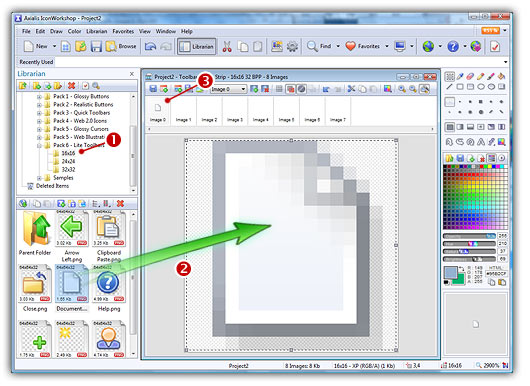
4. In the Librarian, In the Librarian, open the folder "Objects/Pack 6 - Lite Toolbars/16x16" (see below ![]() ). Images in this folder have been optimized for use in 16x16 toolbars. If you use the images in the other folders, you'll get bad results. Using objects in folder 16x16 you get crisp and sharp resulting images.
). Images in this folder have been optimized for use in 16x16 toolbars. If you use the images in the other folders, you'll get bad results. Using objects in folder 16x16 you get crisp and sharp resulting images.
5. Using drag & drop, add the file "Document.png" in the icon editor (![]() ). The icon is updated in the list (
). The icon is updated in the list (![]() ):
):
6. Now as an exercise, using the same method, and with the objects included in the "16x16" folder, try to create the following strip image:
tip: "Image 2" can be created from "Image 1" by flipping it horizontally and adjusting its HUE/Saturation.