Step 1 of 6 - Specify a filename and location
Once your project is created, you can compile your screensaver in order to be installed on the end-user computer. The file that will be created will be compatible with Windows Screensavers (.SCR). When compiled, you'll be able to use it personally on your computer or to distribute it as is. No install procedure will be created.
IMPORTANT: Once created, the SCR file can't be modified or decompiled. We recommend you to save your project to a SSP file before compiling it. Don't loose your SSP file!
1. Load your screensaver project and choose Make Screensaver (F4). A dialog box opens (see below). Keep in mind that you can click on the context help button (![]() ) if you need get more information on a specific element of a dialog box.
) if you need get more information on a specific element of a dialog box.
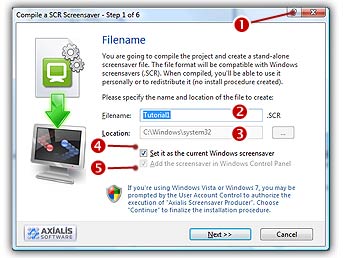
Specify the Screensaver Filename and Location
1. In the Filename area (![]() ), specify the name of the file to create. You don't need to specify an extension here (.SCR by default).
), specify the name of the file to create. You don't need to specify an extension here (.SCR by default).
2. In the Location area (![]() ), specify the folder where you want to create the file. If you want to redistribute this SCR file, specify your output folder. You must type a folder full pathname here. If you want to use this screensaver on your computer only, do not modify the proposed entry (see below).
), specify the folder where you want to create the file. If you want to redistribute this SCR file, specify your output folder. You must type a folder full pathname here. If you want to use this screensaver on your computer only, do not modify the proposed entry (see below).
4. Check Add the screensaver in Windows Control Panel option (![]() ) if you want to see the screensaver listed in the Windows Control panel. This will permit you to easily select it later as the default Windows screensaver.
) if you want to see the screensaver listed in the Windows Control panel. This will permit you to easily select it later as the default Windows screensaver.
Set the Screensaver as the default Windows Screensaver
5. If you check the "Set it as the Current Windows Screensaver" option (![]() ), it allows to set the compiled Screensaver as the current Windows Screensaver. The fields
), it allows to set the compiled Screensaver as the current Windows Screensaver. The fields ![]() and
and ![]() are disabled because they're set by default when you choose to set your screensaver as Windows default.
are disabled because they're set by default when you choose to set your screensaver as Windows default.
6. When done, click the Next button. If the specified file already exists, you'll be prompted to confirm the overwriting.
![]() Step 2 - Specify a description, configure a RSS reader
Step 2 - Specify a description, configure a RSS reader