Compile Icon Libraries with Activation Codes
In relation to Axialis IconWorkshop, this article offers information on the following topics:
- A word on Activation Codes
- Compile an Icon Library with Activation Code
- Generate Codes based on the User Name
- Generate Codes based on Serial Numbers
This new version of IconWorkshop includes a feature to compile Icon Libraries as install package ready for distribution. Additionally, a feature has been added to force the user to enter an activation code to proceed with installation (optional feature). Before reading with this topic, you need to know how to compile an Icon Library. Click here to read the related topics if necessary.
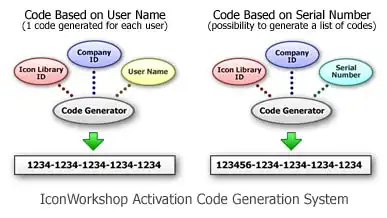
Two kinds of Activation Codes have been implemented in IconWorkshop:
1. Based on the User Name: The user must enter its name and the activation code using this format: 1234-1234-1234-1234 (4 groups of 4 digits).
• Pro: The user has to provide his name if he wants to publish the code.
• Con: The author has to manually generate a code for each user.
2. Based on a Serial Number: The user just enters a longer activation code using this format: 123456-1234-1234-1234-1234
• Pro: The author can automatically generate a list of codes.
• Con: The user can anonymously share his code on Internet.
Compile an Icon Library with Activation Code
1. When preparing to compile an Icon Library (using the Compilation Wizard), you see the following screen (Step 5 of 6):
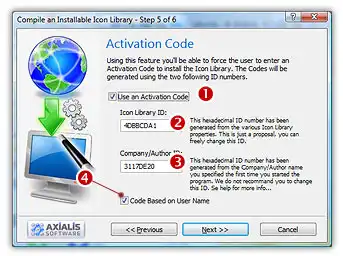
2. Click to check the option "Use an Activation Code" 1. The whole dialog box enables.
3. In the Icon Library ID zone 2, you see a large hexadecimal number. This ID will identify your Icon Library (used during activation code generation and verification). This is just a proposal based on your Icon Library properties.
You can change it but we recommend you to keep it "as is" and to enter the same ID each time you compile THIS library. Of course, you will change this ID when you'll compile another Library.
4. In the Company/Author ID zone 3, you see another large hexadecimal number. This ID will identify yourself or your company (used during activation code generation and verification). This is just a proposal based on your Company Name properties.
You can change it the first time you compile a Library, but we recommend you to keep it unchanged after.
5. If you want to use the Activation Codes based on the username (see the figure above for the differences), check the option "Code Based on User Name".
6. When done, click "Next" to proceed with the compilation...


Generate Codes based on the User Name
1. If you have chosen to use the system of activation codes based on the username during the compilation: Choose Edit/Generate Activation Codes or press Alt+F6. A dialog box opens:
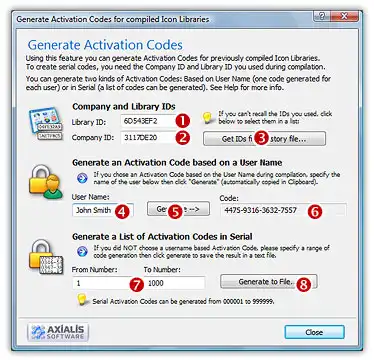
2. In the Library ID 1 and the Company ID 2, enter the hexadecimal numbers you entered at compilation for the requested Icon Library. If you can't recall these numbers, click on the "Get IDs from History File" button 3. A dialog box opens, displaying a list of the compilation you have done, select the right line then OK.
3. In the User Name zone 4, enter the name of the user then click the "Generate" button 5, the code is generated and displayed in the Code zone 6. A text is also automatically copied in the clipboard as in this example (useful if you send an email to your customer):
Your User Name : John Smith
Your Activation Code : 1527-9872-0984-6717
Generate Codes based on Serial Numbers
1. If you have chosen to use the system of activation codes NOT based on the username (i.e. based on Serial Codes) during the compilation: Choose Edit/Generate Activation Codes or press Alt+F6. The above dialog box opens.
2. In the Library ID (see above 1) and the Company ID 2, enter the hexadecimal numbers you entered at compilation for the requested Icon Library. If you can't recall these numbers, click on the "Get IDs from History File" button 3. A dialog box opens, displaying a list of the compilation you have done, select the right line then OK.
3. In the From and To Number zones 7, enter the first and the last number of the list of codes to generate. When done, click the "Generate To File" button 8. A standard Save As dialog box opens. Select a location and a new filename (TXT). When done, click OK. The file is generated.