Create a Macintosh Aqua Sphere using Photoshop
In relation to Axialis IconWorkshop, this article offers information on the following topics:
- Create a Flat Circle
- Create a 3D Glossy Effect on Top
- Add an Inner Light
- Enhance the 3D Refraction Effect
- Add a 3D Shadow Under the Sphere
Everybody knows this cool Macintosh Aqua effect. You can create your own Aqua object in a few minutes using Photoshop. In this tutorial we'll see how to create a sphere but this method can be applied to almost any shapes.

1. Select File/New. A dialog box opens. Specify Width=300 and Height=300. Click OK.
2. Using the Elliptical Marquee Tool (M) ![]() , create a 200x200 circular selection in the center of the image (press SHIFT while dragging the mouse to create a round circle). Center approximately the selection by using the arrow keys if necessary.
, create a 200x200 circular selection in the center of the image (press SHIFT while dragging the mouse to create a round circle). Center approximately the selection by using the arrow keys if necessary.
3. Create a new layer by choosing Layer/New/Layer... (Shft+Ctrl+N). A dialog box opens. Keep proposed values and click OK. Be sure the new layer is created and selected in the layer list: "Layer 1".
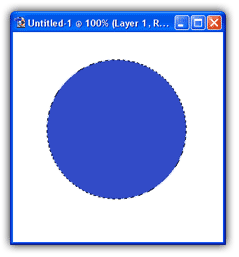
4. Select/create this Foreground color: R=50, G=75, B=200. Using the Paint Bucket Tool (G) ![]() , fill the circle by clicking in the selection. The result looks like this:
, fill the circle by clicking in the selection. The result looks like this:
Create a 3D Glossy Effect on Top
5. Create a new layer by choosing Layer/New/Layer... (Shft+Ctrl+N). A dialog box opens. Keep proposed values and click OK. Be sure the new layer is created and selected in the layer list: "Layer 2".
6. Contract the selection by choosing Select/Modify/Contract. A dialog box opens, specify Contract By=5 pixels. Click OK.
7. Select/create this Foreground color: R=255, G=255, B=255 (white). Select the Linear Gradient Tool (G) ![]() , and choose Foreground to Transparent gradient type:
, and choose Foreground to Transparent gradient type: ![]() .
.
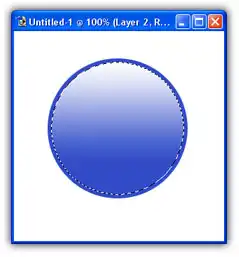
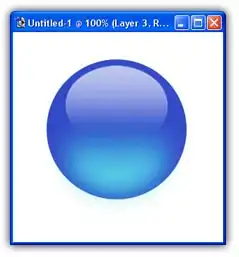
8. Using the mouse, drag & drop vertically from the top of the circle to past the middle of it (approx 75%). Use SHIFT while dragging to create a perfectly vertical gradient. The resulting work should look like this:
9. Select the Edit/Transform/Distort command and transform the white gradient as shown below.
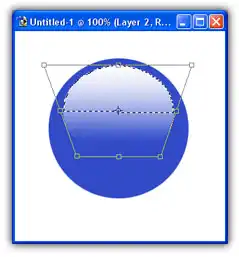
The distortion must be symmetrical. Try to keep the gap between the top of the white gradient and the blue circle as constant as possible. When done, hit the ENTER key to render the transformation.
10. Adjust the Layer Opacity to 70%:
![]()


11. Select Layer/Duplicate Layer command. A dialog box opens, enter "Layer 3" as new layer name. Click OK. Be sure the new layer is created and selected in the layer list.
12. Select Edit/Transform/Flip Vertical command. Select the Move Tool (V). Using the SHIFT+Down Arrow keys, move the selection down at the bottom of the circle (approx 10 pixels from the bottom).
13. Select Filter/Blur/Gaussian Blur. A dialog box opens, enter Radius=15.0 Pixels. Click OK.
14. Select Image/Adjustments/Hue Saturation (Ctrl+U) command. A dialog box opens:
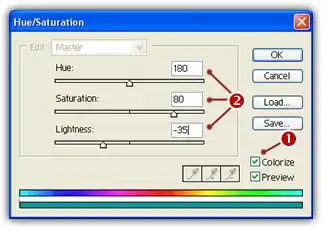
Enable the Colorize option 1. Enter Hue=180, Saturation=80 and Lightness=-35 2. Click OK. The resulting work should look like this:
Enhance the 3D Refraction Effect
15. Select "Layer 1" in the layer list. Choose Layer/Layer Style/Inner Glow command. A dialog box opens (see a portion below).
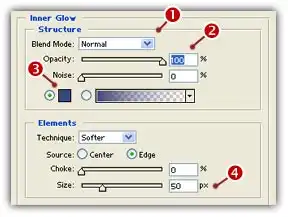
n Structure group, specify Blend Mode to Normal 1, Set Opacity to 100% 2, Specify the following color: R=65, G=70, B=130 3. In Elements group, specify Size=50 px 4. Click OK.
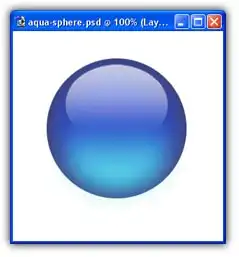
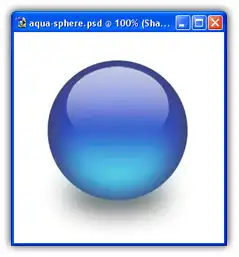
16. The Aqua Sphere is done:
17. Now you can save the file: Select File/Save specify "aqua-sphere.psd". If you want to add a shadow under the sphere, go to next step. If you want to export it as PNG with Alpha Channel, hide the Background layer (click its "eye" button in the layer list), then select Save As... Choose "PNG" and click OK.
Add a 3D Shadow Under the Sphere
18. Select the Background layer. Create a new layer by choosing Layer/New/Layer... (Shft+Ctrl+N). A dialog box opens. Enter "Shadow" as name and click OK. Be sure the new layer is created and selected in the layer list above the Background: "Shadow".
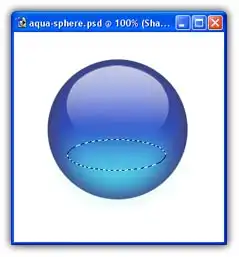
19. Select the Elliptical Marquee Tool (M) ![]() , create a 150x45 oval selection as shown below:
, create a 150x45 oval selection as shown below:
20. Select a white Foreground color: R=255, G=255, B=255. Using the Paint Bucket Tool (G) ![]() , fill the oval portion by clicking in the selection. You don't see the results because the layer is placed behind the shpere.
, fill the oval portion by clicking in the selection. You don't see the results because the layer is placed behind the shpere.
21. Choose Layer/Layer Style/Drop Shadow command. A dialog box opens (see a portion below).
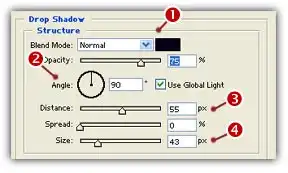
In Structure group, specify Blend Mode to Normal 1, Set Angle to 90° 2, Set Distance to 55 px 3, Set Size to 43 px 4, Click OK.
22. The shadow is done. If necessary, adjust the Distance value to get the following result:.
23. Now you can save the file: Select File/Save.
24. If you want to export it as PNG with Alpha Channel, hide the Background layer (click its "eye" button in the layer list), then select Save As... Choose "PNG" and click OK.