Quickly create a Flash Screensaver
A built-in Explorer permits you to browse your computer folders with thumbnail preview, select files and quickly create a screensaver!
Open the built-in Explorer, select the files
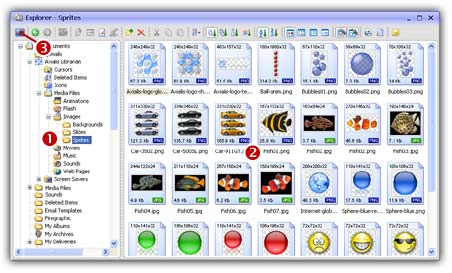
1. In the menu, choose File/New/New Explorer (Ctrl+E). An explorer window opens in the application:
2. The window
is divided in two parts. The separator can be moved using the mouse. On
the left pane, use the folder tree to browse and find the desired folder (![]() ). In the right pane, you see a thumbnail the media files present in this folder (
). In the right pane, you see a thumbnail the media files present in this folder (![]() ). Images and video files are shown with preview. You
also see Flash and sound files (without preview).
). Images and video files are shown with preview. You
also see Flash and sound files (without preview).
3. Select the Flash® movie you want to add in your screensaver.
![]() You can select several files by clicking
on files while pressing on the CTRL key. To select a range of files, use the SHIFT key.
You can select several files by clicking
on files while pressing on the CTRL key. To select a range of files, use the SHIFT key.
Create the screensaver
4. Click on
the New Screen Saver Project From Selection
(F7) button (![]() )
or choose File/New/New Screen Saver Project
From Selection in the menu.
)
or choose File/New/New Screen Saver Project
From Selection in the menu.
5. A dialog box opens. Select Flash® Based Screen Saver option in the list. Click Next.
6. In this new dialog box, enter the screensaver title and some additional information (copyright, author...). Click Next when done.
Customize and compile the screensaver
7. The screensaver project window opens with the Flash® file selected. Now specify the screensaver display properties. To learn more about Flash® screensavers, we recommend you to follow this tutorial.
8. We can take a look at the result full screen. Press F11 or click the Full Screen button in the toolbar. The screensaver is executed full screen. Press a key or move the mouse to end the full screen test.
9. Save your project by choosing File/Save or by pressing Ctrl+S.
10. Now you can compile your screensaver or compile and create an installation package.