Introducing Vista Icons
This article provides information on the following topics:
• Windows Vista - A Resolution-Independent User Interface
• Windows Vista 256x256 PNG Compressed Icons
• Compatibility with Windows XP
• Create a Windows Vista Compressed Icon with IconWorkshop
• Use of Windows Vista Compressed Icons in Software Projects
• Compiling a Program with a 256x256 PNG icon using Visual C++ 6.0 and VS 2005
• PNG-Compress and icon in a Visual Studio 2008 solution
• Create an icon in the style of Windows Vista using Axialis Image Object Packs
Microsoft Windows Vista include many new features and enhancements. The most visible evolution will be the new Graphical User Interface (GUI). A first look at Aero (the name of the Windows Vista user interface) reveals a slicker interface with sharper graphics.
But the changes are not only visual. Aero has been designed to comply with computer technology that will be delivered over the next decade. Many new features have been implemented in Aero to support the hardware changes to come.
Windows Vista - A Resolution-Independent User Interface
One of the most important enhancements of Aero is its ability to deal with the high-resolution displays of the future, and that feature a resolution-independent UI. At present, monitors generally have a resolution of 96-DPI (dots/pixels per inch). Simply put, 48x48 icons are displayed on screen in a half-inch square.
Future LCD screens however will support resolutions up to 192 DPI. Therefore, to be displayed at the same size without quality loss, icons must include much larger images. That's the reason why Windows Vista introduces a new standard for Windows® icon size: 256x256 pixels.
The screenshot below shows the Windows Vista File Explorer displaying icons using the maximum resolution available: 256x256. Of course the result seems a bit "large" on a 96-DPI screen, but keep in mind that this technology has been designed for future screens. The icon files have been created with Axialis IconWorkshop.
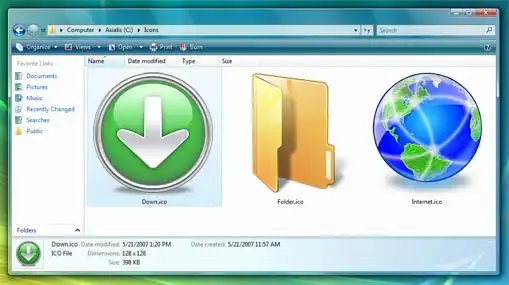
Windows Vista displaying
256x256 icons
An additional option will permit you to display icons at smaller sizes more attune to medium-res screens (say 120-DPI) screens. In such cases Aero uses the 256x256 image and shrinks it the desired size without any quality-loss. The result looks really slick with real-time zoom!
Windows Vista 256x256 PNG Compressed Icons
Microsoft Windows Vista comes with a new format of icons supporting PNG compression and sizes up to 256x256. The standard Windows Vista icons now includes the following image formats (grayed formats are optional):
| 256x256 - RGB/A | 64x64 - RGB/A | 48x48 - RGB/A | 32x32 - RGB/A | 24x24 - RGB/A | 16x16 - RGB/A |
| 256x256 - 256c | 64x64 - 256c | 48x48 - 256c | 32x32 - 256c | 24x24 - 256c | 16x16 - 256c |
| 256x256 - 16c | 64x64 - 16c | 48x48 - 16c | 32x32 - 16c | 24x24 - 16c | 16x16 - 16c |
The problem is: if you simply make the icon and save it in standard Windows® XP ICO format, the resulting file will be 400Kb on disk. The solution is to compress the images. Only the 256x256 images are compressed. The compression scheme used is PNG (Portable Network Graphic) because it has a good lossless ratio and supports alpha channel. The compressed icon sizes are 100Kb to 150Kb.
See below the different formats included in our sample icon down.ico (the 16-color formats are not displayed but are present in the icon):
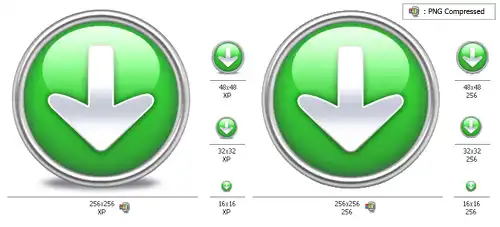
Example of Windows Vista icon images
If you want to download this sample icon right-click and choose "Save Target As..." on this link: down.ico
![]() The PNG compression is embedded in the
ICO file for the 256x256 images only. PNG compressed Windows Vista icons cannot be read and
edited with an Windows® XP-only compatible icon editor, nor can you open
them with a PNG image editor. You will require a Windows Vista compatible icon editor, like Axialis
IconWorkshop , to edit
such icons.
The PNG compression is embedded in the
ICO file for the 256x256 images only. PNG compressed Windows Vista icons cannot be read and
edited with an Windows® XP-only compatible icon editor, nor can you open
them with a PNG image editor. You will require a Windows Vista compatible icon editor, like Axialis
IconWorkshop , to edit
such icons.
Compatibility with Windows® XP
Windows Vista compressed icons are compatible with Windows® XP. They can be used in Windows® XP but only using the standard formats (48x48, 32x32 and 16x16) which will be read and displayed. The 256x256 PNG formats will be ignored.
For example, if you save the down.ico (see link above) on your Windows® XP desktop, it will be displayed as 48x48. The most important fact is that Windows® XP won't reject Windows Vista icons.
Can we add other formats, such as 128x128, in Windows Vista icons?
Yes, but this is not recommended. 128x128 format is used by Windows® XP Desktop or Dock-Bar applications. These applications will probably support 256x256 icon format when ported under Windows Vista.
Can we create 256x256 icons which display under Windows® XP?
Simply by creating uncompressed versions of the icons. They will work on all versions of Windows. However, if you want to display at large size under Windows XP, you must install a Deskptop Enhancer application. The drawback is the icon file size: 400Kb for an icon! Using Axialis IconWorkshop you can easily remove the PNG compression option.
Create a Windows Vista Compressed Icon with Axialis IconWorkshop
Here is a step-by-step tutorial on how to create a Windows Vista compressed icon using Axialis IconWorkshop.
1. Create a 256x256 version of your icon image using any image/vector editor. Save your artwork with smooth transparency (32 BPP alpha channel) using a file format that is compatible with Axialis IconWorkshop: BMP, PNG, JP2000, PSD.
You can also transfer your work from Adobe Photoshop® using the Axialis transfer plug-in (see this tutorial) or you can create an icon by assembling several image objects (see this tutorial).
In this procedure, we'll use this file: down.png (we recommend you to download it and save it on your disk - use right click and choose "Save Target As"). You can also find the file in the Librarian, folder "Objects/Pack 2 - Realistic Buttons". If this object pack is not present in the folder, you can download it from here.
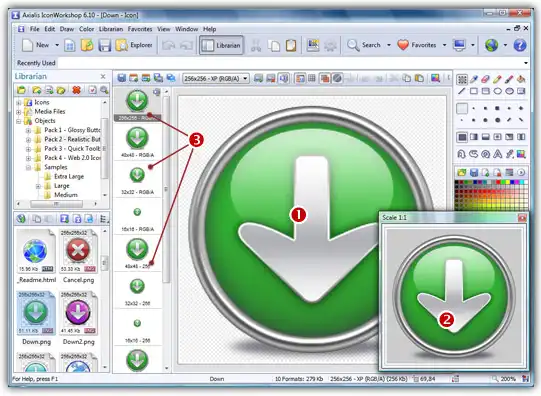
2. Launch Axialis
IconWorkshop and open
the image file. It is loaded in an image document window, not an icon
editor window, as shown below (![]() ):
):
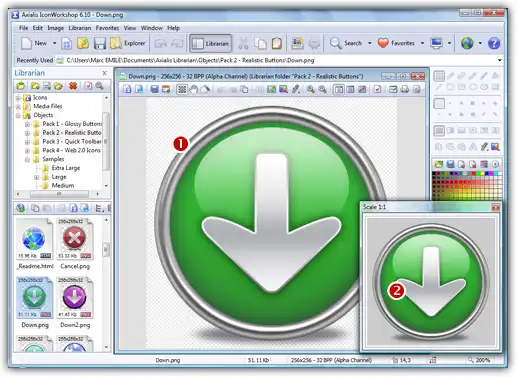
3. If the scale-1:1
preview window is not in 256x256 mode, the preview image will be cropped.
It is recommended that you switch to 256x256 preview mode if you want
to work with 256x256 Windows Vista
icons. To switch to this mode, right-click in the preview window, a menu
opens. Choose "256x256 Display".
The preview window now looks as shown above in floating mode (![]() ).
).
Use the same method to return to the previous state: choose "128x128 Display", remove the "Floating Window" option and use the mouse to dock the window.
4. Select the whole image. Choose Edit/Select All or press Ctrl+A. An animated selection rectangle is now drawn around the image.
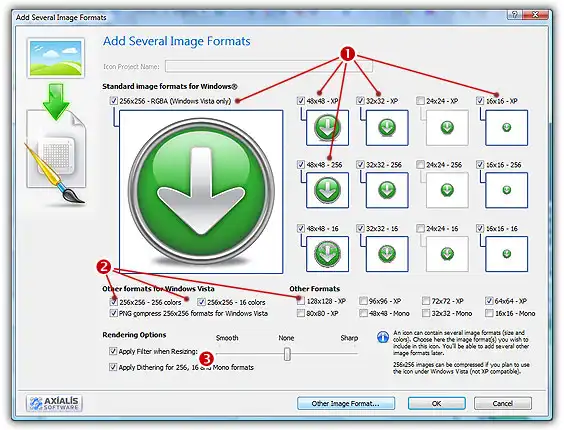
5. Choose File/Create Windows® Icon From Selection or press "I". A large dialog box opens. This dialog box will permit you to create all the image formats you want to include in your icon in one simple step:
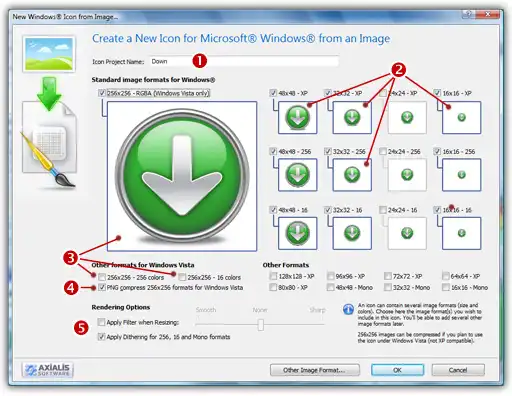
6. Type the
Name of the new icon project (![]() ). The root of the image file is proposed by default.
). The root of the image file is proposed by default.
7. Select the
images formats to include in the icon (![]() ) by clicking on the
images. To create a Windows Vista
icon, it is recommended that you follow the Windows Vista
specifications as specified above. Don't forget to add the 256x256 Windows
Vista formats in RGB/A
(Windows® XP), 256 and 16 color modes (
) by clicking on the
images. To create a Windows Vista
icon, it is recommended that you follow the Windows Vista
specifications as specified above. Don't forget to add the 256x256 Windows
Vista formats in RGB/A
(Windows® XP), 256 and 16 color modes (![]() ).
).
8. To create
a fully-compliant Windows Vista
icon, you'll need to compress the 256x256 formats in PNG. Select the associated
option (![]() ).
).
9. You can
also choose to apply the dithering option to the 256/16 color images as
well as add a filter effect to smooth/sharpen the resulting images in
RGB/A mode (![]() ). View the results in the preview images.
). View the results in the preview images.
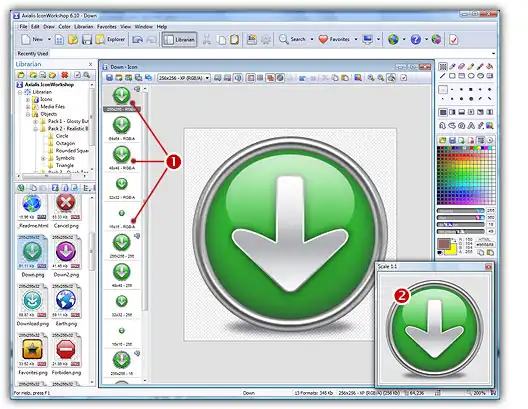
10. When done, click OK. A new icon project is created in a document window:
11. The main
window with the grid (![]() ) is the edition area where you can
retouch the icon. The gray chessboard-like texture behind the icon is
the transparent portion of the icon (the alpha channel info has been preserved).
The scale 1:1 preview is displayed in the associated window (
) is the edition area where you can
retouch the icon. The gray chessboard-like texture behind the icon is
the transparent portion of the icon (the alpha channel info has been preserved).
The scale 1:1 preview is displayed in the associated window (![]() ).
).
12. All the
available formats are displayed in a list (![]() ). You can select
them to edit (
). You can select
them to edit (![]() ) or preview (
) or preview (![]() ) them. See the
application built-in help (press F1)
to learn how to add/remove formats or work with this icon project.
) them. See the
application built-in help (press F1)
to learn how to add/remove formats or work with this icon project.
13. The compressed format (only the 256x256 formats can be compressed) are marked with this overlay PNG compression image: . You can add/remove this option by choosing Draw/Compressed Image Format (Windows Vista) or by pressing "K". You can also use the local toolbar or a right-click menu.
14. When done, save the icon by choosing Edit/Save or pressing Ctrl+S.
Use of Windows Vista Compressed Icons in Software Projects
Windows Vista PNG compressed 256x256 icons will be supported in Microsoft Visual Studio 2008 (codename "ORCAS"). We've tested PNG compressed icons on Visual C++ 6.0 and Visual .NET 2003/2005 and they all reject the icon during the resource compilation:
Error RC2176: old DIB in res\app.ico; pass it through SDKPAINT
This is unsurprising to us since this new ICO file format introduces a new header which points to raw PNG data. Of course the compiler returns a false error message. The DIB header is not old, it is PNG. Passing it through SDKPAINT does not help.
Windows Vista compressed icons have also been reported as not functioning in the Delphi programming environment. New components will no doubt be developed in the future that identify these shortfalls.
Compiling a Program with a 256x256 PNG icon using Visual C++ 6.0 and VS 2005
Create a 256x256 icon with all formats embedded as recommended for Windows Vista. Save your icon without compressing your 256x256 formats (approximately 400Kb icon file). Once the icon is created, work on your project as usual. The compiler will handle correctly the image since it won't be a PNG image.
When your project is finished and before releasing the program file, follow the procedure below:
1. Open the EXE file containing the uncompressed icon in IconWorkshop.
2. The file opens in a document window with all the embedded icons displayed. Be sure to display all the formats in raw: choose "View/Display Icons/All Formats In Raw".
3. Double-click on the icon you want to compress. It opens in another document window.
4. In the list of available formats (vertical list on left), right-click on the first "256x256 RGB/A" format, a menu opens. Choose "PNG Compressed Image Format (Windows Vista)". A small overlay icon indicating the compression is displayed (![]() ).
).
5. Repeat step 4 with the other 256x256 image formats (if any).
6. Save the icon "File/Save". Close the icon window.
7. Back in the EXE document window, you see the compression overlay icon (![]() ) displayed on all the 256x256 formats. Repeat steps 3 to 6 for all the other icons containing 256x256 images (if any).
) displayed on all the 256x256 formats. Repeat steps 3 to 6 for all the other icons containing 256x256 images (if any).
8. Save your EXE document, close the window.
9. You're done! The EXE file size is smaller indicating that the compression is made.
PNG-Compress and icon in a Visual Studio 2008 solution
This topic explains how to compress a 256x256 image format in an icon included in a solution. This will be done by opening it in IconWorkshop using the Visual Studio® plug-in (read the plug-in introduction). This feature is available for Visual Studio 2008 only.
1. Launch the Visual Studio® IDE.
2. Open the solution.
3. In the Solution Explorer window (press Ctrl+Alt+L if not visible), double click on the icon you want to PNG Compress. The icon file opens in a document window.
![]() This icon must already include a 256x256 image format because you can only PNG compress 256x256 formats (read more about Vista Icons).
This icon must already include a 256x256 image format because you can only PNG compress 256x256 formats (read more about Vista Icons).
4. Launch the plug-in command by clicking on the IconWorkshop button or by choosing Tools/Edit in Axialis IconWorkshop. The icon is opened in IconWorkshop.
5. Select the 256x256 - RGB/A image format in the list and right-click on it. A menu opens, enable the option "PNG Compress Image Format (Windows Vista)".
6. A small image ![]() is displayed in the upper-right corner of the list item. This shows that the image is PNG compressed.
is displayed in the upper-right corner of the list item. This shows that the image is PNG compressed.
7. Redo the same operation for the other 256x256 formats, if any (in 16 and 256 colors).
8. Save your icon, select File/Save or press Ctrl+S. Close the document.
9. Switch back to Visual Studio®. The IDE prompts you "Filename.ico - This file has been modified outside of Visual Studio. Do you want to reload it?". Click Yes.
10. You have finished. Now you can compile your project.
Create an Icon in the Style of Windows Vista using Axialis Image Object Packs
Here is a step-by-step tutorial on how to create a Vista compressed icon using Axialis IconWorkshop and the Axialis Image Object Packs. This tutorial requires the following items:
• Axialis IconWorkshop 6.01 or more (Download 30-Day Tryout version)
• Axialis "Realistic Buttons" Object Pack (Download Tryout Pack)
The standard Windows Vista icons now includes the following image formats (grayed formats are optional):
| 256x256 - RGB/A | 64x64 - RGB/A | 48x48 - RGB/A | 32x32 - RGB/A | 24x24 - RGB/A | 16x16 - RGB/A |
| 256x256 - 256c | 64x64 - 256c | 48x48 - 256c | 32x32 - 256c | 24x24 - 256c | 16x16 - 256c |
| 256x256 - 16c | 64x64 - 16c | 48x48 - 16c | 32x32 - 16c | 24x24 - 16c | 16x16 - 16c |
The largest image format is 256x256 XP (ie RGB with alpha channel). To achieve the best results we'll start the project using this new format and work with it to assemble the Objects. When finished, we'll create all the other formats using the resulting 256x256 graphic as a template. Let's create our new icon project:
1. Launch Axialis IconWorkshop. Choose File/New/Windows Icon Project or press Ctrl+W. A dialog box opens:
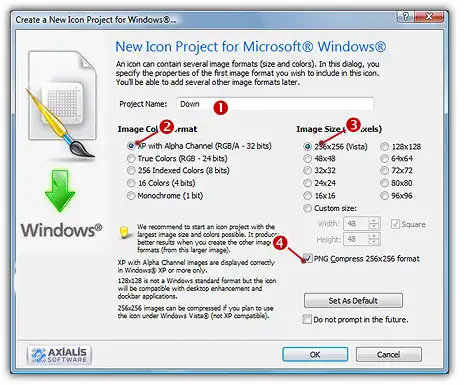
2. Type the name of the project (![]() ): "Down".
): "Down".
3. Now specify the format of the first image to add in the project: In Colors, choose "XP with Alpha Channel (RGB/A 32 bits)" (![]() ). In Size in Pixels, choose and "256x256 (Vista)" (
). In Size in Pixels, choose and "256x256 (Vista)" (![]() ).
).
4. As we want the 256x256 format to be used under Windows Vista, we will choose to compress it as a special PNG file: Click the option "Compress 256x256 Vista format" (![]() ).
).
5. When done, click OK. A new icon project window is created (![]() ):
):
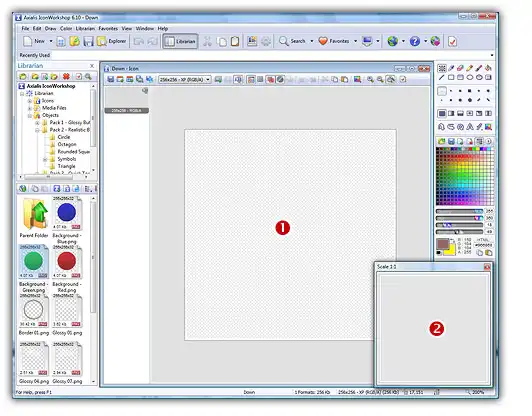
6. If the scale-1:1 preview window is not in 256x256 mode, the preview image will be cropped. We recommend that you switch to 256x256 preview mode to work with 256x256 Windows Vista icons. To switch to this mode, right-click inside the preview window and a menu will open. Choose "256x256 Display". The preview window now looks as shown above in "floating mode" (![]() ).
).
Use the same method to return to the previous state: choose "128x128 Display", remove the "Floating Window" option and use the mouse to dock the window. The time has come to be creative which you'll find easy and a lot of fun with IconWorkshop. Before we start, don't forget that each step of the creation can be undone/redone up to 16 steps (Ctrl+Z/Ctrl+Y).
7. In the Librarian window (choose View/Librarian if it is not visible), select the "Objects/Pack 2 - Realistic Buttons/Circle" folder (![]() ). If the pack is not yet installed download and install it from this page. A list of available Object are displayed in the contents window below (
). If the pack is not yet installed download and install it from this page. A list of available Object are displayed in the contents window below (![]() ). Find the "Background - Green.png" file and select it (
). Find the "Background - Green.png" file and select it (![]() ).
).
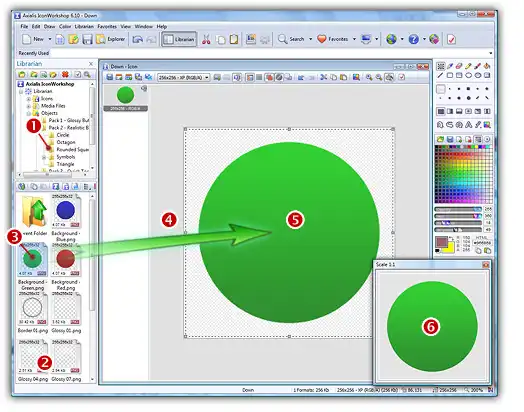
8. When done, use a mouse Drag-and-Drop to add it into the project as shown above (![]() ). The Object is added to the project as a floating selection (
). The Object is added to the project as a floating selection (![]() ). Take a look at the quality of the artwork in the Scale 1:1 window (
). Take a look at the quality of the artwork in the Scale 1:1 window (![]() ).
).
Congratulations, you've just added your first Image Object to your project! As you can see it's very intuitive. Now let's continue and add other objects to build the icon.
IMPORTANT To follow the next steps, the "Preserve Transparency" option must be set (press "T" or select Draw/Preserve Transparency). If this option is not set, the transparency will not be kept each time you add a new image object and the objects already added will be fully replaced. |
9. From the librarian, select the file "Inner Glow 2 - Black.png" and add it to the project using the same method. The resulting image now includes a red light effect as shown below:
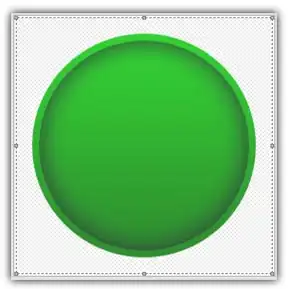
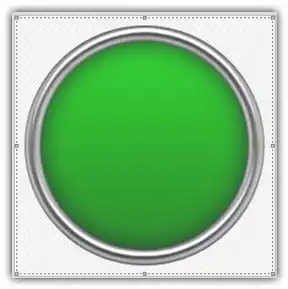
10. From the librarian, add the file "Border 01.png" to the project:
11. Let's add the arrow. Select the folder "Objects/Pack 2 - Realistic Buttons/Symbols" and add the file "Arrow Down.png" to the project:

12. A good idea is to add a glossy effect to increase the realism of the icon. From the librarian, select the folder "Objects/Pack 2 - Realistic Buttons/Circle" and add the file "Glossy 04 .png" to the project. Here is the result:

13. The final touch is the shadow under the icon. Let's add the "Shadow Bottom 01 - Black.png". The image object is placed by default in foreground by IconWorkshop. In our case, the shadow should be placed behind the icon. A feature permits to do this in IconWorkshop: Press the End key on the keyboard. The shadow is now placed in background.
You're done! The resulting image should look like this:

Now that the largest image is complete (256x256 RGB/A), we'll create all the other formats of the icons from this one. This is done in one step with Axialis IconWorkshop Corporate Edition. Using the Personal Edition, you need to create each format manually (see the product help file for more info).
14. Choose Draw/Add Several Image Formats from This Image or press "V". A dialog box opens:
15. Select the images formats to include in the icon (![]() /
/ ![]() ) by clicking on the associated check boxes. Follow the specifications as we defined them above for Windows Vista icons. Don't forget to compress the 256x256 image formats (
) by clicking on the associated check boxes. Follow the specifications as we defined them above for Windows Vista icons. Don't forget to compress the 256x256 image formats (![]() )
)
16. You can also choose to apply the dithering option to the 256/16 color images as well as adding a filter effect to smooth/sharpen the resulting images in RGB/A mode (![]() ). View the results in the preview images.
). View the results in the preview images.
17. When done, click OK. The new formats are automatically created and added to the project (![]() ):
):
18. Take a moment to admire your work :) Click on the various formats (![]() ) and see the resulting icon at scale 1:1 in the preview window (
) and see the resulting icon at scale 1:1 in the preview window (![]() ). You can change the background lightness of the Scale 1:1 window simply by clicking in it using the left button of the mouse. This will allow you to see how the icon is displayed on different backgrounds with different lightness settings.
). You can change the background lightness of the Scale 1:1 window simply by clicking in it using the left button of the mouse. This will allow you to see how the icon is displayed on different backgrounds with different lightness settings.
19. Save your icon: Choose File/Save or press Ctrl+S. It will be saved as Windows ICO format.
Conclusion
Windows Vista icons deliver a new framework of icon presentation for high definition monitors and operating systems while remaining compatible with Windows® XP and lower definition screens. The larger 256x256 icon format provides additional opportunities for icon designers to explore more subtle and detailed development in their aim to create visual symbols that aid the user in their use of the computer environment.