IconGenerator
Online Help

Table of Contents:
Version: 1.00
Last update: Jan 17, 2017
Introduction
Axialis IconGenerator is a powerful icon production tool for developers, UI designers and illustrators. It lets you create icons in all existing formats, vectors and bitmaps, from a large database of icon sets made by professional graphic designers.
The database, which is automatically updated via Internet, contains a large variety of images in vector native format. These images are used to generate the icons via IconGenerator. Several icon sets are provided with different styles and specifications. Using IconGenerator is very simple: Simply select icons and overlays and generate all the icon files you need.

Generate Vector & Bitmap Icons
The application generates icon files in vector formats SVG, XAML, PDF, EPS, PS, as well as bitmaps formats PNG, BMP, JPEG, ICO, ICNS. You can create collections or generate icons directly from the database. A powerful generation tool lets you create all your icons at all sizes and formats in one batch operation.

Customize Icons With Overlays
Many overlay images are included in the icon sets. They let you illustrate actions or states associated to an icon like ADD, REMOVE, INFO, ERROR, etc. With Axialis IconGenerator you can associate them to icons in a few clicks and place them at 4 different positions:
![]()
![]()
![]()
![]()
![]()
![]()
![]()
![]()
Colorize Your Icons
You can also choose to colorize the icons to match a specific interface color. This icon set is colorized using monochrome solid colors to create an outlined style:
![]()
![]()
![]()
![]()
![]()
![]()
![]()
![]()
![]()
![]()
Two Sizes of Icons for Ribbons, Toolbars & Menus
Some icon sets were designed for use in application toolbars & menus. In such case, two sizes are provided for pixel-perfect fit in toolbars, menu & ribbons:
![]()
![]()
![]()
![]()
![]()
![]()
![]()
![]()
![]()
![]()
![]()
![]()
Getting Started
Requirements
Axialis IconGenerator requires the following system to run:
- Intel Pentium class CPU - 1.4 Ghz (Core Duo recommended)
- True color video card (16.8 M Colors) - 1280x1024 (1920x1200 recommended)
- 2 Gb RAM (4 Gb recommended)
- Windows Vista (7, 8 or 10 recommended)
Installing IconGenerator
To install IconGenerator, please follow the procedure below:
- Download the installer from Axialis site and save it in a specific folder.
- Open folder and start the installer.
- Click YES in the User Account Control window when prompted.
- Follow the installation procedure (read carefully the user agreement, you need to accept it to install).
Starting IconGenerator
IconGenerator starts automatically after installation. You can also launch it from the start menu or using the shortcut created on Windows Desktop.
Axialis IconGenerator is totally free to use without limit of time. Read IconGenerator User License Agreement to learn more.
Updating IconGenerator & the Icon Set Database
IconGenerator and the icon set database are automatically updated when the application starts (an update check is performed). However you can perform a manual check by clicking on Check For Updates in the main toolbar, or in Help menu.
When an update is available it is downloaded and applied automatically. New or updated icon sets are displayed in bold in the list with a little "new" overlay.
Registering IconGenerator
When you start IconGenerator you're prompted to register the product. Registering is optional but strongly recommended. By doing so, you become a registered user and get many benefits (read more in registration window). Registering is free, done in seconds and your privacy is preserved.
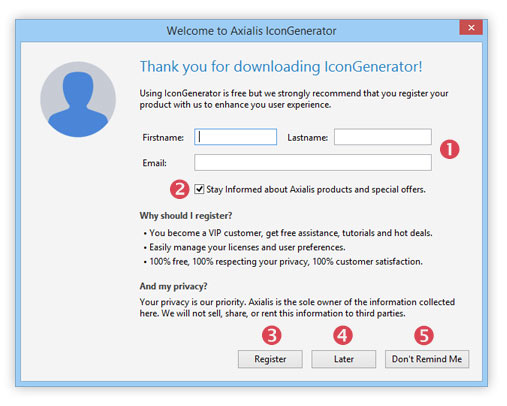
Enter your name & email ❶, select Stay Informed option ❷ to receive information emails from Axialis (strongly recommended to get latest news, promotions, free icons...). When done, click Register ❸.
If you want to register later, click Later ❹. If you don't want to be asked again, click Don't Remind Me ❺ (you'll be able to register later from the Help menu).
Start Creating Icons
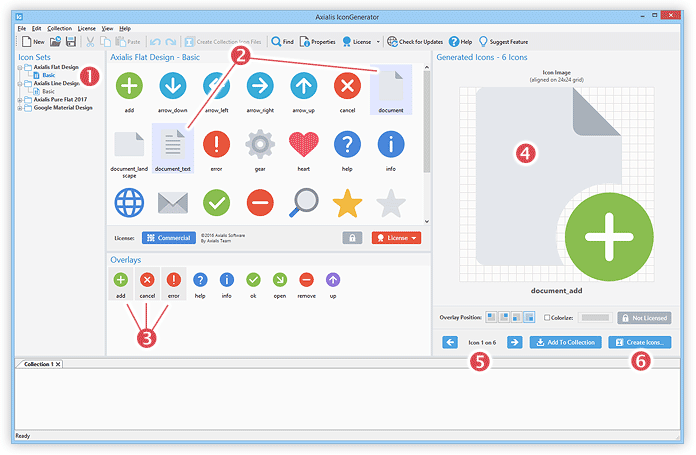
Once IconGenerator is opened, you can start creating icons immediately. Select the icon set you want to use in the list on left ❶. Select one or several icons in the list containing all the icons included in the set ❷.
You see the first icon you selected in the right pane Generated Icons ❹. If you selected several icons you can browse your selection by clicking on the left & arrow buttons located at the bottom of the pane.
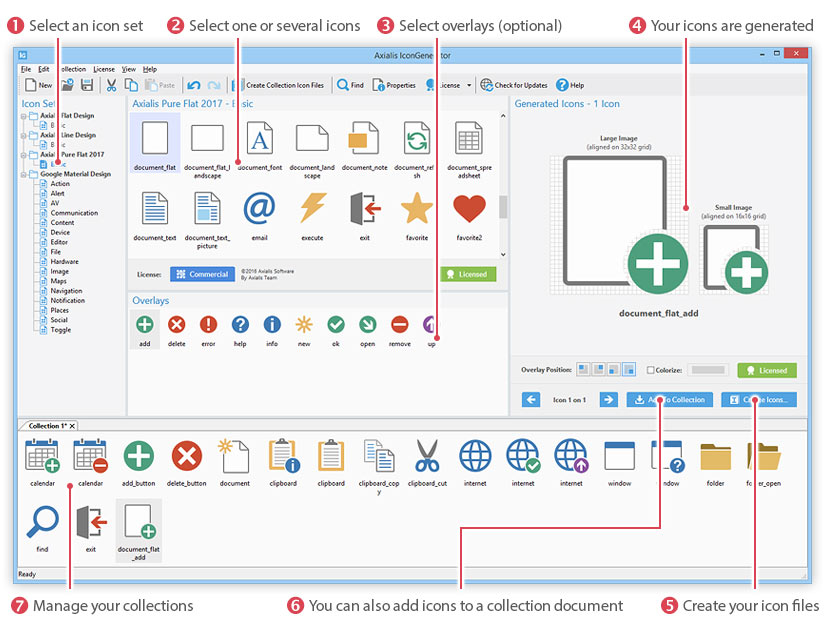
If you want to customize your icons with overlays, select one or several overlays in the list ❸. Now browse icons in the right pane: you have all combinations of icons/overlays possibles. For example, if you selected 5 icons and 3 overlays, you have generated 3 X 5 = 15 icons. Note that you can place your overlay at 4 different positions. You can also colorize the icons by clicking the Colorize option. Also, by right-clicking in the right pane, you opens a contextual menu with various commands.
When you have all the icons you want, click Create Icons ❺ to start the generation of icon files. An large window with many options opens. On the left size select the target folder (you can create a new one if you want). On the right side, select the icon file formats & options you want to generate (more information in section Generating Icons).
When done, Click OK, your icons are generated in one batch operation... cool! 😃
Using Collections
You can also add your icons in a collection. A collection is a document files (extension .AXICP) which lets you manage icons you need for a project. You can create, load, save collections in a multi-documents interface with tabs (at the bottom of the IconGenerator window).
To add generated icons to a collection, click Add To Collection button ❻. Once icons are added, you can move, copy, delete, rename, modify them ❼. By right-clicking on selected icons, you opens a contextual menu with various commands
Once you have finished working on your collection, you can save it by choosing File > Save. Later, you'll be able to load the file again to commit changes or generate icon files from it.
To create icons from a collection, choose in menu Collection > Create Collection Icon Files or press F4. The option window which opens is similar to the one used for generated icons. Click OK to generate the icon files
Icon Set Licenses
Icon sets provided in the database have different licenses types: Open Source (totally free), Common Creative (Free, Limited with Attribution) and Commercial (must be purchased).
Open Source License
Icon sets with Open Source license (for example "Google Material Icons") are totally free to use in commercial and personal projects. Click green button Feee License to read more.
Axialis Commercial License
Icons sets with Axialis Commercial License (for example "Axialis Flat Icons") must be purchased to be used without restriction in commercial and personal projects.
Icons are licensed per user, which means that a company must purchase one license per employee using the icons in his projects. Each user can use the icons for unlimited number of projects such as applications, web sites, slide shows, documentations.
Our license is Lifetime, which means that you purchase each set once and get all future updates for free without limit of time or quantity.
With this license YOU CAN:
- Create SVG, XAML, EPS, PS, PDF vector versions
- Create PNG, BMP, JPG, ICO, Mac ICNS bitmap versions at all sizes
- Use the icon in commercial applications or websites without linking or giving credits to us
- Get free updates without limit of time (Axialis Lifetime License)
Read more about Axialis Commercial License
Free, Limited, Attribution License (CC BY-ND 4.0)
Icons sets with Commercial License can be used freely in commercial and personal projects. However, only limited versions of the icons can be used and we require a copyright notice and a link to our website.
With this license YOU CAN:
- Use the icons at native size (scale 1x) in bitmap format
- Use the icons for any purpose, even commercially
YOU MUST:
- Give credits to us "Icons courtesy of Axialis Software" with a link to "https://www.axialis.com".
- Keep the derivatives. If you remix, transform, or build upon the icons, you may not distribute the modified icons
Read more about Axialis free license
Read more about CC Attribution-NoDerivatives 4.0 International
Purchasing a Commercial License
To fully use a commercial icon set you must buy the license on our web site. You'll receive a product key and you'll be able to activate the set in the application. To buy an icon set license, follow the procedure below:
- <Select the icon set you want to buy. Each set is sold individually, so you need to select it in the list, for example "Axialis Flat Design - Basic"
License ❶, a drop-down menu opens: 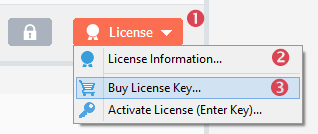
License Information ❷ if you want to read more before purchasing. Buy License Key ❸. Your browser opens and the Axialis website opens in a page. The icon set is automatically added in cart. Repeat operation if you want to purchase several sets. - Follow the checkout procedure and proceed with payment. You will receive your activation keys in minutes ion your mailbox. See below how to activate your icon sets using the these keys.
Activating a License
Once you have purchased a license you must activate it in IconGenerator using the key you received. You must be connected to internet to perform the activation.
- Select the icon set you want to activate.
- Click button License. In menu, click Activate License, an activation window opens
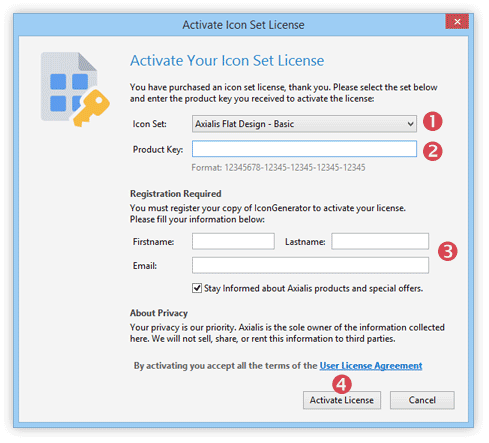
- Select the icon set in the list ❶.
- Enter the activation key ❷. We recommend using copy/paste to avoid errors.
- Registration is required to activate. If you have not yet registered IconGenerator, you must register now ❸. If you already registered, this section is not displayed.
- Click Activate License" ❹.
- The application connects to Internet, activation is done in seconds. Thank you! 😃 Now you can fully use your commercial license.
Generating icons
Generating icons with IconGenerator is very simple. The workflow has been designed to enhance your productivity. You create icons in 3 simple steps: Select icons and optional overlays, apply options, then generate icon files.
Selecting Icons & Overlays
To generate icons, simply select icons & overlays by following the procedure below:
- Select the icon set in the list ❶:
- All the icons included in the set are displayed in the icon list. Select one or more icons in this list ❷. You can use Shift / Ctrl keys to select several icons.
- If you want to apply overlays to your icon selection, select one or several overlays in the list ❸. Selecting overlays is optional. If you selected overlay and wish to remove selection, click in a blank area of the list or right-click and choose "Select None".
- Once selection is done, you see a large image of the generated icon in the right pane "Generated Icons" ❹. Note that in the image above, we have 6 icons generated because we have selected 2 icons and 3 overlays.
- You can browse through the generated icons by clicking right & left buttons ❺.
- If you want to have more information on a generated icon, right-click on it ❹, a menu opens, click on Properties. Many informations are available here. If you click the Image tab, you get vector code for SVG & XAML. You can also copy/save the image in bitmap format (at scale 1:1, 2:1 & 10:1).
- To get more information on the license associated with this icon (the whole set it belongs to), click the License button (either "Not Licensed", "Licensed" or "Free License").
- You can also change the overlay position and colorize the icons (see the following sections to read more).
- When done, click Create Icons button ❺ to create the icon files you need (read next topic).
Creating Icon Files
Once you have generated the icons by selecting them as describe above, you are ready to generate icon files on your hard disk. Following the procedure below:
- Once icons are selected, click Create Icons. A window where you can choose various options opens:
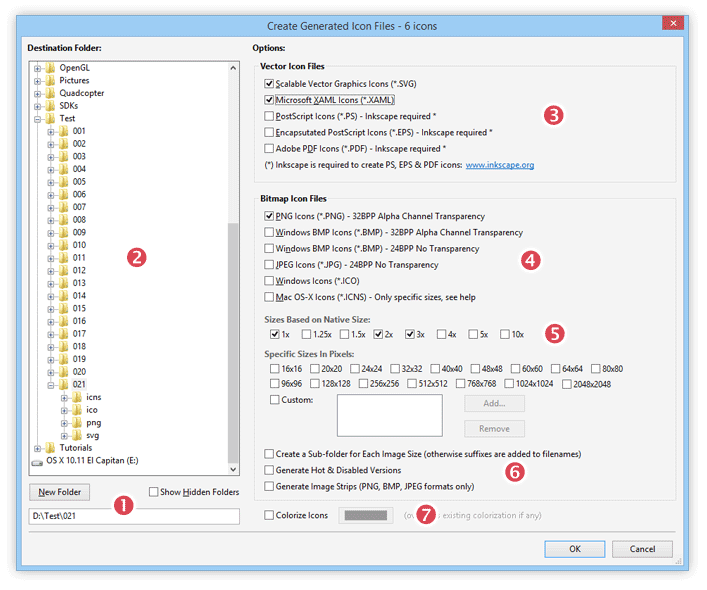
- Specify the destination folder ❶. Icon files will be saved in this folder. I will be created if it doesn't exist. You can also select an existing folder in the directory tree ❷
- Choose the vector formats you need ❸. Each format will be created in a different folder. SVG, XAML formats are generated using a built-in feature, so there is no external requirement for them. To generate PS, EPS, PDF formats you need to install Inkscape, a free application that you can download here.
- Select the bitmap formats you want to create ❹. Each format will be created in a different folder.
- If you have chosen at least one bitmap format to create, select the different sizes you want to create ❺. Each format will be created in a different folder. You can specify sizes based on native size of the icon set. For example native size is 24x24 in "Axialis Flat Design" icon set. In this case, scale 1x will be 24x24, scale 2x will be 48x48, and so on. You can also choose specific or custom sizes.
- Specify options for the bitmap generation ❻:
- • Create a sub-folder for each image size: each image size will be created in a sub-folder, otherwise all images will be in the same folder with image size added in the filename.
- • Make Hot & Disabled versions: hot and disabled (greyed) versions will be in addition to the normal icon.
- • Generate Image Strips: all icons will be places in raw in one single image (useful to populate toolbars and image lists).
- You can also Colorize the icons ❼. Read topic Colorizing icons to learn more.
- When done Click OK, your icons are generated in one batch operation... 😃
Quickly Saving an Icon File
You can choose to quickly save an icon file. Following the procedure below:
- Once icons are selected, right-click in icon preview. A contextual menu opens.
- Click Save Image As. A sub-menu opens.
- Select the image format and follow the procedure.
Quickly Copying an Icon File
You can choose to quickly copy an icon image in the Clipboard. You can copy a SVG/XAML vector code or the bitmap image. Following the procedure below:
- Once icons are selected, right-click in icon preview. A contextual menu opens.
- Click Copy Image As. A sub-menu opens.
- Select the image format. The image is copied in the Clipboard either as SVG/XAML code or as bitmap.
Adding overlays
Many overlay images are included in the icon sets. They let you illustrate actions or states associated to an icon like ADD, REMOVE, INFO, ERROR, etc. With Axialis IconGenerator you can associate them to icons and place them at 4 different positions:
![]()
![]()
![]()
![]()
![]()
![]()
![]()
![]()
Adding Overlays
To apply overlays, follow the procedure below:
- Select the icon set in the list ❶:
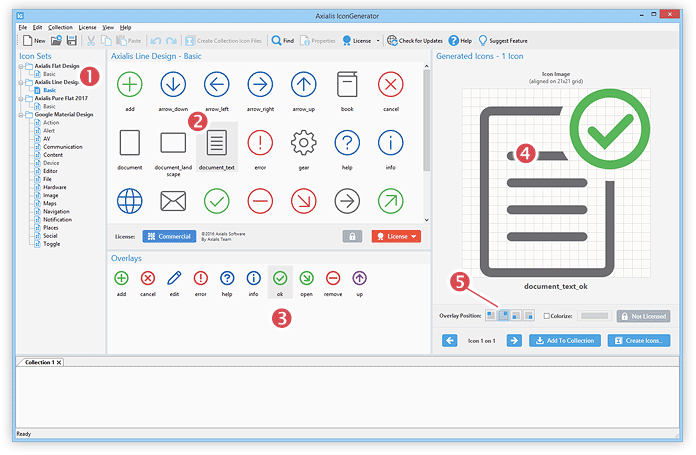
- All the icons included in the set are displayed in the icon list. Select one or more icons in this list ❷. You can use Shift / Ctrl keys to select several icons.
- If you want to apply overlays to your icon selection, select one or several overlays in the list ❸.
- Once selection is done, you see a large image of the generated icon in the right pane "Generated Icons" ❹. In the screenshot, the overlay is located in the upper-right corner.
- You can place the overlay at a different location by clicking one of the 4 position buttons ❺. The preview image is automatically updated to show the new position.
Removing Overlays
To remove overlays simply unselect them in the overlay list: click in a blank area of the list or right-click and choose "Select None".
Colorizing icons
Colorizing icons can be useful to enhance visibility of icons (on a dark background for example) or to be consistent with a user interface theme. Depending of the icon set style, two colorization modes are available: monochrome or shaded.
The colorization mode is part of the icon set properties and can't be chosen by the user.
Monochrome Colorization
In this colorization mode, the whole icon is colorized with a unique color which is exactly the one you selected. Dark or medium colors are replaced. White and light colors are set to transparent. See below how Axialis Pure Flat 2017 is colorized:
![]()
![]()
![]()
![]()
![]()
![]()
![]()
![]()
![]()
![]()
![]()
Shaded Colorization
In this colorization mode, the icon is colorized keeping the original shades of grey. This applies to icons using shaded colors without borders or outlines. See below how Axialis Flat Design is colorized:
![]()
![]()
![]()
![]()
![]()
![]()
![]()
![]()
![]()
Colorizing Icons
To apply overlays, follow the procedure below:
- Once icons are selected, you see the icon preview in the right pane ❶:
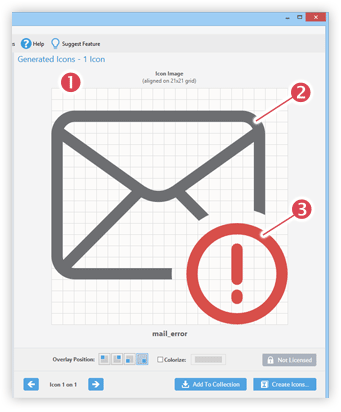
- The icon is displayed without colorization: icon is dark grey ❷ and overlay is red ❸.
- To colorize the whole icon (icon and overlay), check option Colorize ❶:
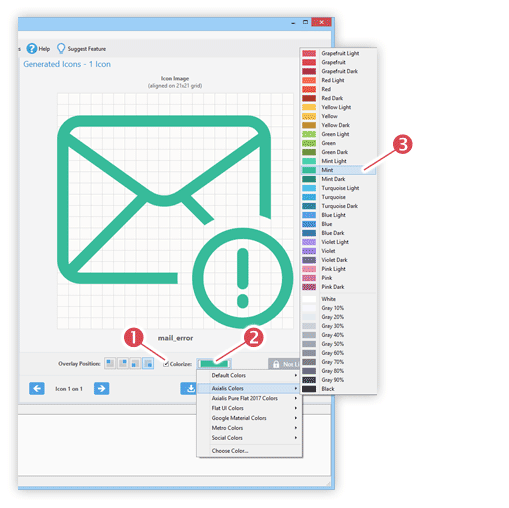
- Select the color by clicking the Colored button ❷. A menu opens with different color palettes. Select one of them and click on the color of your choice ❸.
Adding Your Own Color Palettes
You can add your own color palette to the color menu. Palette files are located in the Roaming Application Data folder. Under Windows it is: c:\Users\YourName\AppData\Roaming\Axialis\IconGenerator\Color Palettes
Axialis color palettes have extension AXPAL. They are XML text files which have a simple and self-explanatory format. You can create yours using a text editor.
Adobe ACO color palette files are also supported.
Working with collections
Making icon files with IconGenerator is quick and simple. However, the level of customization may not be sufficient for larger projects. Collections will solve this by letting you create your own list of customized icons with different properties
For example, you'll be able to generate icons with different overlay positions or colorizations, and store them in the same collection. You can also sort, duplicate, rename icons in a collection.
Collections are IconGenerator's documents. They can be created, modified, saved in files and re-loaded for later use. Using collection is the best method for managing icons for a project. Collection files have extension AXICP. They are saved in XML text format.
Of course, once the collection is complete, you can create all the icon files it contains in one single batch operation!
Managing Collections
Collection documents are managed from the File menu. You can create, open, save, close collections. Collections are opened in a tabbed interface located at the bottom of the application window.
Click a tab to activate a collection. Use drag & drop to move a tab in the list. Click X button to close a collection.
Adding Icons To Collections
To add icons to a collection, follow the procedure below:
- Once icons ❶ and overlays ❷ are selected, you see the icon preview in the right pane ❸ :
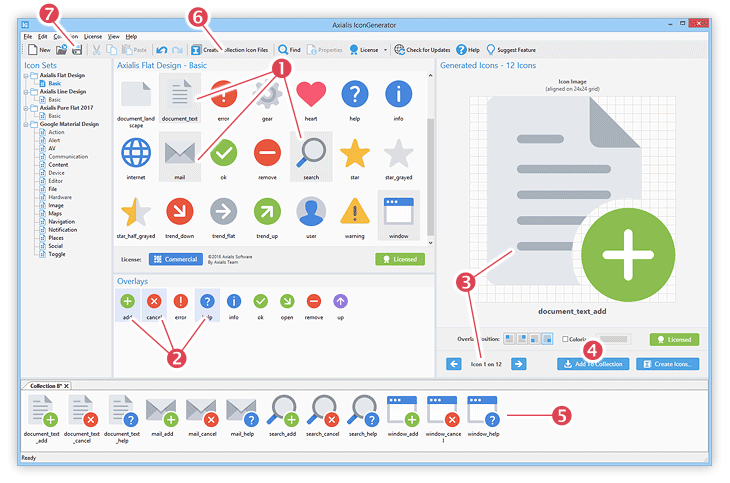
- In the example above, we have selected 4 icons and 3 overlays, so we have 12 generated icons ❸.
- Click Add To Collection button ❹. All 12 icons are added to the current collection ❺.
- Now you can move, remove, rename and change properties of the icons you just added. Clipboard operations can be performed as well as mouse drag & drops (Press Ctrl key while dragging to copy.
- Once the collection is done, you can Create Icon Files ❼ and Save it as an AXICP file ❻.
Quick Adding Icons
You can quickly add icons directly to the collection document without using the Generated Icons pane:
- Select one or several icons in the list and drag them using the mouse in the collection.
- Or, select one or several icons in the list, right-click and choose Add To Collection.
- Or, double-click on an icon in the list.
Quick Applying Overlays
You can quickly apply overlays directly to the collection document without using the Generated Icons pane:
- Select one or several overlays in the list and drag them using the mouse in the collection. They will be applied to selected icons.
- Or, double-click on an overlay in the list. It will be applied to selected icons.
Managing Icons in a Collections
Once you have added icons in a collection, you can manage them:
- Moving Icons: Select one or several icons and drag them to the new location. You can also use the clipboard Cut + Paste.
- Copying Icons: Select one or several icons and drag them to the new location while pressing the Ctrl key. You can also use the clipboard Copy + Paste.
- Removing Icons: Select one or several and press Del key (or right-click and choose Delete).
- Changing Icon Properties: Select one or several icons, right-click and choose Properties.
Creating Icon Files From a Collection
Once you have added the icons in the collection, you are ready to generate icon files on your hard disk. Following the procedure below:
- Click Create Collection Icons or press F4 key in the toolbar. A window where you can choose various options opens:
- Specify the destination folder ❶. Icon files will be saved in this folder. I will be created if it doesn't exist. You can also select an existing folder in the directory tree ❷
- Choose the vector formats you need ❸. Each format will be created in a different folder. SVG, XAML formats are generated using a built-in feature, so there is no external requirement for them. To generate PS, EPS, PDF formats you need to install Inkscape, a free application that you can download here.
- Select the bitmap formats you want to create ❹. Each format will be created in a different folder.
- If you have chosen at least one bitmap format to create, select the different sizes you want to create ❺. Each format will be created in a different folder. You can specify sizes based on native size of the icon set. For example native size is 24x24 in "Axialis Flat Design" icon set. In this case, scale 1x will be 24x24, scale 2x will be 48x48, and so on. You can also choose specific or custom sizes.
- Specify options for the bitmap generation ❻:
- • Create a sub-folder for each image size: each image size will be created in a sub-folder, otherwise all images will be in the same folder with image size added in the filename.
- • Make Hot & Disabled versions: hot and disabled (greyed) versions will be in addition to the normal icon.
- • Generate Image Strips: all icons will be places in raw in one single image (useful to populate toolbars and image lists).
- You can also Colorize the icons ❼. Read topic Colorizing icons to learn more.
- When done Click OK, your icons are generated in one batch operation... 😃