Create a PNG, BMP, JPEG 2000 Image with Transparency
In relation to Axialis IconWorkshop, this article offers information on the following topics:
- What is RGB with Alpha Channel Transparency?
- Open the icon, save the RGB/A Image in an external file
- The JPEG 2000 options
If you work with external programs such as Macromedia Freehand, Adobe Photoshop or Jasc Paint Shop Pro, you may need to save an Icon Image to an external file.
Axialis IconWorkshop permits you to save an icon image to PSD, PNG, BMP or JPEG 2000 file formats preserving the transparency areas of the icon. The images are saved in RGB format with Alpha Channel tansparency.
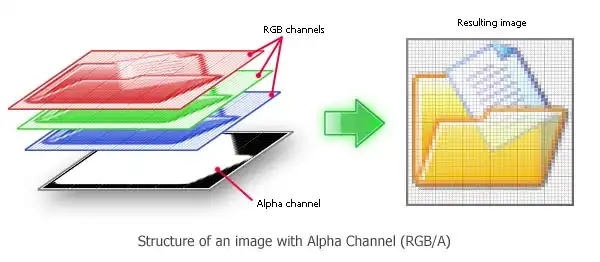
What is RGB with Alpha Channel Transparency?
Icons contains different formats of the image to display. Some of these formats are called RGB/A or XP. These formats contain 16.8M colors coded in RGB plus an additional opacity channel. This channel is called the "Alpha Channel". Each channel is coded using 8 bits per pixel. As a result each pixel is coded in 32 bits (32 BPP - Bits Per Pixel). See the illustration below to understand how channels are organized in an RGB/A image.
This is a new image format that you can find in new generation of icons. This image format is called XP RGB/A by IconWorkshop.
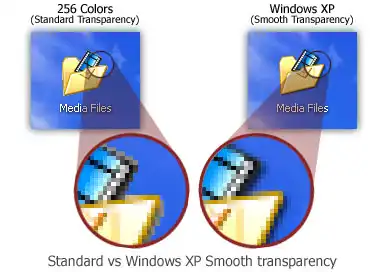
The main advantage of this image format is that it permits to display a smooth transparency in icons. The resulting image is displayed with smooth contours on all backgrounds. It permits also to create dropped shadows behind icons. This interesting effect is used in Windows XP, Windows Vista and Macintosh OSX icons.
The following illustration shows the difference between a standard image format transparency (in 256 color formats for example) and the new Windows XP smooth transparency:


Open the icon, save the RGB/A Image in an external file
1. Open your original icon file (from the librarian or using File/Open...).
2. The image file opens in a document window. In the image format list, select the image you wish to save to an external file.
3. Choose Draw/Save Image as Bitmap. A dialog box opens. Choose to Preserve Transparency Information (this will permit you to keep transparent areas in your image file). When done, click OK.
4. A standard Save Image As dialog box opens. In the Save as Type list, select the format you wish to use to save the image. Choose a destination folder and type a new filename. When done, click OK. The file has been created.
5. In your external program, open the newly created file. It opens, containing the icon image with transparency. Now you can retouch it or use it as necessary.
JPEG 2000 is the latest generation of compressed image format. It permits to compress images with low quality loss. Additionally it permits to encode images with alpha channel.
When you save an image in JPEG 2000 format you need to specify the type of compression you want for this image:
• Lossless compression - This will result in perfect image quality but larger file size (about 30-50% of original image). The compression ratio cannot be adjusted.
• Lossy compression - This can be adjusted to create smaller files (high compression means low quality - see preview in dialog box).
If you use lossy compression, we recommend you to adjust the compression level using the slider and compare the difference between the original and the resulting image in the preview window.