Create Your Own Photoshop Templates
In relation to Axialis IconWorkshop, this article offers information on the following topics:
- Photoshop Templates - A Technical Overview
- Create the PNG image file
- Create the XML description file
By default, Axialis Iconworkshop is provided with 10 templates. However, we have designed the system to permit you to create your own ones. This topic explains in details how you can create templates that will match your specific needs.
Photoshop Templates - A Technical Overview
The figure below shows in details how the Photoshop templates are implemented in Axialis IconWorkshop:
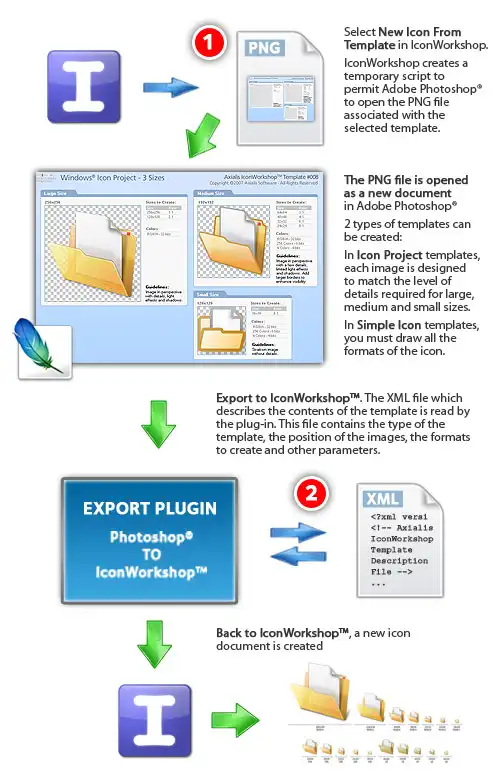
When you select the command File/New/Icon Project from Photoshop Project, IconWorkshop populates a menu with all the templates it finds in folder "[Application Data]\Axialis\IconWorkshop\Templates". The folder "[Application Data]" has different locations depending on Windows versions. If you want to open the Axialis IconWorkshop application data folder, choose the command File/Open Application Data Folder in IconWorkshop menu to open it in Windows Explorer. It contains several data files (Color Swatches, Color Tables, Templates). The Photoshop template files are located in the sub-folder "Templates".
By choosing one of the templates, it opens the associated PNG file 1 (same root filename as the XML description file) in Photoshop as a new document. The name of the document has the name of the template image with the string "Copy" added to the end. This is very important because it means that the document window is not attached to the original PNG file. This has been implemented this way to avoid overwriting of the original PNG template file. If you choose file/save (Ctrl+S) you'll be prompted to enter a new filename.
Once you have drawn your image files, be sure to remove any selection and export it into IconWorkshop by choosing File/Export/Export to Axialis IconWorkshop. The image is temporary flatten (not the original work which keeps the layers if any) and the export plug-in is executed automatically.
During the export process, the plug-in recognizes that the image is a template by detecting a special "barcode" located in the upper-left corner of the image:
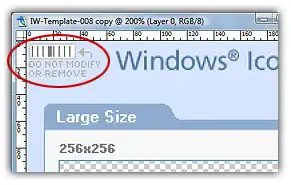
This barcode should not be modified or removed during the artwork creation. If the plug-in can't find this barcode, the whole image will be exported to create an icon like it is usually done with the plugin. This is not what we expect with the Photoshop templates. We want the plugin to extract portions of the image as described in the associated XML file to create the different formats. This barcode permits to the plugin to identify which XML file is associated with this template image. This is a binary-based barcode which permits to generate a number up to 255. Therefore, you can create 245 additional templates (10 templates are already provided). You'll need to create your own barcode to identify the template you'll create (see later in this topic).
Once the plug-in has identified the template by its number, IconWorkshop searches for the associated XML description file 2 in folder "[Application Data]\Axialis\IconWorkshop\Templates". The filename must have the following format: "IW-Template-NNN.xml" (where "NNN" is the template number: "001","002"...). When the file is found, it is read, all the template data are loaded and the icon is created based on this data.
As a conclusion, if you want to create a new template, you must:
1. Create a PNG image file named "IW-Template-NNN.png" 1 with the transparent drawing zones. The file must be RGB/A (32-bit with alpha channel) to permit IconWorkshop to support transparency.
2. Create the associated XML description file named "IW-Template-NNN.xml".
3. Place the 2 files in folder "[Application Data]\Axialis\IconWorkshop\Templates" and reload IconWorkshop.


Create the PNG image file
In this image file, you need to place at least the drawing zones and the barcode as discussed previously. We recommend you also to add some texts to identify the drawing zones and give instructions to the person who will draw the icon. However, this is not necessary. Only the barcode and the content of the drawing zones will be used. To create the PNG file, we recommend you to use Adobe Photoshop. Once the image is done, save it as PSD for future edition and save a copy as PNG in the IconWorkshop Template folder. The PNG file must be saved as RGB/A 32 bits.
1. Launch Adobe Photoshop. Create a new RGB/A image. Specify the size as requested by your template.
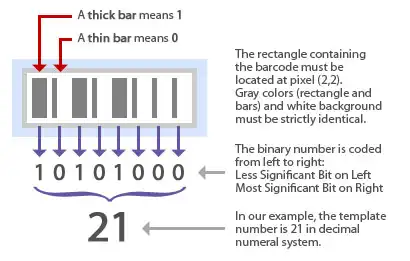
2. Create the barcode. To do so, we recommend you to copy/paste an existing barcode from the templates provided with IconWorkshop and modify it to reflect your template number. The code must be located at the same position as in the existing template (pixel 2,2). Only the rectangle and its content is used. The text "DO NOT MODIFY OR REMOVE" and the arrow can be removed. They're here only for info. The barcode is binary-based from left to right (lower digits are left, upper digits are right). To get more info about the Binary Numeral System, we recommend to read this article: http://en.wikipedia.org/wiki/Binary_numeral_system. The barcode is composed of 8 bars. A thin bar (1 pixel) means O and a thick bar (3 pixels) means 1:
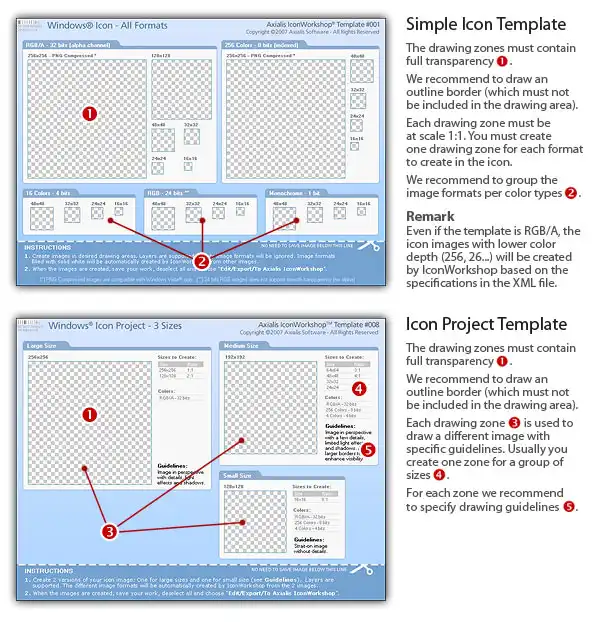
3. Create the drawing zones. You can create 2 types of templates:
• If you create a Simple Icon Template, each zone must be specified at scale 1:1. You must make one different zone for each format.
• If you create an Icon Project Template, the drawing zones are usually larger than the final icon formats. Each zone can be used to make several icon formats.
4. When the image template is done, first save it as PSD for future use, then save it as PNG with RGB/A transparency (32 bits). Use a filename as specified above. For example, if the template is number 21, save it as "IW-Template-021.png" in IconWorkshop template folder.
Create the XML description file
The description file permits to specify the necessary information associated to the template. This will permit IconWorkshop to create the icon. The file is in text format using XML syntax. We have choosen this format because the XML syntax provides an excellent way to describe object-oriented data. Additionally, an XML file is a text file, so it can be created and edited with any text editor, including Windows Notepad. However, if you don't have an advanced text editor, we recommend you to use Notepad++ which is a freeware text editor supporting XML syntax highlighting.
If you want to have more information on the XML format, we recommend to visit this Wikipedia page.
Basically, XML is a tag-based text file. This means that each element (text, numerical or structured) must be enclosed between a root opening tab and a corresponding closing tag:
<NAME>This is the name</NAME>
The root element can be preceded by an optionnal XML declaration. We recommend to add the following declaration at the first line of the XML file:
<?xml version="1.0"?>
You can add comments at any location in the file by using the following syntax (one per line is recommended):
<!-- This is a comment --!>
Each element can be a simple data element (one per line is recommended):
<WIDTH>256</WIDTH>
or a structured object element. The FORMAT object below contains several data members (the indentation is not necessary but recommended for an easier reading):
<FORMAT>
<WIDTH>256</WIDTH>
<HEIGHT>256</HEIGHT>
<BPP>32</BPP>
<COMPRESSION>JPEG2000</COMPRESSION>
<X_POS>551</X_POS>
<Y_POS>90</Y_POS>
</FORMAT>
The TEMPLATE object
This is the main object of the description file. Add the opening tag of this object after the XML declaration. The closing tag of this object ends the declaration file (nothing will be read after its closing tag).
The TEMPLATE object contains the following data members:
REF (numerical)
This member specifies the number of the template. It must match the number coded in the barcode included in the associated PNG image file (see above).
NAME (text)
This member specifies the name of the template. This text will appear in the IconWorkshop menu. This will permit the user to identify the template and launch it from IconWorkshop. It must be informative but not too long to preserve the menu appearance.
TYPE (fixed data)
This member specifies the type of the template. Two types can be specified: Simple Icon Template and Icon Project Template. See above in this page the difference between the two template types.
ICON - The template is a Simple Icon Template.
PROJECT - The template is a Simple Icon Template.
TARGET_OS (fixed data)
This member specifies the format of the icon: Windows or Macintosh:
WINDOWS - This will create a Windows icon (ICO).
MACINTOSH - This will create a Macintosh icon (ICNS, BIN...)
FORMAT (list of structured objects)
You can specify a list of several formats to be created. Add one FORMAT structured object per icon format you wish to create. The FORMAT object has 2 versions depending on the template type (simple icon or icon project). See later in this page for the descriptions of the FORMAT object.
See below an example of a TEMPLATE object:
<TEMPLATE>
<REF>006</REF>
<NAME>Macintosh OSX Leopard Icon (512x512,...)</NAME>
<TYPE>ICON</TYPE>
<TARGET_OS>MACINTOSH</TARGET_OS>
<FORMAT>
...
</FORMAT>
<FORMAT>
...
</FORMAT>
...
...
</TEMPLATE>
The FORMAT object
This object is intended to be used as a member of the TEMPLATE object. A list of several FORMAT objects can be added in the TEMPLATE object. The data members present in the FORMAT object change depending on template type. Some members are used only in Simple Icon templates, others are used only in Icon Project templates.
The FORMAT object contains the following data members:
WIDTH (numerical)
This member specifies the width in pixels of the icon format to create.
HEIGHT (numerical)
This member specifies the height in pixels of the icon format to create.
BPP (numerical)
This member specifies the bits per pixels of the icon format to create.
32 - The image is RGB/A (with alpha channel).
24 - The image is RGB (obsolete format, RGB/A is recommended).
8 - The image is 256 colors.
4 - The image is 16 colors.
1 - The image is monochrome.
COMPRESSION (fixed data)
This member specifies the type of the image compression. If you don't want to compress the image, don't add this member or specify NONE. This member is to be used with 256x256 or more format sizes.
NONE - No compression (or just don't specify the COMPRESSION member).
PNG - The compression is PNG. Used in Windows Vista icons only.
JPEG2000 - The compression is Jpeg 2000. Used in Macintosh Tiger or more icons only.
X_POS (Simple Icon Templates only - numerical)
This member specifies the X position in pixels of the upper-left corner of the drawing zone associated with this format in the template image. This permits to locate the first pixel in the upper-left corner inside the drawing area (not the border).
Y_POS (Simple Icon Templates only - numerical)
This member specifies the Y position in pixels of the upper-left corner of the drawing zone associated with this format in the template image. This permits to locate the first pixel in the upper-left corner inside the drawing area (not the border).
SRC_X (Icon Project Templates only - numerical)
This member specifies the X position in pixels of the upper-left corner of the drawing zone associated with this format in the template image. This permits to locate the first pixel in the upper-left corner inside the drawing area (not the border).
SRC_Y (Icon Project Templates only - numerical)
This member specifies the Y position in pixels of the upper-left corner of the drawing zone associated with this format in the template image. This permits to locate the first pixel in the upper-left corner inside the drawing area (not the border).
SRC_WIDTH (Icon Project Templates only - numerical)
This member specifies the width in pixels of the drawing zone associated with this format in the template image.
SRC_HEIGHT (Icon Project Templates only - numerical)
This member specifies the height in pixels of the drawing zone associated with this format in the template image.
See below an example of a FORMAT object in a Simple Icon Template:
<FORMAT>
<WIDTH>512</WIDTH>
<HEIGHT>512</HEIGHT>
<BPP>32</BPP>
<COMPRESSION>JPEG2000</COMPRESSION>
<X_POS>25</X_POS>
<Y_POS>90</Y_POS>
</FORMAT>
See below an example of a FORMAT object in an Icon Project Template:
<FORMAT>
<WIDTH>256</WIDTH>
<HEIGHT>256</HEIGHT>
<BPP>32</BPP>
<COMPRESSION>PNG</COMPRESSION>
<SRC_X>25</SRC_X>
<SRC_Y>90</SRC_Y>
<SRC_WIDTH>256</SRC_WIDTH>
<SRC_HEIGHT>256</SRC_HEIGHT>
</FORMAT>
When the XML description file is done, save it as a XML text file. Use a filename as specified above. For example, if the template is number 21, save it as "IW-Template-021.xml" in IconWorkshop template folder.
Once you have created the PNG and the XML files in the template folder, restart IconWorkshop and check the menu File/New/IconProject from Photoshop Template. Your template should be visible in the list (sorted by template numbers).