Use IconWorshop with Adobe Photoshop
In relation to Axialis IconWorkshop, this article offers information on the following topics:
- Transferring an Image from Photoshop to Create an Icon
- Transferring an Icon Image from IconWorkshop to Photoshop
- Install the Photoshop transfer plug-in
- Transferring an Image from Photoshop using the plug-in
If you use Adobe Photoshop to create or retouching your images, here is how to work efficiently with Axialis IconWorkshop to create icons.
Transferring an Image from Photoshop to Create an Icon
1. Axialis IconWorkshop supports the native Photoshop PSD image format with Layers. In Photoshop save your image to a PSD file.
2. In IconWorkshop, choose "File/Open", browse your folders and select your file (Windows standard dialog box).
or
Choose "File/New/File Explorer" or press Ctrl+E. A built-in Axialis file explorer window opens. Browse your disks, see the thumbnail preview and double-click the image file you wish to open.
or
In the Recently Used zone (in the main toolbar), type the full pathname of the image file you wish to open then hit Enter.
3. The image file opens in a document window. If the image contains layers, you see them on the left side of the document window. You can select one layer by clicking on it. Its contents appears automatically in the main area. Now you can create an icon from this image (see Step 2 of topic Create an Icon from an Image File).


Transferring an Icon Image from IconWorkshop to Photoshop
1. Open an icon in IconWorkshop. Select the desired image format by clicking on it. It appears in the editor window.
2. Choose Draw/Save Image as Bitmap. A dialog box opens. Choose to Preserve Transparency Information (this will permit you to keep transparent areas in your PSD image file). When done, click OK.
3. A standard Save Image As dialog box opens. In the Save as Type list, select "Adobe Photoshop (PSD)". Choose a destination folder and type a new filename. When done, click OK. The file has been created.
4. In Photoshop, open the newly created file. It opens, containing one layer with transparency. Now you can retouch it or use it as necessary.
Install the Photoshop transfer plug-in
Before using the plug-in as detailed in next topic, you need to install it on your computer. The plug-in can be easily installed from within IconWorkshop in one fast and simple operation.
1. Before installing the plug-in we recommend you to close the Photoshop application (if it is actually opened in background). Choose File/Install Photoshop Plug-in...
2. The dialog box Install the Photoshop to IconWorkshop Transfer Plug-in opens (see below). In the Location edit zone 1, specify the Photoshop plug-in folder. If you don't know the exact folder path, click the browse button 2 to choose the folder in a list.
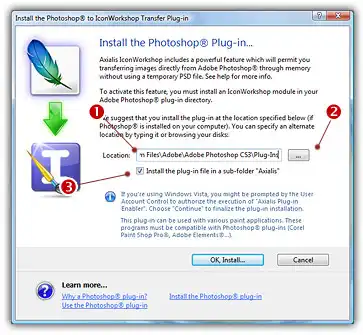
3. If you want to create a subfolder "Axialis" to install the plug-in module (recommended to organize your folder properly), activate the option "Install in a subfolder Axialis" 3. Note that creating a subfolder may fail with some compatible applications.
4. Click OK. When done, a message informs you that the plug-in has been installed.
5. Now you can start your Photoshop application. The plug-in is visible in Filter/Axialis/Transfer To IconWorkshop menu. Read this for more info on how to use the plug-in filter.
Transferring an Image from Photoshop to IconWorkshop using the plug-in
1. First of all, launch Photoshop and open or create an image file. You don't need to launch IconWorkshop before using the plug-in. It will be automatically launched by the plug-in if necessary.
2. Select the layer and the portion of the image you want to transfer to IconWorkshop 1. If you don't create a selection area, the whole layer image will be transferred. Only rectangular selections are supported for transfer.

Important
Only the active layer is transferred by the plug-in. If you want to transfer an image composed of several layers you need to merge then before proceeding (undo the merge operation after the transfer).
3. Choose the Filter/Axialis/Transfer to Axialis IconWorkshop... command in the menu.
4. Axialis IconWorkshop is automatically launched (or activated if running in background) and the dialog box Install the Photoshop to IconWorkshop Transfer Plug-in opens (see below).
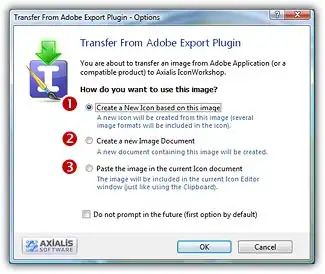
3. The image is about to be transferred in IconWorkshop. You can choose one of the following operations:
Create a New Icon using this Image 1:
You create a new icon with several formats based on the image (see step 4);
Create a New Image Document 2:
IconWorkshop opens a new document containing the image. You'll be able to perform various operations on the image (resize, crop, save...) and even create a new icon from a portion of it;
Paste the Image in the Current Icon Document 3:
This option is enabled only if an icon document is already opened in IconWorkshop. It pastes the image in the current editor area (just like the Clipboard paste operation).
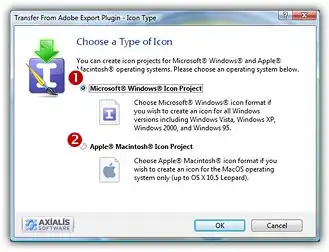
4. If you choose the first option (Create a New Icon using this Image), the following dialog box opens (see below). As IconWorkshop support creation of both Windows and Macintosh icons, you're prompted to choose the format. Select option 1 for Windows or option 2 for Macintosh.
5. By choosing Windows, the following dialog box opens (a similar dialog opens if you choose Macintosh)
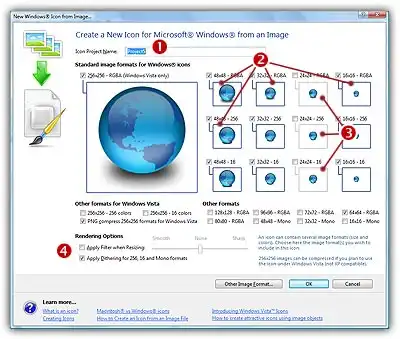
6. In the Name group 1, enter the icon project name. Do not specify any extension.
7. In the Image Formats group, select the image formats you whish to add in the icon 2 and unselect the unwanted images 3. Just click on the image preview to select/unselect. To know more about the desired Windows standard image format, see What is an Icon topic.
8. You can also apply or not the dithering option to the 256/16 color images as well as add a filter effect to smooth/sharpen the resulting images in RGB/A mode (try 4 and see the results in the preview images).
9. If you wish to start creating your icon with an unlisted format, click the Other Image Format button.
10. When done, click OK. The icon is automatically created with the various image formats you've selected.