Create a Transparent Image with Alpha Channel
All Axialis Software products support images with Alpha Channel transparency. PNG, BMP and PSD file format actually support alpha channel. If you want to create a nice icon (using Axialis IconWorkshop) or a screensaver with smooth sprites (using Axialis Professional Screen Saver Producer) we recommend you to use images with Alpha channel.
Alpha channels are masks through which you can display images. The alpha channel is an 8-bit channel, which means it has 256 levels of gray from 0 (black) to 255 (white). White acts as the visible area; black acts as the transparent area (you see the background behind the image when displayed). The level of gray in between determines the level of visibility. For example, 50 percent gray allows for 50 percent visibility. Alpha channels are usually used with 16.8M color RGB images. The resulting image is called RGBA (RGB+A, A means alpha channel).
In the illustration below you see how the alpha channel is applied to the original image to remove (visually) the orange gradient background. The result produces a 32 BPP (Bit Per Pixel) transparent image. The grey checkboard-like pattern shows the transparency of the image.

We'll learn how to create a transparent image with Alpha Channel from a standard image. Paint Shop Pro contains powerful Alpha Channel manipulation features. We'll see here one of the simplest way to proceed: Extrude a part of the image and remove the existing background. Advanced techniques also exist to work with alpha channel. See Paint Shop Pro help to read more.


Create a Transparent Image using Jasc Paint Shop Pro
1. Open your image in Paint Shop Pro (we use version 7.0 in this tutorial). Select File/Open... Choose your file and click Open. The file open in a separate document window. You can download the original image we use in this tutorial here: logo.bmp (right-click and choose Save Target As).
2. If the file is not in RGB format (16.8 M colors), convert it: Choose Colors/Increase Color Depth/16 Million Colors (24 bits).
3. Now select the background area of the image (the area you wish to remove). If the image background has a solid color (white in our example), select the Magic Wand tool by clicking ![]() in the toolbox. Be sure to specify Tolerance=15 and Feather=1 in the Magic Wand options (floating dialog box). You may need to adjust the tolerance value (it depends on your image). When done, click in the background area of the image 1:
in the toolbox. Be sure to specify Tolerance=15 and Feather=1 in the Magic Wand options (floating dialog box). You may need to adjust the tolerance value (it depends on your image). When done, click in the background area of the image 1:

4. A selection dashed-line appears around the logo and around the square border of the image. It means that the background is selected (not the logo). If the background is not made of a solid color, you can select it by using the Freehand tool (a Lasso just above the Magic Want tool). It's a bit more difficult but that's the only way to proceed.
5. Now, we'll select the logo only. To do so, choose Selections/Invert (Shft+Ctrl+I). It's almost unchanged but the dashed-line around the square border of the image has disappeared. Adjust the selection by choosing Selections/Modify/Contract. Specify "1" in number of pixels.
6. Choose Edit/Copy (Ctrl+C), then Edit/Paste (Ctrl+V) to create a new image with the "extruded" logo in it.
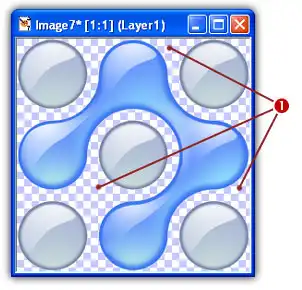
5. The new image document now looks like shown below. The background area (which was white) has disappeared. Now you see a blue-checkboard-like texture around the logo 1 indicating that this area is in fact transparent.
6. We recommend to save the image to another file to keep the original one intact. Select "File/Save As...". In Save As Type box, select "PNG" (our favorite format). Click Save.
7. You're done, the transparent version of your image is created. You can download the image we've created in this tutorial here: logo-psp.png (right-click and choose Save Target As).