Export formats and options
IconGenerator can export vector icons, bitmap images, platform icon containers (ICO/ICNS), image strips, and icon fonts.
This page explains the available formats and the most important options in the export dialog. For step-by-step generation workflows, see Generating icons and Workflow.
Where export options are configured
IconGenerator provides two main export commands:
Export from the current icon/overlay selection (Generated Icons):
F3
Export from an icon collection (
.AXICP):F4
Both commands open an export dialog where you choose:
Destination folder
Formats
Bitmap sizes
Variants and additional options
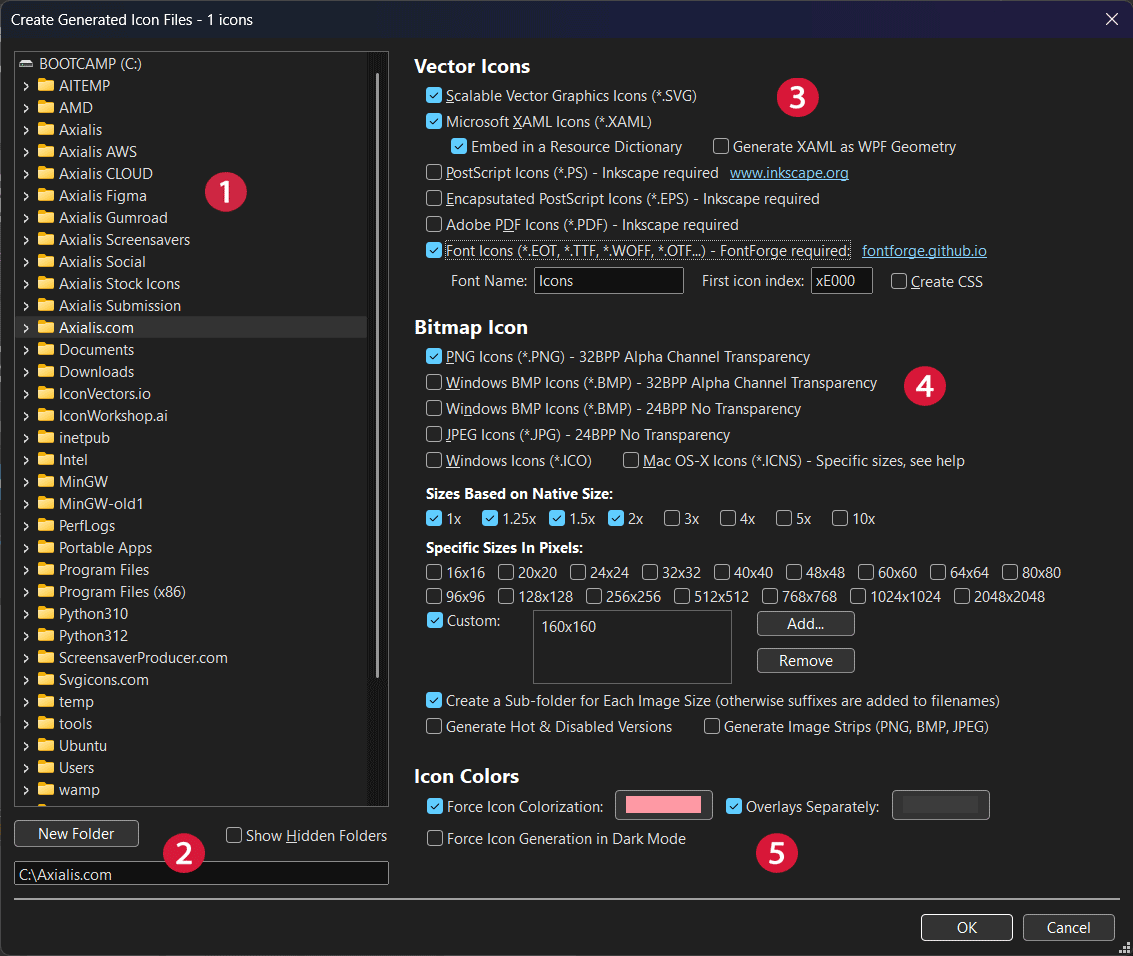
Export dialog used to generate icon files (formats, sizes and options).
Destination folder and output structure
Choose the output directory in the left folder tree. IconGenerator writes all generated files inside this folder.
If the selected destination folder does not exist, IconGenerator can create it.
Use New Folder to create a dedicated output directory.
Enable Show Hidden Folders if you need to export to a hidden path.
One folder per format
When multiple formats are selected, IconGenerator creates a dedicated folder for each format (for example SVG, PNG, ICO, etc.). This keeps the output directory readable and prevents mixing different file types.
Bitmap size organization and filename suffixes
When you generate bitmap formats (PNG, BMP, JPEG), you typically export multiple sizes. IconGenerator provides two ways to organize the generated bitmaps:
Create a sub-folder for each image size
When Create a Sub-folder for Each Image Size is enabled, each bitmap size is written to its own subfolder.
This is recommended if you export many sizes and want clean, predictable folders.
Add size suffix to filenames
When Create a Sub-folder for Each Image Size is disabled, all sizes are written into the same folder and IconGenerator appends the size to each filename.
The separator character used in the filename suffix is configured in Preferences
(see Icon format separator character). Example with the default @ separator:
filename@32x32px.png
Vector formats
Vector outputs are resolution-independent and recommended whenever your UI stack supports them (web, WPF/XAML, scalable UI frameworks, print/design workflows).
SVG
Scalable Vector Graphics (*.SVG)
Use SVG when:
You design web UIs (HTML/CSS)
You need scalable assets for multiple resolutions
You want to open icons in most vector tools
SVG is generated by IconGenerator directly (no external dependency).
XAML
Microsoft XAML (*.XAML)
Use XAML when:
You build WPF / XAML-based applications
You want vector icons that integrate with Windows UI frameworks
Two XAML-specific options can be available in the export dialog:
Embed in a Resource Dictionary Generates XAML content intended to be included in a WPF ResourceDictionary.
Generate XAML as WPF Geometry Exports the icon using WPF geometry primitives (useful when you want to style and recolor shapes in XAML).
PDF / EPS / PS
Adobe PDF (*.PDF), Encapsulated PostScript (*.EPS), PostScript (*.PS)
Use these formats when:
You deliver icons to print/design pipelines
You need compatibility with DTP and illustration workflows
These formats require Inkscape to be installed (the export dialog indicates the requirement).
Tip
If PDF/EPS/PS options are disabled or do not produce output, install Inkscape and restart IconGenerator.
Bitmap formats
Bitmap outputs are pixel-based images. They are recommended when:
Your UI stack requires bitmaps (or you target a legacy UI toolkit)
You need perfect raster control at specific sizes
You generate assets for mobile apps, toolbars, or image lists
PNG
PNG (*.PNG) – 32-bit with alpha transparency
PNG is the recommended bitmap format for modern UI:
Supports transparency
Lossless compression
Suitable for most UI frameworks
BMP
Windows BMP (*.BMP)
Two variants can be available:
32-bit BMP with alpha transparency
24-bit BMP (no transparency)
BMP can be useful for legacy environments or when a specific tool requires it.
JPEG
JPEG (*.JPG) – 24-bit, no transparency
JPEG is rarely used for UI icons because it does not support transparency and introduces compression artifacts. It is mainly useful for documentation images or specific legacy workflows.
Platform icon container formats
ICO (Windows)
Windows Icon (*.ICO)
ICO files are containers that typically bundle multiple bitmap sizes into a single file. This allows Windows to select the best available size depending on the UI context and scaling.
Recommendations:
Select a range of common sizes (for example 16×16, 24×24, 32×32, 48×48, 256×256).
Include 256×256 when you want crisp icons at large sizes (Windows can store a PNG-compressed image in ICO).
ICNS (macOS)
Mac OS X Icon (*.ICNS)
ICNS files are macOS icon containers, also bundling multiple sizes. In the export dialog, ICNS creation is tied to specific sizes (macOS expects a defined set of sizes).
Recommendations:
Export the standard macOS sizes your target requires.
When in doubt, include sizes up to 1024×1024 for Retina / large previews.
Selecting bitmap sizes
When at least one bitmap format is selected (PNG/BMP/JPEG/ICO/ICNS), you can select output sizes using:
Sizes based on native size
Use scale factors (for example 1×, 2×, 3×). The resulting pixel dimensions depend on the icon set’s native size.
Example:
If an icon set has a native size of 24×24:
1× → 24×24
2× → 48×48
3× → 72×72
This approach is recommended when you want pixel-perfect scaling relative to the original set design.
Specific sizes in pixels
Choose common fixed sizes (16×16, 24×24, 32×32, 48×48, 256×256, …).
This approach is recommended when you must match strict platform guidelines (for example Windows UI sizes).
Custom sizes
Enable Custom and use Add… / Remove to maintain your own list of sizes. Use this when you have non-standard constraints (for example 18×18, 36×36, 160×160, etc.).
Variants and additional options
Hot and disabled versions
When Generate Hot & Disabled Versions is enabled, IconGenerator creates additional variants intended for UI states:
Hot (hover/active)
Disabled (greyed)
This is useful for toolbars and classic desktop UI frameworks where state images are separate files.
Image strips
When Generate Image Strips (PNG, BMP, JPEG) is enabled, IconGenerator generates one or more strips: a single image containing all generated icons arranged in a row.
Use image strips when:
You build toolbars or image lists that expect a single bitmap resource
You need sprite-like assets for a specific toolkit
Note
Image strips apply to PNG, BMP, and JPEG outputs (not ICO/ICNS).
Icon colors and dark mode
The Icon Colors section in the export dialog controls colorization and dark mode generation:
Force Icon Colorization Generates icons using a fixed color (pick the color using the color swatch).
Overlays Separately Allows the overlay to be generated with a different color than the base icon.
Force Icon Generation in Dark Mode Generates dark-mode versions when the selected icon set supports dark mode rendering.
Icon fonts
IconGenerator can generate icon fonts for web or applications.
Typical font outputs include:
OTF, EOT, WOFF, WOFF2 (and related font formats)
An optional CSS helper file for web projects
Font generation requires FontForge (the export dialog indicates the requirement).
Font options
When Font Icons export is enabled, additional options are available:
Font Name Sets the name of the generated font.
First icon index Defines the first Unicode code point used for icon glyphs. A common practice is to start in the Unicode Private Use Area (for example
0xE000) to avoid collisions.Create CSS Generates a CSS mapping file to reference each glyph in a web project (class names, codes, etc.).
Practical examples
Export PNG at 1× / 2× / 3× for UI
Select PNG in the bitmap formats.
In Sizes based on native size, enable 1×, 2×, and 3×.
Enable Create a Sub-folder for Each Image Size for a clean structure.
Click OK to generate the assets.
Result: you get consistent PNG files at multiple scales, suitable for standard and high-DPI displays.
Create image strips for a toolbar
Select PNG (or BMP/JPEG) as output.
Choose one or more sizes (for example 24×24 and 32×32).
Enable Generate Image Strips (PNG, BMP, JPEG).
Click OK.
Result: IconGenerator creates one or more strip images you can load as a single resource in toolbars/image lists.
Generate a web icon font
Enable Font Icons in vector formats.
Set a Font Name.
Keep the default First icon index (commonly
0xE000) unless you already use a reserved range.Enable Create CSS for easy web integration.
Click OK.
Result: you get font files (WOFF/WOFF2/OTF/EOT) and optional helper files for integration.